11/12/2020 Pet supplies Share
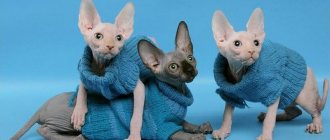
In order to keep your pet warm in the cold, you need to knit clothes for him. This is especially true for Sphynx cats, which have delicate skin. For them, clothes made by your hands will be very useful. In this article you will find a description of a knitted sweater with a pattern and detailed description. If the cat is not protected from hypothermia, then it will develop respiratory diseases. At the same time, diseases in sphinxes are very difficult to treat.
As you know, a cat is one of the domestic animals that has the most pronounced character, and each individual has its own, but what they have in common is willfulness, capriciousness and stubbornness. In sphinxes, these qualities are generally manifested much more clearly. Therefore, it is necessary to accustom the cat to clothes carefully, and in no case against the will of the cat.
The first and most important circumstance: clothing should not be too tight, and at the same time, should not drag on the floor, interfering with the movement of the animal. It is optimal to have fasteners that allow you not to squeeze the animal into a piece of clothing, but to envelop it with it.
Clothing should be made of natural, non-electrifying materials.
When trying on, try to keep the animal busy with games or treats. It's good if you have one or a couple of assistants. If there is an urgent need (for example, you have to move for a long time with the animal in the cold season), it is not a sin to use a trick and lure the animal with the help of a special spray purchased at a pet store with the aroma of catnip.
Knitted vest for the sphinx
You will need:
- 70 g turquoise wool yarn
- hook number 4
- tape measure
- sequins
- decorative feathers
- needle with a thick eye
- thin thread
- Take measurements from your animal: measure the length of the back, the circumference of the chest, as well as the length from the base of the neck to the middle of the abdomen and the distance between the front legs.
- Make a chain of air. loops corresponding in length to half the chest circumference. Knit in straight and reverse rows. b/n until the length of the canvas reaches half the length from the base of the neck to the middle of the abdomen. Start decreasing stitches evenly to knit the armholes. Reduce stitches until the width of the fabric is equal to the distance between the front legs. Continue knitting, gradually adding loops and knitting the neckline.
- Move on to knitting the back. Cast on the same number of loops and knit the same number of rows without increases or decreases as were knitted for the front part. Start gradually decreasing the stitches along the edges of the knitting for the armholes, knit the neckline.
- Sew the back and front pieces together. Embroider a pattern on the back with sequins and decorate it with decorative feathers.
How to make a pattern
Based on the measurements taken, a pattern is made. You can do it easier and use a regular sock. Here you need to put the sock and mark the holes for the paws with chalk. Afterwards they are carefully cut out. The result is a ready-to-wear product.
There is also a more complex scheme. In this case, using the measurements taken, a trapezoid is drawn with holes for the front legs. Here you need to correctly determine the location for the fasteners. This is how vests, sweaters and jackets are made. The latter products require sleeves.
The overalls are made using a more complex pattern. It consists of two parts (bottom and top) that need to be sewn together. Such products are complemented by zippers, pockets, and sleeves. The main parameter here will be the length of the back. The resulting value is divided by 8. The result will be the sides of the grid square where the pattern will be built. All dimensions must be carefully and accurately transferred to this grid.
Using these patterns you can easily make any type of clothing for your cat.
Knitting a short sweater for a cat
You will need:
- 100 g green wool yarn
- circular needles No. 3
- hook number 3
- tape measure
- needle with a thick eye
- Measure the circumference of the neck at the base and the length from the base of the neck to the middle of the abdomen.
- On circular knitting needles, cast on a number of stitches corresponding to half the neck circumference plus 2 cm. Round the number of stitches to a multiple of 12 plus edge stitches.
- Work in 1 x 1 rib stitch, adding 1 stitch at the end of each row for 7 rows.
- Knit in straight and reverse rows without increasing or decreasing to the middle of the breast with the main pattern: 1st row - * k4, p5, k1, p1, k1. *, repeat from * to *, finish with 1 person. 2nd and all even rows - according to the drawing. 3rd row - * k5, p3, k3, p1. *, repeat from * to *, finish 1 p. 5th row - * P1, k5. *, repeat from * to *, finish 1 p. Row 7 - * P2, K3, P1, K5, P1. *, repeat from * to *, finish 1 p. Row 9 - * P3, K1, P1, K5, P2. *, repeat from * to *, finish 1 p. Row 11 - * P4, K5, P3. *, repeat from * to *, finish 1 p.
- Repeat rows 1-11 as many times as necessary.
- Then begin adding stitches evenly through each row. Knit this way to the bottom of the breast. Next, continue knitting without increasing or decreasing until the desired length is reached.
- Knit the back piece in the same way as the front piece, starting adding loops after 1 row a few rows earlier. Work the same number of rows in the main pattern as for the front piece. Sew the parts together, tie the armholes of the sleeves in a circle with a st. s/n. Tie the bottom, sleeves and neck in a crawfish step.
Yarn and hook
For cats, you need to choose only natural yarn. It should not be electrified. Silk and wool fit this description. From plant origin, you can also pay attention to cotton. Only it is not so warm that you can knit sweaters for pets only from it. Unless there are some demi-season options.
As for color, you can choose a variety of combinations, but experienced pet owners strongly advise against bright shades. This can noticeably distract the cat from its typical routine. And the first fitting can simply scare your pet and instill fear in clothes. To prevent all this from happening, it is better to pay attention to calmer tones.
Bright elements can be left for the back of the product. The hook is selected in this case only depending on the thickness of the thread. The product should be strong, durable and tight.
If some crochet patterns somehow allow larger hooks for looseness, then it would simply be inappropriate here. The cat should not be disturbed by excess fibers and threads.
For beginners, how to cast on the first loops on a hook:
Set of first loops
Set of 1st and 2nd loops on hook
Crochet 1st chain
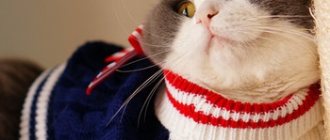
Classic cat vest
You will need:
- 50 g raspberry wool yarn
- 40 g white yarn
- hook number 5
- 20 cm satin ribbon
- tape measure
- needle with a thick eye
- 5 small buttons
- Measure the circumference of the chest and the circumference of the neck at the base, as well as the distance between your cat's front legs.
- Start knitting with white yarn. Make a chain of air. loops, the length corresponding to half the neck circumference plus 2 cm. Tie 4 rows of st. b/n.
- Next, add 6–8 loops on one side with raspberry yarn and knit 1 row of st. b/n. At the end of the row, add the same number of loops and continue knitting in straight and reverse rows until the middle of the chest. Knit the middle loops with white yarn, the side loops with raspberry yarn.
- Start adding stitches evenly along the edges of the product in order to knit the armholes. Continue knitting the middle stitches with white yarn and the rest with purple yarn. When the piece reaches the bottom of the breast, begin to reduce the number of stitches knitted with white yarn, knitting them with crimson yarn. The result should be a rounded white “front” on a red background. Continue knitting until the piece reaches the length of the mid-belly.
- To make the back, cast on the same number of stitches with white yarn as for the front piece. Work 4 rows of st. b/n, add 6–8 loops with black yarn and knit 1 row of st. b/n. Cast on the same number of loops at the end of the row and knit further in straight and reverse rows without using white thread. Decrease under the armholes of the sleeves and knit the fabric to the end. The number of rows for the back and front pieces should be the same.
- Sew the back and front. Tie the bottom and armholes of the sleeves with several rows of stitches. s/n white yarn. Sew 5 buttons to the shirtfront at equal distances from each other. Make a bow tie from a satin ribbon and sew it under the collar.
Emergency heating
It happens that you need clothes for a cat urgently. There is not enough time to create a pattern and sew it. This happens when a frozen kitten is nailed to the house in winter. To quickly warm him up, you can make a simple outfit out of a regular sock.
What you will need:
- an old warm sock without a pair;
- scissors;
- chalk.
Sock cat vest
To make a simple vest from scrap materials, you don't need sewing skills. Even a child can cope with this task, since it includes several simple steps:
- The sock is applied to the pet and the length of the future product is measured with a small margin (1 cm). Mark the cutting line with chalk;
- the sock is folded and ironed, then the excess is cut off;
- After this, the position of the holes for the paws is noted. It is important to draw them symmetrically. To ensure that the vest has a wide collar, holes are drawn in the middle of the sock;
- longitudinal holes are cut with scissors. If desired, they can be overcast with a hand seam or use an overlocker;
- try the products on the cat. You should check whether she is tight in such an outfit. To do this, place your palm under the sock. If the hand fits in freely, the outfit is sewn to size. The neck area is also checked.
An outfit made from a sock cannot claim to be a fashion item in a cat's wardrobe. However, in difficult situations, such a suit can warm a small pet and give him a sense of security.
Video - How to make clothes for a cat with your own hands
Knitted cape for a cat
You will need:
- 100 g blue mercerized cotton
- 25 g fancy yarn "grass" with lurex
- circular needles No. 3
- stocking needles No. 3
- tape measure
- needle with a thick eye
- Measure the circumference of the neck at the base, the circumference of the chest, and the distance between the front legs of your animal.
- Cast on the stocking needles with fancy yarn for a number of stitches equal to the circumference of the neck plus 3 cm. Knit 3 rows with a 1 x 1 elastic band, switch to knitting with cotton thread, knit another 5 rows.
- Divide the knitting into two parts to knit the back and front pieces in straight and reverse rows. Transfer the stitches to circular needles.
- The number of stitches for the front should correspond to the distance between the front legs plus 1.5 cm, cast off 4 loops on both sides of the front piece, and continue knitting the back piece on the remaining stitches.
- Knit the back in straight and reverse rows to the bottom of the shoulder blades, knit the breast in two pieces, evenly decreasing stitches on both sides for 5 rows, then knit without increasing or decreasing to the bottom of the breast.
- Knit the loops of one breast part, cast on 5 loops, knit the back loops, cast on 5 loops and knit the loops of the second breast part.
- Continue knitting in straight and reverse rows until the fabric reaches halfway across the back. Then start decreasing stitches every 3 rows, and when the back length reaches 2/3, start decreasing stitches along the edges of each row. Close the loops.
- Pick up stitches at the armholes of the sleeves and distribute them evenly across 4 needles. Knit in the round to the required length, increasing from the armhole between the last and penultimate stitches on each needle.
- Knit the last 3 rows of sleeves with fancy yarn. Cast on stitches along the bottom edge and also knit 3 rows with fancy yarn.
Knitting a bright jumpsuit for the sphinx
You will need:
- 100–150 g section-dyed wool yarn
- circular needles No. 4
- double needles No. 4
- tape measure
- sew on buttons
- needle
- threads to match the yarn
- Measure your animal's chest, waist and neck.
- On circular knitting needles, cast on a number of stitches equal to 1/4 of the waist circumference and knit in stockinette stitch, adding stitches at the beginning of each row until the fabric reaches half the waist circumference. Continue knitting without increasing or decreasing until the length of the fabric is equal to 1/3 of the length of the back.
- Add such a number of loops to the knitting needles on both sides of the fabric so that the total width of the fabric becomes equal to the waist circumference. Knit in straight and reverse rows until the length of the fabric reaches 2/3 of the back length. Cast off the side stitches and leave on the knitting needles the number of stitches corresponding to half the chest circumference. Knit in straight and reverse rows, decreasing stitches after each row until the fabric reaches a width equal to half the circumference of the neck.
- Add so many loops on both sides of the fabric so that their total number corresponds to the girth of the animal’s neck, and continue knitting in straight and reverse rows without decreasing for another 5-10 rows with a 2 x 2 elastic band, close the loops.
- On both sides of the fabric, above and below the waistband, cast on the stocking needles with the number of stitches required for knitting the legs and sleeves.
- Knit the legs and sleeves in the round, finishing each sleeve with 4 rows of 1 x 1 rib.
- Sew the required number of buttons to the belt and collar parts.