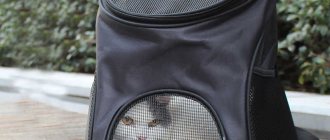
Cats sleep most of their lives, 2/3 of them in fact. That is why a loving owner must provide a comfortable place for his pet to sleep. Moreover, it is very simple to make a homemade lounger, even from scrap materials.
You can make a comfortable bed out of old things without spending more than an hour, and most importantly, saving money, because we all know how expensive accessories for pets are in stores.
Purpose
A separate sleeping structure for pets is a protective space where they will sleep peacefully and no one will disturb them. Organizing it for your pet will reduce the amount of hair on the furniture. There will be less hair on the owners’ clothes, and the apartment will be easier to clean. A cat bed solves many household problems.
In its cozy place, the pet will play and sharpen its claws, which will save the wallpaper and furniture upholstery that they so love to spoil. If the bed has sides, then the mother cat has the opportunity to rest there with her kittens.
Soft sofa with sides
To make a resting place for your pet, you should choose dense material for the seat covers and backrests, durable fabric for the bottom, light filling, threads and needles. When cutting out the bottom, you should proceed from the size of the cat; the remaining parts (2 side and one back walls) must have the appropriate parameters. The front panel consists of two symmetrical fragments and has a central opening for entry.
At the first stage, you need to sew all the elements of the sides along the edges, providing holes so that you can later turn the workpiece inside out and lay the filler. After stuffing the parts, the edges are sealed with hidden seams, then the side walls are attached to the bottom. An additional pillow is placed inside the sofa.
Types of beds
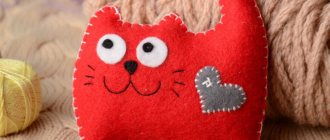
To decide how to make a cat bed with your own hands, you need to understand what types there are. A place that resembles a heart shape, an oval, a circle, a rectangle - this is a small list of designs for this.
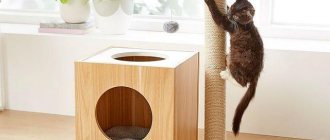
A small soft chair for relaxation with a height of more than 20 cm - called ottomans, which have a higher density. Animals really like poufs and they love to sleep on them.
A cat bed can resemble a bed with backs. It is possible to come up with various interesting configurations for it - a book, a huge shoe, etc. Hiding in secluded places during play is a favorite pastime for the cat breed.
You can make beds for cats with your own hands, reminiscent of a semi-house, where a small roof covers a comfortable soft bed. This place resembles a hole where the pet can hide from the owner's eyes.
In hammock beds with a large view, animals watch their household with interest.
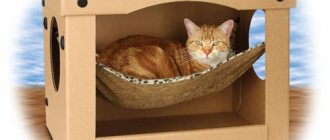
From cardboard
The simplest house option that comes to mind for absolutely all owners of these animals is a cardboard cat house. If you have a cat, then you know how much they love all kinds of bags, bags and boxes. Any packaging material is their favorite toy, which is the reason why many people make a cardboard cat house.
See how to assemble such a house in just half an hour.
Pros:
- easy and quick to do;
- low costs;
- even a child can handle it;
- animals like it.
Minuses:
- quickly becomes unusable;
- doesn't look very presentable.
In what cases can these disadvantages be neglected? Yes, the house wears out pretty quickly, but at the same time it costs practically nothing - it can be rebuilt at any time.
An unpresentable appearance can be a problem for a person who is too particular about his home. For example, my mother chooses textiles only by taking pieces of furniture upholstery from home - so that the colors are in harmony, otherwise the tablecloths and napkins will look tacky. Naturally, she wouldn’t like a cardboard house, but I was interested in making it, and it fit perfectly into my close friend’s creative workshop.
Available materials
When you want to please your pet, but sleeping places are expensive in the retail chain, it is advisable to sew a cat bed with your own hands from old clothes and fabrics available at home, according to the size of the animal, with a functional and roomy design.
The product must:
- do not be torn by the claws;
- stretch well;
- do not inject drugs;
- do not become electrified;
- do not attract dust.
The dimensions of the bed must be suitable for the size of the pet; the hardness of the pillow may vary. It is desirable that the product is in harmony with the overall interior of the living space.
The design requires a strong attachment so that it does not move when the pet first jumps. A depression inside is created if you do not completely fill the pillow with its contents.
Mattress for a cat
For the simplest mattress you will need two pieces of fabric and filling (sintepon). Such a lounger will protect armchairs and sofas from the need to constantly clean them of wool.
Cut out two identical pieces of fabric and place them right sides together. Sew on three sides and turn inside out.
Cut out the insulation from padding polyester, sized so that it fits tightly into the resulting “bag”.
Carefully fold the unsewn edges inward and stitch the last side of the bed. To prevent the filling from bunching up when washing, you can stitch the mattress several times along the front side.
Comfortable sofa for your pet
How to sew a cat bed with your own hands in the form of a spacious sofa? Take for sewing:
- wear-resistant fabric;
- thick rag bedding for the bottom;
- filler;
- sewing supplies.
Next, we make a pattern for a cat bed in the shape of two rectangles according to the required dimensions for the upper and lower parts. We cut out the sides in a rectangular shape of the required height: one for the length of the wall and 2 for the size of the sides. The front part is cut out in the form of two rectangles, only with a cutout for the entrance.
Next, we sew the sidewall on the back side, leaving an opening on one edge for laying holofiber. After filling the sides, they are stitched in a secret way.
We connect the bottom fabric and the bedding with a seam from the inside out, turn it inside out through one of the remaining slots and put the filling inside. We sew the cut manually. We place the bed-cushion in the prepared sofa from the sides.
Note!
DIY satin ribbon bows: photos of original design ideas, step-by-step DIY master class- DIY hair bands - ideas for decorating homemade rubber bands + step-by-step instructions for making them yourself
- DIY shadow theater: step by step how to do it at home! 175 real photos
Various production options
As practice shows, sewing a bed for a cat is not so difficult. To do this, you need to take a piece of soft material, cut out the desired shape, stuff the product with filler, and then trim the edges. For these purposes, you can also use some of the owner’s old clothes. A smell that is familiar to your pet will certainly be perceived positively. An animal can take a long time to get used to a store-bought bed or ignore it altogether. For production you will need:
- newspaper or piece of cardboard for making a pattern;
- reinforced thread to match the fabric;
- needle;
- ruler;
- dense soft material;
- felt-tip pen;
- scissors;
- needle threader;
- pins for fixing parts;
- filler for stuffing (at the owner’s request, this can be padding polyester or holofiber).
You need to take into account some of your pet's habits. For example, if the cat likes to sleep on the owner's bed, it is better to use fabric for sewing bed linen. It is quite simple to sew such a bed, but if the material is made of cotton or silk, the design will not last long.
For the manufacture of products, it is recommended to use mixed materials containing equal amounts of cotton, as well as viscose or polyester. Such fabrics are more durable and can withstand many washing cycles without any difficulties. Jeans are difficult to process, but it is quite easy to remove the wool from it, so care procedures will not take much time. Linen fabric wrinkles a lot; it is best to use it to make a cover for a removable mattress for a sun lounger.
To secure a part of the product manually, it is recommended to lay a blind seam. It is performed as follows: first, the needle is injected from the wrong side to the face and back, then the thread is secured with a knot. Next, both folded edges are connected, a stitch is made from the wrong side, and the thread is brought to the face. The folds are reconnected by tensioning the thread. To fill the lounger, you can use worn sweaters, scraps of other materials, if the existing filler suddenly is not enough.
Sun lounger with high sides
To fill the sides, you need to use foam rubber or fix the top edge on a cord, which needs to be tied in a knot. Another possible method is to quilt the stuffed border with a parallel stitch or use bartacks at a distance of 3-5 cm from each other. This is necessary due to the fact that after stuffing, the size of the sides is significantly reduced. The step-by-step process of sewing and creating a pattern for a cat bed with your own hands looks like this:
- The first step is to draw a circle on a newspaper or a piece of fabric folded in two layers. Then from the center you should set aside 20 cm on all sides (this is necessary in order to get a bottom with a diameter of 40 cm). The sides are made 20 cm high, 3 cm is added for the top seam (a ribbon or braid will be threaded into it). The total diameter will be 86 cm.
- To improve the strength of the product, the resulting circle is divided into 12 equal parts. This can be done in several ways: in the first it is assumed that the diameter of the bottom is not divided; in the second option, each part corresponds to the diameter of the circle, but the center of the structure is not outlined by 10 cm (otherwise it will not be possible to lay the filler, because it will be very narrow). The lines are secured with pins, then stitched by hand or using a sewing machine. The stitching must be done on the right side of the material.
- Then each segment needs to be filled with filler. The sides are sewn at the top by laying two lines, between which the tape will then be threaded. The edges of the material should be carefully folded inward and sewn with small stitches, leaving 2 holes for the braid. The latter needs to be threaded through the top edge and the ends tied together.
- If desired, you can decorate the sides of the bed with lace or frills. The edges of the frill need to be hidden under the trim. Separately, you can make bows or butterflies from a material that matches the color scheme. The simplest way to decorate is to tie a thread around the top of the sides so that protruding balls are made from the main material.
Cat pillow product
A pillow-shaped bed is more suitable for an adult pet, not a kitten. This is explained by the fact that babies do not like open space. The inside of the product must be tightly stuffed with holofiber, padding polyester or synthetic padding. The design can be of any shape:
- square;
- rectangle;
- heart;
- circle;
- The bed can also be made in the style of a dog or cat's face.
The cut of such a lounger is quite simple, because the upper and lower parts are the same in shape. The size of the structure is calculated taking into account the length of the animal. If your pet likes to sleep in an extended position, you need to consider its length with four outstretched legs. On average, these figures range from 90 to 120 cm (it all depends on the breed and age of the cat). To cut all the parts, a piece of material must be cut into two equal parts. Step-by-step manipulations:
- To cut a heart-shaped bed, you need to fold half of the prepared material in half with the right side inward. To prevent the fabric from moving, the edges must be secured with pins. Then along the fold you should measure a distance of 38 cm from bottom to top. This will be the main point of the entire pattern. From there, using soap, you need to draw the left-side half of the heart (the left half because the fold of the material is on the right). The width of the half is 30 cm from the center, the total height is 53 cm + 2 cm for allowance.
- The resulting half of the heart must be cut out and then placed on the second part of the material, folded in half. Then trace and cut out the part.
- Fold the bottom and top of the product facing inward, pin and stitch, leaving 15-20 cm for stuffing.
- Turn the structure inside out and insert the filler. Fold the edges and sew with a hidden seam. Make through fastenings across the entire area of the lounger at a distance of 15-20 cm.
- To decorate the side seam, fringe or lace is sewn on. The work can be considered completed.
Bed sofa
At various exhibitions, owners show off their cats lying on small copies of various designer furniture. Basically, expensive material with bright colors, patterns and a velvet surface is used to make such sun loungers.
The frame is formed from layers of foam rubber, to which glued cardboard parts are added. Sofa decor is often done along all visible seams. For these purposes, cords with golden threads, tassels, and bright fringe are used. The fasteners are decorated with sparkles that imitate various precious fabrics. A similar design on store shelves will be quite expensive.
The two-cat sofa lounger consists of separate parts: one or more armrests, a seat, a backrest. Each piece of furniture, as well as its cover, is made according to different patterns and then joined together.
To make a rectangular structure with a round back, you will need cardboard and foam rubber that will hold the three-dimensional shape of the elements. The upper part of the product is often sheathed with furniture material (usually tapestry or chenille measuring 60 by 150 cm is used). The work is carried out in the following sequence:
- First you need to create patterns for all four structural elements. The first part is the bottom, 6 cm thick; the dimensions of the rectangle of material should be 62 by 72 cm (taking into account allowances). The next detail is the back of the structure. The drawing is applied to paper or directly to the material, folded in half with the front side inward. The width of the top of the back is 62 cm. Then up on both sides you should put 6 cm and draw a line that will be parallel to the bottom. Set aside 19 cm from the center and mark it. From the latter, two arcs should be drawn down on both sides. The height of the backrest should be 25 cm.
- Next, the back is cut with an allowance. After this, covers are made for the armrests, the size of which is 40 by 26 cm. After applying the markings, all structural elements are cut out.
- The parts need to be pinned together, swept away, and then put the cover on the bottom, leaving an open side that will be fixed on the back. Then all the details need to be turned onto the face.
- Fill the covers with filler until it stops or insert pre-cut foam rubber. Connect the parts into a single structure.
Bed made from worn jeans
A cat bed with a pattern of scraps from old jeans in two colors is made like this:
We are preparing additional materials: filling for the bottom and sides, an old terry towel for the bottom, or fleece fabric, sewing supplies.
We sew a side from 12 flaps of different colors of jeans 25x160 cm. To do this, we sew the strips on the wrong side, smooth them with an iron and sew a zigzag stitch on the outside to strengthen the seams.
Note!
- DIY bracelets | Selection of the best models and master class on making beautiful bracelets
DIY bird feeder - interesting ideas on how to make it quickly and easily from scrap materials
- Do-it-yourself cold porcelain: the best options for porcelain products, step-by-step instructions and recipes for making it yourself (photo + video)
We cut out a circle from sewn large pieces of denim trousers, a circle of 48-50 cm, sew an applique into the center, which we turn off with a zigzag stitch on a sewing machine for strength.
We fold it in layers: an outer cover, a padding polyester on it, a layer of soft fabric, an outer upper cover and stitch it in a circle, as well as several times diagonally so that the padding polyester does not move.
We sew the edges of the side, leaving a hole for the padding polyester, and sew it with a machine to the assembled circle. Fill the side with padding polyester and sew up the hole.
Sewing a bed with sides
To make such a product, you will need a piece of foam rubber or padding polyester, suitable fabric, thick cardboard, scissors, a needle, thread, a ruler and a pen. You can use an old unnecessary pillow as a base. It is necessary to cut three parts: two narrow rectangles for the sides and one large one for the base (bottom). They take the part that will be the bottom, round its edges, ultimately forming an elongated oval.
For reliability, you can sheathe the edges of all three blanks to prevent the padding polyester from falling out and sliding. The sides are connected to each other. After this, they take the fabric, lay it out on a flat surface and cut it out according to the size of the padding polyester blanks (cut old pillow). Having cut out a rectangle of sufficient length, grind it down in the middle and put the sides on the part.
Next, the side is connected into a ring, the allowance is packed inside, making a secret stitch. After this, the sides are sewn to the base. This can be done with a machine stitch, pinning the board to the base with the edge matching.
An original lounger can be a model in the form of a sofa. To complete this you will need polystyrene foam, ten-centimeter thick foam rubber, as well as textiles. In addition, you will have to use glue in the work. Four parts are cut out of foam plastic: the base, the back and two sides. In this case, you should get two large rectangular blanks and two small ones.
The back (large part) is glued to the seat, and the sides are glued to the sides. It turns out a kind of frame, similar to a sofa. To refine the structure, it is thickened with foam rubber, cut to the same dimensions as the first four parts. If you want to make the sidewalls soft on three sides, take measurements and cut out elements of greater width.
After the foam rubber is glued, you can begin making the upholstery. To prevent the product from making an unpleasant squeak in places where there is no foam rubber, the cover can be sewn from dense fabric. For example, fleece or textiles with large pile, which are used in the manufacture of blankets, are well suited for this. If you have an old blanket at home, that will do too.
Having taken measurements of the sofa, they make a pattern for the cover, then lay it out on the fabric, cut out and assemble the upholstery on a sewing machine. In this case, you can also use elastic textiles: they can stretch and therefore fit better than regular fabric with plain weave threads. This material is called bielastic; it stretches both lengthwise and crosswise. Having sewn the cover, it is put on the prepared base.
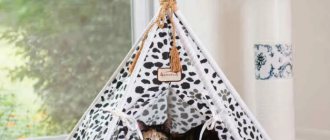
Lounger in the form of a house
It’s not difficult to make a cat bed with your own hands that resembles a small house. You will need: fleece fabric 1.5x1.5 m, synthetic padding 1.5x1.5 m, flexible powerful cord for the roof, sewing accessories.
Fold the fleece in half to a width of 0.3 m and cut off a length of 1 m - this will be the part for the roof. From padding polyester to insulate the top, we cut out a piece slightly smaller in size than the previous one for insulation.
We sew up the edges of the roof, except for one on the side, insert padding polyester there, distribute it evenly inside and sew it up with hidden seams. We quilt the roof lengthwise and crosswise to strengthen the structure.
To cut out the back part of the roof, bend it to the desired size and apply it to a piece of fabric, draw out a shape with chalk, cut out 2 parts, stitch them, connecting them along the circumference, turn the part inside out.
In the remaining cut we place a padding polyester, which is also cut according to the same pattern, only in a smaller size, then we sew up the cut with a hidden seam.
We cut out the bottom from fleece, or from artificial leather, line it with synthetic padding, cut the pillow on top to the shape and quilt the bottom.
Then we begin assembling the structure. First we sew the side to the roof, then we attach the bottom. We attach a cord along the edge of the roof from the inside to support the structure.
Instructions for making a house for two cats
The family has two cats. The older cat is the aggressor and the younger one is more active. Therefore, the design was designed so that the youngest could hide on the highest platform, but the elder, due to his weight, could not get there. They decided to place the house high, since both cats prefer heights. They made it larger in size so that both individuals could be there at the same time.
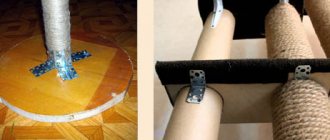
Source material and results of labor
For this design, thick furniture plywood (12 mm) measuring 75*50 cm, timber posts 50*70 (4.2 m), jute-based carpet - 1*2.5 meters, 20 meters of rope were purchased. Fasteners - corners. For the house - 15 * 20 mm, for attaching platforms - 40 * 45 mm, 55 * 20 and 35 * 40 - for insurance, and a couple of large ones - for attaching to the wall.
We prepare the platforms and attach them to the poles
There are three pillars in the chosen design: one is 220 cm, the second is 120 cm and the third is 80 cm. They will be attached to a base made of plywood sheet. The pillars should be placed on the base so that the longest one is closest to the wall. To avoid confusion, when marking on a sheet of paper, using a ruler and pencil, we first drew a stencil on paper, on which the location of the pillars relative to each other was marked. The markings for installing the pillars were transferred from the finished layout. They were fastened with long nails through the base (4 pieces each), drilling holes of slightly smaller diameter in the plywood. Then they were secured on the outside with corners 55*20 for the large post and 35*40 for the smaller ones.
Markup is the most important thing
Using the same template, the location of the pillars was marked on the platforms, then holes were cut out for them according to the markings. To do this, we took a 12 mm feather drill and drilled holes in the corners marked for installing squares into which the jigsaw blade fits perfectly. From experience: it is better to make the slots for the posts a millimeter or two larger. The platforms are still held in place by the corners, and if the slot is made too small, it will take a long time to refine it with a file or sandpaper.
We fasten the prepared platforms
Before installing the platform, we “try it on”, adjusting the slots if necessary. Having placed the platform horizontally (using a building level) at the required level, mark with a pencil where the platform stands. Using this marking, we then install the corners, so that we make clear marks on all four sides. When all the platforms are installed normally, we cover them with carpet.
Assembling the house body
Two pieces of plywood 75*50 cm were cut into 4 rectangles. They made the roof, floor and two side walls. When making one of the shelves, there was a piece of plywood left with a semicircular hole in the side. It was decided to make it an “entrance”, and the back wall was cut out from one of the pieces. All that remains is to assemble the house, which is not difficult at all. Small metal corners were used, which were fastened with short self-tapping screws.
Preparing a “nest” for a cat
Before covering the house with a roof, it was upholstered from the inside, thus covering the fasteners and increasing comfort. Working inside the case is not so convenient, but you can manage. The roof was covered on both sides, after which it was secured using the same corners, but placed on the outside. Not very pretty, but not deadly. The finished house was secured in its designated place. The corners came to the rescue again, but larger ones - 35*40 mm.
We wrap the pillars
The last stage is to wrap the poles, making a scratching post. The easiest way to secure a rope to a pole is with staples. A few staples and you're done. Next, tightly pressing one turn to the other, we wrap the pillars in a spiral. We reach the obstacle, secure the rope with brackets again and continue on the next section.
As it turns out, the rope needs to be hammered...
From experience, I must say that no matter how hard we tried, the turns of the rope did not fit one to the other very tightly; over time, they “got soft” and began to “move” up/down a little. After working through the mistakes, we found a way: after laying several turns, we knock them out with a hammer. Everything is simple, but if I had known in advance... That's all, we made a house for the cat with our own hands. It took about 6 hours.
A similar design is discussed in the video below.
Products made from paper tubes
How to make a bed for a cat if she really loves baskets. Weave it from waste paper and read newspapers, from which the tubes are rolled. A snowflake frame is assembled on a dense cardboard bottom. Next, it is braided around the perimeter with newspaper tubes to the desired height.
During the weaving process, the desired shape of the basket is selected. The ends of the newspaper tubes are inserted into each other to strengthen their connection. The edges of the structure are fixed with PVA glue.
The cat's house is decorated with various ribbons and fabrics, and toys. You can color it with animal-friendly food dyes.
Sofa with bows
To sew an elegant sofa for dogs and kittens with your own hands, you will need:
- two types of fabric (you can use plain or printed);
- ribbons;
- filler.
Use two layers of fabric to make the seat and back of the sofa in accordance with the dimensions of the pet. Leave cavities for laying insulation, provide places for attaching ribbons. When stitching the product around the perimeter, leave free holes. Turn the workpiece right side out, fill it with padding polyester, thread the fastening tapes, then sew up the open areas. Tie ribbons to secure the connection and give the sofa the correct shape.
Suspended structure
A DIY hanging bed for a cat will also please him. It is hung with a hook from vertical objects, as well as from the ceiling, and gives the interior of the room a special flavor.
First of all, you need to determine how many tiers are needed for this design. Based on this, you need to sew several small mattresses of the same or different sizes. The pads are connected using wide strips of fabric tied at the top for hanging.
The main reasons why you should install a cat bed
Animal education experts recommend that every owner provide a sleeping area for their cat. The animal will know a space in which it can sleep or rest peacefully, from where no one will kick it out, push it or simply disturb it.
It is important for a cat to sleep in the most comfortable conditions for her.
Helpful information! During sleep, an animal of any breed loses a large amount of hair. Cat litter will help prevent hair from accumulating in unnecessary places.
If the animal gets used to resting only in its bed, the process of cleaning the entire house will be simplified, because it will not have to waste time cleaning other furniture. In addition, clothes that have a lot of hair clinging to them will become less dirty, especially if you sit where your pet recently slept.
If the owner has not taken care to acquire a bed, then the pet will be forced to nap wherever he can.
It is not difficult to arrange a place for a cat yourself. Some make a little more effort and create entire play complexes, equipped not only with a place to sleep, but also with a variety of climbing frames and scratching posts. Having such personal space, your pet will be able to sharpen its claws, play with a soft toy suspended on a rope, and rub its bedding with its hind legs.
Before making a cat bed with a play complex with your own hands, it is recommended to study photos illustrating various product options. Such a bed will help preserve the integrity of the upholstery of the furniture placed in the apartment. In addition, an installed scratching post will help protect wallpaper in corners and other places where the pet sharpens its claws. Moreover, it must be taken into account that a domestic animal, unlike a street animal, does not have the opportunity to grind its claws on hard concrete or tree trunks. Cats prefer to do this in any place convenient for them. If you do not offer the animal an alternative option where it will be possible to grind off its claws, then there is no point in scolding it.
To prevent your pet from sleeping anywhere, it is better to buy a sleeping place for him, or make a lounger with your own hands
Other reasons that highlight the importance of installing a cat bed
You definitely need to sew a bed for a cat that is preparing for the birth of offspring, because otherwise the kittens will be born wherever the new mother cat decides. A comfortable place should be installed at least 2-3 weeks before the expected birth, so that the cat gets used to the place and appreciates its safety. It is important that the animal is comfortable and comfortable to be inside, so that the sides do not allow the kittens to roll out of the nest.
When creating a cat bed with your own hands, you should choose the right size. It is imperative to ensure that the animal has enough space inside not only during sleep, when it curls up, but also during “stretching”, when the cat stretches its paws. You should not make the bed too large, because animals prefer a limited space than an open one.
A cat won't sleep in a bed if it doesn't like the material or its hardness.
As for the form, there are no special restrictions. The main thing is that the pet is comfortable. In addition, it is necessary that the bed fits well into the surrounding interior. The photo of cat beds shows that, in addition to standard rectangular shapes, there are also products of unusual configurations. The most fun looking beds are those that imitate the following items:
- big boots;
- slippers;
- pumpkin;
- book;
- miniature sofa or bed;
- royal throne.
The pillow gets dirty often, so the fabric should be durable enough to wash
Beds for kittens or cats in the form of semi-houses, which have side walls and a roof, are popular among animals and their owners. This option will also appeal to your pet, because in any case, cats are originally wild animals, so hunting instincts are inherent in them by nature. In this case, the house will serve not only for sleeping, but also for organizing a secluded place for attacking the enemy. And many cats prefer to sleep in spaces that are closed on all sides, for example, in closets, bedside tables or a sofa.
You should not give up simple ideas, for example, creating a hammock for your cat with your own hands. Despite the fact that some people find the design uncomfortable, nevertheless, a pet can lie in a hammock and at the same time observe what is happening around it, especially if the product is secured somewhere high. When creating a cat place, you should also take into account some characteristics of the animal, among which it is worth noting:
Cat beds in the form of semi-houses, which have side walls and a roof, are popular.
- Character. A calm animal is unlikely to need a lot of entertainment, but a playful cat is better off hanging rustling toys on strings nearby.
- Habits. If your pet likes to constantly hunt, it is better to make him a closed shelter in which he can safely hide.
- Size and weight. If the house is fixed at a height, you need to evaluate the cat's capabilities. For example, it will be difficult for overweight pets to jump onto high-lying beds, so it is better to place them directly on the floor.
- State of health. Injured or visually impaired cats need to install the sleeping place as close to the floor as possible so that they can climb inside without unnecessary movements.
The choice of materials for the bed will depend on the preferences of the cat
Unnecessary sweater for a lounger
If your cat likes to sleep on an old sweater, then you can use it to design a sleeping place for your pet. You need to prepare: sewing supplies, scissors and stuffing. The neck of the sweater should be rolled or cut.
Next, you should make a line from one armpit to the other and sew up the cuffs to create a tube, which should be filled with filler. Then the ends of the sleeve are sewn together, the bottom of the sweater is sewn to the sides of the pipe, which is also filled with padding polyester. I made this cat bed with my own hands and it took very little time.
From rope or jute
To make a sleeping place from rope or jute, you will need a crochet hook, a jute rope with a diameter of 8 to 10 mm, three-strand jute 3 mm, scissors, a clothespin and markers. Knit an oval bottom of the required size. Knit 1-2 rows of walls, place markers for the armhole. Knit the walls, changing the knitting directions in the place of the markers. Knit the required number of rows, depending on the desired height of the bed. Knit the top row with connecting stitches until the rise. Finish the binding, cut off the thread with a margin, hide the tip of the thread on the wrong side. Steam the bed basket.
Hammocks for cat breeds
A hammock for a pet is made of fabric, which is attached at the corners to the base. The structure should not reach the floor; you can place it in your pet’s favorite place. It’s better to make it with an adjustable height and see which one is suitable for the cat.
For a hammock, you should initially choose a fabric fabric on which the cat liked to sleep. The hammock is attached to various supports, you can use an inverted stool, the pet will happily sleep on its favorite cloth.
The hammock is attached to the radiator in winter to keep your pet warm. To do this, a frame with hooks is made from strong wire, with the help of which the structure can be easily attached to the battery. The dimensions of the frame must correspond to the size of the animal.
A bed in the form of a cover with a clasp is sewn according to the size of the frame. You can also place a worn knitted half-over with folded sleeves and neckline on the wire outline.
Choosing a suitable location
Any cat tries to find a place in the house where no one will disturb him. Often there may be several such places. Animals spend most of their lives sleeping. It happens that a cat falls from the bed onto the floor. That is why every owner, when installing a structure on a windowsill, must fix it so that it does not fall. Pets will be happy to settle down on the bedding, which will have a good view of the street. In winter, it is better to place the lounger on an ottoman near the heating radiator.
Quite often, cats choose a place next to their owners, regardless of what the latter do. Every loving owner notices that the pet tries to stay somewhere nearby. You can place the animal on a soft bed on the back of the sofa or next to the bed so that the cat can watch when the owner is resting.
Many pets are comfortable being at a height, for example, on a closet with clothes. This is due to the fact that in this way they can control everything that happens around them. Often the back of a chair can become a favorite sleeping place for a cat. That is why it is important to place the bed not on the floor, but on top of some piece of furniture.
If the cat has offspring, then it is better to make a bed with high sides and install it in quiet, dark places. This is explained by the fact that a caring mother tries to hide her kittens from prying eyes. If the side of the lounger is equipped with an entrance, it is better to close it for a while so that the kids do not crawl out.
Loving owners try to equip a cozy place for their pet where he will feel comfortable and safe. Having received its own lounger as a gift, the cat will not settle down to rest on other home furniture. Making a cozy bed for your pet with your own hands will help you save a lot of money.
Slipper bed
Many of the cat breeds love to rest on their owner's slippers, so make a bed for them that resembles a slipper. To do this, you will need two pieces of thick fabric - 40x55 and 40x50 cm, filler, and sewing accessories.
We make a pattern: a large foot 55 cm long and 40 cm wide, the top of a slipper in the shape of a semicircle 40 cm high and 50 cm wide at the base. We cut out the parts in two pieces, sew them together, stuff them with filler. We sew up the seams with decorative stitching, and sew the top and bottom parts of the slipper.
Before purchasing expensive structures for resting cats and kittens in pet stores, try making them yourself. There are many unnecessary things at home that will make wonderful places for animals to rest, and then, based on their tastes and habits, you can pick up expensive equipment at the pet store so that the purchased item does not stand idle.
Making a cat bed for a radiator
Cats love to sleep on warm radiators in the cold season, despite the fact that they have an uncomfortable, hard surface. To facilitate the sweet sleep of the fluffy, we will make a “crib” using special fasteners.
Step-by-step master class for creating a lounger:
- Let's build a frame from wood. The design of the fasteners for its top depends on the design of your battery. The cat bed must be very durable so that the cat does not fall when jumping onto it from the floor. Otherwise, he will no longer approach this unsafe place;
- We will sew a bag in the shape of a rectangle from thick fabric, and cover the frame with wood;
- We insert padding polyester or foam rubber inside;
- Let's attach the sleeping place to the battery.
You cannot make a bed that is too large - it will not allow warm air to flow well into the room.
The second version of the “cat bed” on the battery:
- We buy a large diameter PVC pipe in a specialized store;
- We cut the old fur coat into two rectangles of different sizes: we place the small one inside the pipe, the large one on the outside;
- We sew two sides of the smaller rectangle and put the resulting fur pipe into a PVC pipe;
- Wrap the pipe with a large rectangle until you get a fur mink. We sew the edges of the outer and inner rectangles by hand.
In order to secure the bed very firmly to the radiator, you need to sew a reliable fastener along its edge and use it to fix the fur mink to the radiator.
Photo of a do-it-yourself cat bed
Additional ideas
The unlimited imagination of the owners allows them to arrange a place for their pet to relax using absolutely different materials. You just need to look around carefully and, at the same time, take a closer look at the animals’ favorite places to sleep.
Ideas for places where you can arrange beds for your pet:
For many animal lovers, cats are full members of the family. This means that if each member of the household has his own sleeping place, then the pet should also have a bed. We offer you several ways to make a cat sofa yourself.
A cat bed must meet several requirements at once:
1. It should be easy to wash;
2. Do not accumulate too much dust;
3. Be comfortable for the pet;
4. Be safe for the animal.
After carefully assessing all these characteristics, one detail often goes unnoticed - the cat's sleeping area should be made in a style that matches the entire interior. This is not always easy, it will require your imagination and some skills if you want to make it yourself, but the result will please both you and your pet.
The first thing that comes to mind when thinking about how to make a cat bed is creating a beautiful pillow. It seems that it is not difficult to sew such a product from a suitable fabric. Indeed, the correct selection of colors allows you to combine this accessory with any interior style. But it is worth considering that it is much more comfortable for pets to sleep on beds that have a depression in the center - a kind of cozy nest, so the pillow should not be stuffed too tightly. It is better if the sofa for the cat has soft sides, then the pet will be able to take everyone’s favorite sleeping position - curl up. Such a bed will be both comfortable and beautiful.
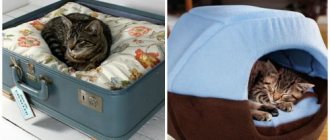
A cat sofa made from an old suitcase is perfect for a vintage style interior. Moreover, the more unusual and antique the suitcase, the more interesting the bed will look. Making a bed like this for a pet is not difficult, as can be seen from the photographs above. Legs are attached to the suitcase (although you can do without them) and a comfortable pillow is placed inside. Vintage cat bed is ready!
Does your cat like to lounge on the sofa? Provide a special place for her in it, as in the next photo. Any pet will love such a secluded corner, and the owners are nearby.
Most long-tailed pranksters love to hide under blankets and climb behind furniture. Help them feel just as comfortable in their home. This fun sandwich style cat bed is sure to become your furry pet's favorite place to relax.
Set up a house for your cat with a bed, disguised as a bedside table. You can do the same with other suitable interior items: flower pots, cabinets and armchairs.
Since a cat is a full-fledged member of the family, it needs furniture similar to human furniture. Then why not make a bed - a copy of the master's? Add a mattress, sheets and pillow and use the crib to create a unique decor for your bedroom.
A DIY cat bed with battery mount is a great idea for the cold season. Here your pet will always be warm, and cats love it (that’s why they snuggle up to the radiator in winter without any devices), and softly.
Some cats like to sleep lounging, and several portable bed options have already been invented for them. For example, a hammock, as in the next photo, of course, is not suitable for all animals, but some cats will be delighted with such a sleeping place.
Simpler hammocks made of elastic materials are suitable for owners who are thinking about how to make a cat bed quickly and without wasting time and money. You just need to stretch the fabric between the legs of the coffee table and show your pet how comfortable and cozy it can be to sit there. In the interior, such a find will look harmonious.
Since long-tailed pets love to climb mazes, you can plan to make more than one sofa for the cat, but several pieces throughout the maze from shelves on the walls or a separate massive structure. Then the cats will be able to rest, a little tired from playing.
It is good to use wicker baskets for making a cat bed. Such accessories are appropriate in country, Provence, and rustic styles.
Some cats like beds made of wood with a fairly hard surface. This bed is compatible with many modern interior styles.
A cat in tissue understands...
Pet stores today offer a good selection of cat beds. However, do all of them meet our taste and the needs of animals? In practice, it turns out that such products do not solve all problems. Firstly, they are by no means cheap, not always functional, and often do not have the proper quality. For example, one of my friends bought a bed with sides in such a store. He was attracted by the bright and rich fabric of the product. He bought a bed for his pet, who was expecting offspring.
When the kittens were born, the sides of the cat's house lost their shape and began to fall to one side, the kittens simply began to fall out while feeding and jostling each other, the mother cat was nervous, the kittens were squealing desperately, and the owner was upset. To avoid such troubles, isn’t it better to foresee such moments yourself and choose high-quality material for the bed, make a frame for the sides, think through everything in advance and get a high-quality and practical product, moreover, made with your own hands? Of course, for this you need to have at least basic sewing skills. Well, you definitely need to take into account some points:
- Materials for pets should be durable, if possible natural, able to withstand cat teeth and claws.
- In addition to being natural, the material used to make the bedding should not be prickly or electrified. In addition, it is advisable to choose a fabric that is moisture-resistant and, if possible, dust-repellent.
- The size of the bed should be quite large. Cats need comfort and space.
- When making a lounger, it is necessary to provide for its easy disassembly for cleaning and washing. We must not forget about hygiene and cleanliness.
- When designing the cat’s place of residence, do not forget about the interior of the room, everything should be harmonious, the bed should fit well into the decor and maybe even decorate it.
We must not forget about the safety of animals when you take on the construction of their home with your own hands. If you secure the beds at a height, then it should be very secure. The cat is growing, gaining weight, its jumps must be safe, light and weak structures are excluded.
What material to choose for building a bed? All owners have their own preferences and skills. Some people will prefer to work with wood and glue, then put a soft bedding or even a pillow in the house. Someone will decorate an ordinary cardboard box, covering it with fabric and adding the same soft fabric bedding inside. Someone will even put slippers where the cat will climb and hide with great pleasure.
Your old things, soft rags are well suited for decorating a cozy sleeping place for a cat: these can be already used blankets, sweaters, even jeans, jackets with padding polyester.
For lovers of frame structures, we can offer various thick boxes, old suitcases, and drawers as housing options for cats. PVC pipes can be used as a frame; they are lightweight, easy to install, and have an average cost. You can put any cover on the pipe base, which will be removable and therefore easy to clean and wash if necessary.
For covers, it is convenient to use zippers, as well as Velcro strips, which, however, are not durable due to the rapid adhesion of foreign particles to them: wool, fibers, etc.
Luxurious sofa for an important cat
How long can you occupy your cat’s favorite spot on the couch? Finally, sew him your own. And don't forget about the bows!
For work, prepare: warm fabric (in our example, corduroy), material for the bottom of the sofa, material for interior decoration, padding polyester, scissors, threads, needles and a sewing machine.
We draw the layout. Dimensions are determined by the size of the animal. The optimal width of the side panel is 20 cm.
The bottom consists of dense fabric on the bottom, padding polyester and corduroy on top.
Sew the layers together.
We cut the side. Sew along the edges, leaving one side unsewn.
We first attach the side panel to the bottom with pins.
We fill it with synthetic fluff.
Sew up the hole.
Now it’s the turn of the sofa cushions. We also fill it with synthetic fluff. If desired, add a patterned stitch along the edges.
We decorate the crib with bows or other accessories, for example, fish. We admire it!
What you need to prepare for work
Before sewing a cat bed with your own hands, you need to prepare suitable material:
- corduroy and jeans;
- cotton and calico;
- knitwear and knitted fabrics;
- plush and similar soft materials.
Any synthetic compounds can be used as padding.
It is very practical to sew a removable mattress, it can be washed more often
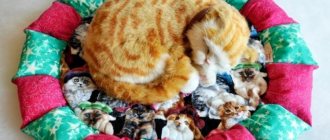
The sleeping place can be decorated with interesting decor, for example, pillows
Simple patterns for making your own cat bed
In order for the fluffy to use the sleeping place with pleasure, it must be suitable for him in size. It is best to pre-measure your pet and add 5-10 cm to the measurements. We have selected several universal cat bed patterns that are quite easy to make with your own hands.
The sides of the bed are tightened with ribbon or braid. Rectangular berth
Simple house template
How to make a cat bed with your own hands: step-by-step manufacturing instructions
A soft mattress is a universal bed that any pet is sure to love. The presence of high or low sides will create a feeling of personal space and keep the kitten warm in the cool season.
How to make an ottoman for a cat with high sides with your own hands
Even an inexperienced craftswoman can make an ottoman bed for a cat with her own hands, and our pattern and step-by-step master class will help in the work.
| Illustration | Description of action |
| Fold 2-3 layers of thick cardboard, draw two circles using a bowl and connect them into an oval. | |
| Cut out the base with a utility knife and glue the cardboard together with PVA glue. | |
| Trace the blank on a sheet of foam rubber and cut it out. | |
| Cut a side 6-8 cm high from a sheet of cardboard and glue it to the base with hot glue. It should only cover the sides and back. Additionally, it can be secured with wide tape. | |
| Cut an oval out of fabric that is slightly larger than the size of the workpiece, wrap it in foam rubber and gather it together with a thread and a needle manually. Distribute the folds around the circumference as evenly as possible. Insert a small piece of material inside and stitch it. | |
| Cut out the arbitrary shape of the back of the sofa from foam rubber, then cut out the material according to the template, glue it on both sides with hot glue and sew the edges by hand. | |
| Cut the fabric to the size of the base and glue it using PVA. | |
| On the back side of the bottom, tighten the fabric with a thread and a needle. | |
| Cut another oval-shaped piece slightly smaller than the base, apply glue and glue it to the back of the base. | |
| Glue the side panel to the base with hot glue, you can grab the edges a little with threads. | |
| Glue the legs to the base and insert the pad. |
The whole process can be seen in more detail in the video:
Watch this video on YouTube
How to sew a cat bed with low sides with your own hands
Not all pets like high sides; in this case, it is better to make a bed with low sides.
Step-by-step master class on sewing a bed with low sides with your own hands
Useful tips
To ensure that your cat can settle into its corner with maximum comfort, it is worth taking note of a few useful recommendations.
The bed needs to be made thoughtfully, make sure that the bottom does not get wet
This is especially important if your pet is still small and not litter box trained. Not every old thing is suitable for a bed and will be truly warm. Please note that with each wash, warm clothes lose their thermal properties. Cats are picky about the material of the bed
Take a closer look at what exactly your pet likes, on what surfaces he sits more often, where he sleeps, stretching and fiddling with the material with his paws. Choose just such textiles. Do not use loose fabric or bouclé fabric for making: it will not last long, such upholstery is short-lived. If possible, make the case with a zipper. If you plan to not only clean, but also wash the product as needed, try to make removable covers. You cannot wash a bed with cardboard as its base. Pay attention to the type of filler on the bed. Wool stuffing shrinks with any wash, you also need to know this, as well as the fact that the padding polyester will form lumps with each wash. Textiles for production must be durable, with a dense weave of threads. You cannot use silk or satin in your work - such a bed will quickly become overgrown with puffs. To strengthen cardboard beds, you can use old polyurethane foam from a mattress. If you have sewing skills, the bed cover can be made double. For example, you can combine fabric with padding polyester and stitch it on a machine, putting all the details together.