Cats are probably the most popular pets in all countries. In Russia alone there are about 34 million of them in apartments. These affectionate purrs not only brighten up our loneliness, but also become true friends. And, of course, a caring owner always tries to provide them with favorable living conditions. One of the main vital needs of a cat is sharpening its claws. In this way they update their claws and put special marks. Sharpening claws is instinctive: even animals that lack them continue to try to do it anyway. Naturally, our furniture, carpets and even wallpaper suffer from them. To avoid this, be sure to get a scratching post and teach your cat to use it. The stores are full of both expensive and cheap options. And in this article we will tell you how to make a scratching post for cats with your own hands.
DIY scratching post for cats
Why make a scratching post yourself?
Some readers may well ask a logical question: why make a scratching post when it’s easier to buy one? It is indeed easier to buy, but not all products are cheap and safe for animals. When making a scratching post yourself, you will use only materials that are familiar to you, build it in such a way that even during active games the cat will not drop it or get scared. And, besides, you can save a lot of money , because large and beautiful scratching posts sometimes cost a lot of money.
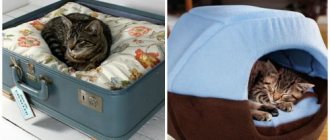
There are different scratching posts for cats
Important! Experienced cat owners recommend changing the scratching post about once a year. Over time, its surface wears out and is no longer useful for cat claws. That is why the product will require replacement. A scratching post is definitely not enough for even one cat’s entire life, what can we say if you have several of them?
The scratching post needs to be changed once a year
A store-bought scratching post may not be to your pet's liking. And, as you know, cats are animals with character , and if they refuse to use the purchased option, then you cannot do anything about it. This means that the money spent is money down the drain.
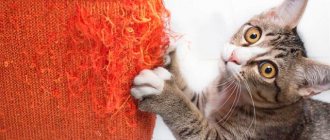
What is a scratching post for?
Without a scratching post, your furniture will suffer.
Sometimes pets refuse to use a nail sharpener just because of its smell - a factory product can smell unpleasant to animals.
Not every scratching post is suitable for your cat.
That is why we recommend observing the animal, understanding what surfaces it likes to scratch, and, based on this, try to make a scratching post yourself. This will be a good device that can even be created to match the interior of the apartment. Yes, you will spend some time making the product, but believe me, no one will make a scratching post for your cat better than you.
Try making your own scratching post
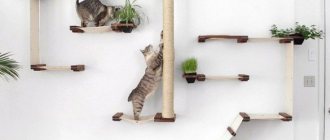
Original wall scratching posts
Health is most important
Long claws cause inconvenience when walking, and after some time the cats begin to limp. There are cases when the plate gets wrapped up and grows into the pad. This is already a serious injury that causes an inflammatory process.
During a jump, when the cat cannot land correctly due to interfering claws, a sprain or even rupture of the ligaments may occur. Don't let this happen!
Suitable materials
What can you use to make a scratching post for your pet? It is advisable to select natural materials - some synthetic ones have a certain smell that is unpleasant to animals and repels them. But if the cat is calm about such scents, then you can use synthetics.
The easiest way to make such a device is to place pieces of cardboard on a pin
Any scratching post, even the simplest one, has some kind of base. It must be strong and stable enough so that the animal is not afraid to use the product and it is convenient for him to sharpen his claws. Wood is usually used as a base (for the simplest scratching posts or more complex options) or pipes used for arranging the sewer system (for scratching posts-houses). You can also take a cardboard reel from linoleum and other similar products. They should be thick enough to make a good base for a scratching post.
DIY wooden scratching post
But the most important element of any scratching post is the part on which the cat will sharpen its claws. This should be a fairly strong, but not rough material that will help the animal effectively remove the falling parts of the claw. It is best to choose fibrous materials, but such that there is no risk of the claw getting stuck in the pile. These can be materials such as cardboard, jute cord, carpet or a piece of an old woolen carpet, sisal, ordinary wood and much more .
A simple cat scratching post made from cardboard
Everything must be safe and sound
To prevent damage to property, you need to give your fluffy a special set of tools. A DIY cat scratching post or one purchased in a store will solve the problem. Believe me, the pussy will only be grateful for such a gift.
In addition to damaged furniture and clothes, your pet may develop problems in the form of cracks and chipped claws. It's not just ugly, it's also quite painful.
Design features
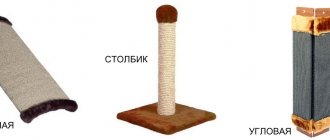
Scratching posts for cats can have different designs. You've probably seen both ordinary planks and complex multi-level houses in pet stores. But these are not all possible forms. The information below will help you understand what shape a scratching post comes in.
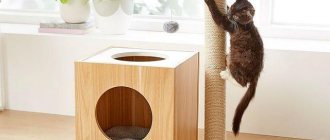
Column with platform .
This is a scratching post that has a special platform on the top, designed for the pet to rest comfortably. Usually it has a fairly stable base, a high column wrapped in a thick cord, and on top there is a platform. To sharpen the claws, a post about 70 cm high is used, and it is better to make the platform soft with a hard base. Wall variation .
The simplest version of a scratching post. It has the shape of a board wrapped with cord or trimmed with carpet. It is fixed directly on the wall, most often on the door frame at the height required for the cat. It doesn’t take up much space, it’s inexpensive, and it’s very easy to do it yourself. Suitable for pets who prefer to sharpen their claws on walls. Claw houses .
The most expensive and difficult option to make yourself. This is a large structure, especially if it is multi-tiered, and is not suitable for installation in every apartment. It is quite expensive in the store - the price of some models can be more than 10 thousand rubles. However, there is no guarantee that the cat will appreciate such costs and will use the product. Angle sharpener . This scratching post has the shape of a corner or a book, as is not difficult to understand from the name. Suitable for those whose cats tend to tear off the corners of furniture or walls. The product will definitely “lie” on the corner in the place chosen by the animal and cover the fabric or paper covering. An improved version of the usual wall-mounted scratching post.
Floor scratching post . This scratching post is simply installed on the floor; it can be a board with a wrapping/carpet or a wave-shaped product with a surface for sharpening claws. Suitable for those breeds that do not like to climb somewhere and stretch upward while sharpening their claws.
Scratching post-shelf for cats
On a note! Experienced cat owners report that it is not worth combining a scratching post with a house. Most cats will not appreciate this option, since the place where they sleep and the place where they mark their territory and sharpen their claws should be in different places. This is laid down on an instinctive level. For safety reasons, wild animals do not mark their dens.
More complex options for scratching posts
Separately, we can say about cardboard scratching posts . These are the simplest and cheapest products that are ideal for small kittens as they are soft enough for their claws. They are made from thick packaging cardboard. You can make them yourself very quickly. There are such products on sale, they are very cheap, but you can’t find them in every store.
Cardboard cat scratching post
And now we suggest you study several master classes on making different types of scratching posts. Thanks to the photo, you will be able to evaluate how difficult/easy it is to create this or that model, understand your financial and time costs, and choose the best option for yourself.
Articles on the topic
DIY dog bed
What is it for?
The fact is that animals’ claws grow, just like people’s nails, throughout their lives. Lovely ladies who take care of their nails cannot understand the procedures of pets who “file off” their claws on hard surfaces.
If you don’t have a nail polisher, use anything that will allow you to carry out a “manicure” procedure - furniture upholstery, carpets, furniture legs, children’s toys, outerwear, shoes.
Option #1. Cardboard scratching post: the simplest
Let's start with the simplest and most budget option - a cardboard sharpener. It can be done if a small kitten has just appeared in your house. Moreover, you can complete the production of the product in literally half an hour.
Step 1 . Take regular cardboard packaging boxes with wide and fairly thick corrugation (look at the end of the box wall and you will understand what we are talking about). Take them apart.
Preparing cardboard boxes
Step 2 . Using a ruler and marker, draw each box into 12 cm wide strips.
Stripes 12 cm wide are drawn
Step 3 . Using the same ruler and utility knife, cut the cardboard into strips along the previously drawn lines. Cut the cardboard on a solid base that you don't mind damaging, or use scissors.
Cardboard is cut into strips
Step 4 . Start rolling individual pieces of cardboard into a tube, making turn after turn.
The pieces are rolled into a tube
Step 5 . To prevent the cardboard from unwinding, secure the individual strips with tape or glue.
Individual lanes need to be fixed
Step 6 . When you get the “bobbin” of the desired size, you can stop winding. You will get a large cardboard scratching post that your cat will definitely appreciate.
DIY cardboard scratching post for cats
Option 3: ombre with a toy
This design has much in common with the first option. However, before you wrap the rope around the beam, it must be properly painted. To do this you need to use permanent markers. One end of the rope is soaked with a large amount of dye, after which one is suspended at full length, the dye slowly descends and an ombre is obtained.
Ordinary paint is not used, since the cord will be less elastic and durable. Alternatively, beet juice can be used. The toy is attached to a separate thread, which is wrapped with sisal on top.
Option #2. DIY carpet scratching post
In the next master class we will get acquainted with another simple variation of the scratching post. This time the author used a rug. This is a denser material than cardboard, and such a scratching post can already be made for an adult cat.
Step 1 . First of all, prepare the base. This can be a piece of board or several bars connected to each other, as in the photo. We recommend taking a solid board - it’s easier and faster.
It will take several bars
Step 2 . If you decide to use bars, then connect them together with long self-tapping screws in several places.
The bars are connected with self-tapping screws
Step 3 . After this, take thin foam rubber, attach a piece of wood to it and measure out a piece of foam rubber the same width as the future scratching post. Cut it off.
You need to measure a piece of foam rubber
Cutting foam
Step 4 . Next, take a small rug or a piece of old carpet, the remnants of carpet after repair.
Next we take the carpet
Step 5 . Place a piece of wood on the underside of the rug first, then a piece of foam rubber.
Foam rubber is laid on top of the wooden blank
Step 6 . Simply wrap the board with foam rubber into the mat, trying to wrap it very tightly.
A board with foam rubber is wrapped in a mat
Step 7 . Secure the mat with self-tapping screws in several places so that it does not unfold. It is important to take short self-tapping screws so that their ends do not come out through the wood.
The mat is fixed with self-tapping screws
The scratching post is created and ready to be fixed on the wall. Additionally, you can add several laces to its upper part, which will attract the cat's attention.
A wall-mounted scratching post can be made not only from carpet, but also from rope. We offer an example of such a product in the video below.
Video - A simple wall-mounted scratching post made of cord on a wooden base
Photo of a scratching post for a cat
How to train a kitten to use a litter box - correctly, quickly and easily train a cat to use a litter box (125 photos)- How to raise a kitten - tips and recommendations on how to properly raise an affectionate and tame kitten (135 photos)
- How to get rid of the smell of cat urine - 125 photos of ways to remove the unpleasant smell of a cat
Read here Harness for cats: tips on how to buy and properly dress a cat. Beautiful collars and features of training a cat to use a collar (105 photos)
Help the site, share with friends 
2
Option #3. Scratching post made from plumbing pipe and rope
In this master class you will see how quickly and easily you can make a scratching post using a regular sewer pipe and rope. It seems like a lot of work, but in reality creating such a nail sharpener will take little time.
Step 1 . Take a plastic pipe, which is used for sewerage, with a diameter of 7 cm and saw off the socket from it using a regular hacksaw.
The socket is cut from the pipe
Step 2 . The length of the pipe blank should be 70 cm. If the pipe is too long, cut off the excess.
The pipe must be 70 cm long
Step 3 . Take 4 ordinary furniture corners. and, attaching them to the pipe, make marks on it in accordance with the fastening holes on the corners. Drill holes with a suitable drill bit.
Holes are drilled in the pipe
Step 4 . Attach the furniture corners to the pipe using bolts and nuts. Be sure to tighten them well to keep the connections strong.
Furniture corners attached
Step 5 . Take a sheet of plywood or chipboard and cut a piece of it measuring 50x55 cm.
Cut chipboard sheet
Step 6 . Turn the piece of plywood over and mark the middle.
The center of the workpiece is marked
Step 7 . Place the pipe so that the center of its hole and the center of the plywood sheet coincide. Mark the places that coincide with the holes in the furniture corners.
Marking holes in furniture corners
Step 8 . Drill holes in the plywood using a drill and then screw the base to the pipe. The pipe will be held in a vertical position thanks to the corners that securely hold it.
The pipe is screwed to the base
Step 9 . Now take a piece of carpet and mark the middle. The piece should be approximately 60x65 cm in size.
The middle of a piece of carpet is marked
Step 10 . Next, cut a round hole in the middle area with the same diameter as the pipe. It is most convenient to cut with a stationery knife.
The hole is cut with a stationery knife
Step 11 . Insert the pipe into the hole in the carpet so that the pile of the carpet faces up.
The pipe is threaded into the hole
Step 12 . Glue the carpet to the wooden base.
The carpet is glued to the base
Step 13 . Treat the lower and upper parts of the pipe with sandpaper and degreaser approximately 10-15 cm up and down.
Sanding the pipe
Step 14 . Prepare two pieces of carpet about 10-15 cm high and a length equal to the circumference of the pipe. Wrap them around the pipe at the top and bottom, and glue them in place using a glue gun.
A piece of carpet is glued
Step 15 . Cut a circle from the carpet with a diameter equal to the diameter of the pipe.
A circle is cut out of the carpet
Step 16 . Glue the carpet circle as a plug onto the top of the pipe. You can glue with a glue gun.
The circle is glued as a plug
Step 17 . Let's go back to the base. In the area of the corners, so that the carpet bends well, cut off the excess, as shown in the figure.
Excess carpet is cut off
Step 18 . Fold the edges of the carpet and secure them with a stapler.
Curved edges are fixed with a stapler
Step 19 . The base is completely ready. Now take a jute rope with a diameter of 12 mm. Such a scratching post will require about 18 m. Next, using a glue gun to fix the rope at the very beginning, wrap it around the pipe, starting from the bottom border of the carpet.
Jute wrapped around a pipe
Step 20 . Wrap the pipe completely with rope. At the top, secure the edge of the rope with a glue gun. To be sure, you can glue a few turns in the middle.
Several turns can be glued
Step 21 . The scratching post is ready. Using the same principle, you can make a claw sharpener not from a pipe, but from a thick block. An example can be seen in the video below.
Do-it-yourself finished scratching post from a pipe
Articles on the topic
DIY dog bed
Video - Scratching post made from pipe and rope
Video - Rope and wood scratching post
How long will a scratching post last?
Any, even the most expensive branded scratching post, wears out over time and loses its original appearance. The frequency of replacement of the scratching post depends primarily on:
- Product quality.
- Conditions of its operation.
- Caring for her.
So which one should you choose? Advice from cat owners will come to the rescue. The rating is based on customer reviews:
- Sisal scratching post. Can last up to 3 years. This is a conditional figure. The thicker the sisal rope, the longer it will last.
- Jute model – up to 2 years. Also depends on the thickness of the rope.
- Carpet - about 1.5 years.
- Faux fur, which can often be found in cat complexes - up to a year. And this is subject to regular cleaning.
- There are two types of cardboard. Cellulose, of higher quality, lasts up to six months, and double-sided cellulose lasts up to 12 months. Waste cardboard, the cheapest, is thrown away 2 months after purchase.
The sisal scratching post lasts the longest!
Option number 4. How to make a scratching post house
And we left the hardest part for last. Here is a master class on how to create a scratching post-house. Whether or not the cat will use it is unknown. But you will spend much less money on creating such a house than buying a ready-made one in a store. However, be prepared to set aside a few hours of your free time. The speed of manufacturing such a product directly depends on whether you have the appropriate skills.
Step 1 . First of all, let's deal with the base. Plywood or chipboard is suitable for it. Using a jigsaw, cut out a fairly large rectangle with rounded edges.
The corners of the workpiece need to be rounded
Step 2 . Next, cut out a partial circle from the same material using a jigsaw. You will need 2 pieces of such parts.
An incomplete circle is cut out
Incomplete circle is ready
Step 3 . Now you will need a sheet of fiberboard. Attach your partial circle to it, circle it and cut out the resulting part. You need 2 of these parts.
There is an incomplete circle circled on the fiberboard
Step 4 . Next, attach one fiberboard semicircle to the plywood semicircle.
Fiberboard blank glued to plywood
Step 5 . In the second semicircle, cut a hole the same shape as the semicircle.
A hole is cut in the second incomplete circle
Step 6 . Take a rectangular base, install and fix both semicircles on one side, as shown in the figure (do not screw it in with self-tapping screws yet). Between them, make a jumper from a block.
A timber lintel is installed
Step 7 . Next, take the resulting structure and cover it with padding polyester, and then with finishing fabric. It is convenient to fix the material with a stapler.
The structure is covered with padding polyester
Fixing the finishing fabric
Step 8 . Take a piece of trim fabric and place it right side down on the round piece. Next, secure the material with a stapler. Place padding polyester on top of it.
The fabric is fixed with a stapler
Step 9 . After this, cover the house with plywood, fixing the material well on the semicircular bases.
The house is covered with plywood
Step 10 . Straighten the padding polyester and finishing fabric, stretching them over the “roof” of the house. Fix it on the back side of the house on a wooden base. Make sure that the materials are well stretched.
Materials must be well tensioned
How to fix materials
Step 11 . Using a glue gun, glue the materials along the lower edges of the sides of the house.
Glue gun used
Step 12 . Take the second semicircle made of fiberboard and cover it with finishing material.
The second semicircle is tightened
Step 13 . Using a glue gun, glue this semicircle of fiberboard to the back wall of the house.
The semicircle is glued to the back wall
Step 14 . Using the same principle - using a stapler and a glue gun - cover the bottom of the structure and attach it to the house itself. He's ready.
The bottom of the house is attached
Step 15 . Now get to the scratching post. Use a plumbing pipe or linoleum reel as a base. Place it on a piece of wood (chipboard, plywood) and draw two circles.
A circle is drawn
Step 16 . Using a jigsaw, cut out two wooden circles. Grind down the edges to make them smooth.
A round workpiece is turned
Step 17 . Use the resulting circles as plugs for the pipe. Insert them inside the pipe and secure with self-tapping screws.
The plugs are fixed with self-tapping screws
Step 18 . Start wrapping the rope around the pipe, securing its end at the bottom with a glue gun.
The pipe is wrapped with rope
Step 19 . As you move up, periodically glue some turns of the rope with a glue gun to ensure reliability. Remember to secure the top end of the rope once you have wrapped the entire pipe.
Upper end of the rope
Step 20 . Screw the finished claw sharpener to the fabric-covered base using long self-tapping screws.
Long screws required
Step 21 . Cut a circle out of chipboard or plywood and mark the places where the circle will be fixed to the top of the pipe. This will be the top resting area for the cat.
This will be the top platform
Step 22 . Screw the circle to the pipe. But first place a circle of finishing fabric on the pipe, face down. The diameter of a circle made of fabric is equal to the diameter of a circle made of wood.
The circle is screwed to the pipe
Step 23 . Cover the top of the circle with fabric and padding polyester using a glue gun or stapler.
Covering the upper platform
Step 24 . Use a stapler to secure the previously placed circle of fabric hanging on the pipe on the underside of the round area, tucking the edges slightly.
Upper play area
DIY scratching post house
The scratching post is ready. If desired, the upper platform can be supplemented with a side, and a toy on a rope can also be attached to it.
scratching house
The claw house is a complex of claw posts and surfaces for sharpening claws.
- All of them are located in such a way that the pet can move around the house without obstacles.
- Houses can be designed in various variations, but most often they consist of several floors and tiers, and post scratching posts support them.
- In addition to places for grinding claws, the house also has a cozy shelter.
Some cats like to rest away from public view, so a small hiding place is the best place for your pet.
Yami-Yami scratching post - the best scratching post for cats
The classic model is a compact flat board that can be placed on the floor or attached to the wall. It takes up minimal space in the apartment and is convenient to take with you on trips. The board is upholstered in durable natural jute. Jute is a coarse rope made from plant fibers.
The material is absolutely safe for animals and is highly wear-resistant. A simple, cheap and effective solution for grinding down cat claws. Don't look at how much the scratching post costs, it will last a long time. Product dimensions: 43×9.2 cm.
- Plus: low cost.
- Cons: narrow.
Price: 369 rub. Buy