A scratching post is one of the mandatory attributes of any home where a cat lives. In most cases, we do not take its choice too seriously, as a result of which the pet simply ignores the purchase and uses upholstered furniture to sharpen its claws. Any veterinarian will tell you that this approach is fundamentally wrong and certain rules must be followed, especially when it comes to the Maine Coon.
Selecting size and shape
Regarding the size of the scratching post, there are certain standards in this regard: the larger the pet, the larger the scraper should be. The parameters of the product directly depend on the size of the cat. This is especially important for wall models, so that the cat does not scratch the wallpaper while sharpening its claws.
The width of the claw blade in this case should be equal to the width of the animal’s outstretched paws. You can calculate the length of the scratching post by adding 5-10 cm to the length of the cat itself (excluding the tail).
For Maine Coons, the height of the vertical nail bed should not exceed 100 cm, especially if there is a bed on top. This is necessary in order to remove excess load from the front paws when jumping. For a kitten, make a scratching post “for growth”, focusing on its approximate future size as an adult.
If the living space allows, then it is better to supplement the nail sharpener with a bed and a house, one or more.
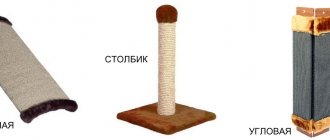
The variety of scratching post models is simply amazing. There are 2 main types of scratchers: floor and wall (or hanging). There are many variations within each type. Thus, floor scratching posts can be flat (located horizontally or at an angle), in the shape of a column, equipped with additional beds, stairs, bridges and houses.
The more cats there are in the house, the more elements the scratcher should consist of.
And almost all designs can be made with your own hands from available materials. The main thing is your desire and willingness to spend a certain amount of time on your pet.
Why do you need a house and a scratching post for a Maine Coon cat?
The first months of a small Maine Coon’s life are the most important period for the physical development and formation of the pet’s character. It is now that such qualities as ingenuity and dexterity, the ability to move quickly are formed, muscles and ligaments are strengthened.
In any case, the cat will begin to look for an opportunity to throw out irrepressible energy. And if the owner does not prepare a play area, the animal will jump on the curtains or from dresser to closet, and sharpen its claws on the furniture.
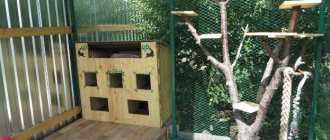
The only way out of this situation is to prepare a special house with a scratching post for the Maine Coon, where the cat can fully express its natural habits.
Required materials and tools
A cat's sense of smell is much more subtle and sensitive than a human's. Therefore, when making such an important and necessary attribute of a cat’s life as a scratching post, you need to use only natural materials that do not have a pronounced odor. Yes, this would be perfect:
- tree;
- jute, linen or sisal ropes;
- leg-split;
- sackcloth;
- hemp;
- pressed or corrugated cardboard;
- carpet
But artificial materials can cause allergies and cause serious harm to the cat’s health. For example, you should not make a scratching post from a plastic pipe - plastic has an unpleasant odor and is allergenic.
Another important advantage of products made from natural fibers is that they remove static electricity well.
The surface of the scratching post should be made rough and durable, but not too hard. The process of scratching should give the cat pleasure and relax it, and not bring unpleasant, and even more so, painful sensations to the animal, and cause broken claws.
The cat's claws should penetrate several millimeters deep into the fabric, tearing the fibers of which it is composed, but without clinging to them. From this point of view, the best solution is sisal rope.
- Try not to use nails and metal staples to connect the parts of the nail clipper, or fix them tightly and thoroughly so that your pet does not get hurt when cleaning its claws. It is advisable to place the fastening parts on the reverse side of the product.
- The material for the scratching post also depends on the size of the animal. If the cat is small, then it is better to give preference to models made of cardboard or corrugated cardboard - if the coating is too hard, the baby can damage its claws.
- However, large representatives of the cat family have stronger and harder claws, so it is worth making cloth for them from stronger and more durable materials. For a large cat, natural wood is suitable.
Only it is better to choose a tree that does not smell strongly and without knots, having first cleared it of bark.
And, of course, be guided by the tastes of your cat. Look at what your pet is sharpening its claws on now. Try to use the same or similar material when making homemade scratches. If he prefers doors, then a piece of wood will do.
If he “does a manicure” on rugs, then carpet will be the best choice; scratches the furniture upholstery - choose jute or sisal rope for covering (the latter is the most reliable and durable material, although the most expensive).
To create a scratching post you may need the following tools:
- threads;
- glue;
- scotch;
- compass;
- screws;
- stapler;
- stationery knife;
- drill;
- hammer and others.
Each model will have its own set of tools.
We make a scratching post out of cardboard with our own hands
To make the most budget-friendly and simple scratching post pillow, you will need the following materials and tools:
- cardboard or corrugated cardboard;
- stationery knife;
- piece of fabric;
- thick paper;
- PVA;
- adhesive tape.
Then do the following:
- Disassemble the boxes and draw stripes more than 10 centimeters wide on the surface.
- Cut strips.
- Then you need to twist one strip and glue it. This will be the middle or core of the scratching post.
- Then wind all the other strips in the same way around the core, periodically securing the layers with glue or adhesive tape. Particular attention should be paid to the last layer.
- Wrap the pillow in fabric and secure it.
- Place the structure on thick paper, trace the perimeter, cut it out and secure the base to a scratching post.
Scratching post on the rug
The scratching post bed for cats is very convenient. It will be easier for the animal to get used to it, because it will be possible to rest on such a rug in the absence of its owners.
By the way, you can choose a material that will make the scratching post fit perfectly into the interior.
- To work you will need colored rope, any rug, a knife, a stapler and sisal rope. We determine the center on the rug - this is the place where the scratching post will be located.
- Using glue, attach the sisal rope to the rug. It is better to also treat its edges with glue so that the cat does not pull the threads out of it.
- You can leave the mat as is, or stretch it over a wooden stand, using a stapler to secure the edges. Then the scratching post can be attached to the wall.
Where to place the scratching post
For a Maine Coon, it is important that his playhouse is located in a room where someone from the family is always present. The ideal place would be a corner of the living room that offers the best view.
An excellent option would also be 2-3 models located in different rooms. Moreover, it is better to make them different. However, it is better to place the largest one in the place where your pet spends the most time, or where he is most likely to want to play. This will save your furniture and make your Maine Coon happy.
Wall-mounted plywood scratching post
Looking at photos of hand-made scratching posts, we can see this option. This design is very easy to make.
It is only important to calculate the dimensions correctly. It is better if the scratching post is 10-15 centimeters larger than the cat’s height. This will protect the walls from scratches. In terms of width, it is better that the surface is at least 40 centimeters.
- You will need to prepare two plywood sheets with a width of 25 centimeters (for large cats, these parameters naturally increase). For a soft layer, a piece of old carpet will do - you will need to secure it to the plywood with the wrong side up. The piece is fixed using a stapler.
You can also wrap the sheet with a rope and secure it with slats along the edges. Next, the structure is nailed to the wall. All that remains is to train the cat to use the device.
Quick option
It happens that a cat appears in the house unexpectedly, or you are given an animal for a while (for example, the owners go on vacation).
In this situation, a DIY scratching post house is an additional waste of time. You can make the construction faster:
- A softwood log is an excellent alternative to the store-bought version. Its length can be about 70-100 meters. We chop the log lengthwise and attach a piece to the wall.
- You can take packaging cardboard and roll it up. We secure it with rope in several places and attach it to one of the walls.
- An old carpet or bedding can be rolled up with the inside out - it will be convenient for your cat to sharpen its claws on this surface.
Combined model for active cats
The Maine Coon is an extremely “social” breed. These animals do not like to be left alone and rarely feel the desire to hide in a secluded dark place. Therefore, they rarely need a classic “house”. A much better option would be a model that combines the functions of a scratching post and a gaming complex. And here everything depends on the imagination of the owners. For calm animals, you can get by with a platform on which a post for sharpening claws and 1-2 beds of different heights will be installed. For active cats, it is better to make a model with hanging toys and play tunnels. The latter can be made from thick cardboard or a piece of large diameter pipe. Please note that the tunnel must be short and wide enough so that the animal does not get stuck in it.
It is quite possible to make a scratching post with a house with your own hands. This is a more labor-intensive task than making a post or bed, but there is nothing super complicated about it:
- Take a board, plywood or chipboard and make blanks for the future house. You will need 2 side pieces, a floor, a roof and a back wall.
- Fasten all elements with screws or corners.
- Cover the inside with thick fabric and make a soft bedding or pillow. The same can be fixed on the roof so that the animal has a choice of where to lie.
All elements, regardless of their number, must be firmly fixed on a heavy pedestal. It's best to make a general framework. However, the game town can be assembled from several separate items.
Design of a sharpener for cats
Before starting work, you should familiarize yourself with important tips and recommendations:
- The height of the working column for sharpening claws should not be less than 100 mm;
- Beds and other accessories are located above the column;
- The diameter of the pillar is at least 100 mm;
- The house is installed on top of the entire structure;
- If there is more than one cat in the family, then the beds are installed on the same level;
- The base of the device must be strong, heavier than the weight of the pet, and its dimensions are quite large.
- If the object is created from a pipe, then its height should be twice the length of the cat.
- The cardboard sharpener is only suitable for kittens and small breeds.
- It is not necessary to hang toys on ropes in this structure.
In order for your pet to fall in love with this device, you need to follow some useful tips. You need to study the habits of your pet, and notice what he has chosen to realize his instinct.
For this reason, you can choose the type of structure and determine the location for it. The cat must be directed to the right place by taking its paws in your hands and running them along the rough surface of the sharpener. Pet the cat and treat her to something tasty.
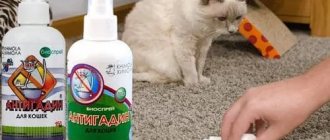
Observing the movement of the animal to its favorite place, pick it up and take it to the scratching post. On furniture that is at risk from sharp claws, you can spray a few drops of citrus freshener. Cats do not like this scent, and it will repel the “attempt”. You need to be patient with getting your cat accustomed to the sharpener; this process is not quick.
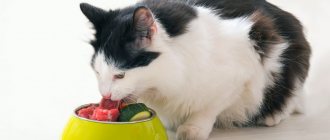
The animal needs to be praised and treated, so the cat will quickly understand that sharpening its claws on a special device will only be praised.
How to make a hanging model?
Wall-mounted (or hanging) scratching posts have many advantages over floor-mounted ones.
- They are stable, there is no risk that a playful cat will be able to turn over such a sharpener, since it is tightly secured in a certain place in the house. The wall-mounted scratcher is perfect for active, playful and large pets.
- It does not take up much space, so this type is the best solution for small apartments.
- Thanks to the vertical position of the hanging scratching posts, wool will not collect on them.
- They can be used to cover wallpaper on the wall that has already been scratched by your pet - this is another important advantage of wall models.
- And finally, such a scratching post is easiest to make at home.
We will tell you a detailed algorithm for its production.
- We will need a rectangular piece of plywood or wood panel as the base of the scratching post. The optimal width is 40-45 cm, so that the cat does not touch the wallpaper, stretching its paws to the sides. The length of the scratching post should be slightly greater than the size of the cat itself in the position of its paws extended upward.
- The prepared wooden base must be covered with material on which the cat will sharpen its claws. Carpet with the wrong side facing out is suitable for this purpose (it is better to make it two-layer for maximum strength and durability).
- You can also use a cotton blanket folded in several layers, or even thick corduroy.
- The size of the fabric sheet should be slightly larger than the parameters of the wooden rectangle, so that the edges of the material are wrapped on the wrong side and fixed with glue or using a stapler.
- Another covering option is to wrap a piece of plywood with jute rope or twine.
- We drill several holes on the wall with a drill and attach the scratching post using 4 slats and 6 long screws.
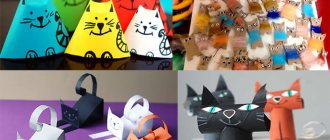
You can also make a corner scratching post, which cats love very much. To do this, you need to take not one, but two pieces of plywood, the width of each of which should be at least 25 cm. We glue a fabric layer onto both wooden sheets and fix the structure with screws on one of the protruding corners of the room or on the vertical plane of the doorway.
However, if you don’t want to spend a lot of time making a full-fledged hanging nail clipper, then you can simply cover the walls to any height with carpet.
What types of scratching posts are there?
A scratching post is a post wrapped in rope or a panel board covered with fabric or carpet. There are multi-story tree scratching posts that allow the cat not only to care for its claws, but also to practice climbing, as well as corner scratching posts that save space in a small apartment. The animal itself will tell you whether it liked the new thing - if it is not to its liking, the stripping of sofas will continue.
But by trial and error, even the most picky cat can choose the right accessory, vertical or horizontal, carpeted or simple wooden, wrapped in linen rope or sisal. In order not to get into trouble and choose the right product, you should watch the animal: find out what it prefers to tear: a sofa, a carpet or a wooden cabinet.
It is also important to find out how he does this: standing on his hind legs or stretching out in length and crouching to the floor. If the new inhabitant of the house is a kitten taken from a nursery, you need to ask the owners what kind of scratching post he used there, and buy or make the same one.
A scratching post can be part of a complex for cats along with beds, houses, shelves, or it can be an independent item.
Step-by-step instructions for making a floor-standing scratching post
- The main advantage of a floor-mounted scratching post is its mobility - the ability to quickly change the location of this cat attribute in the apartment at your discretion.
- There are a huge number of models of floor-standing scratching posts, including those that you can make yourself. Let's talk about the main options that are easiest to make with your own hands.
- The simplest and fastest model to make is a regular horizontal scratching post, which can also serve as a cat bed.
- Take a sheet of plywood or a regular board. We cover it with carpet on both sides with the wrong side facing out, and the edges of the material can also be sewn with thick threads or secured with a stapler. That's it, our scratching post, also known as a bed, is ready.
But here is a slightly more complex version of the horizontal rag.
- To a wooden rectangular board measuring 30*60, we nail a block of the same size on both edges (you can screw them with screws using a drill). They just need to be securely fixed so that the cat does not get injured on the iron parts.
- Next, we wrap the wooden board with a rope (jute, sisal or twine), after having greased it with glue.
- Additionally, you can secure the coating by drilling two holes in the board next to the bars and threading ropes through them, making knots at the ends.
You can make a scratching post not horizontal, but at an angle (in the shape of a slide).
- To do this, we will need another wooden plank, the same or slightly shorter length than the main one (the angle of inclination of the future product depends on this).
- We cover both planks with carpet or other hard, dense fabric. We fix the fabric with glue, you can also sew the edges of the fabric from the inside.
- We connect the two parts of the scratching post to each other with furniture corners or tightly driven nails.
- For greater stability, it is better to place such a scratching post next to the wall.
Another fairly easy-to-make (though short-lived) type of floor scratching post is made from cardboard. It will require the following equipment:
- pressed cardboard;
- stationery knife;
- glue;
- scotch.
The procedure is as follows:
- cut a sheet of pressed cardboard with a stationery knife into equal strips approximately 1 cm wide;
- glue them to each other with the smooth side so that the ribbed wavy edges of each strip are on top and bottom;
- wait for the glue to dry;
- and the final touch - we tape the resulting scratching post around the entire perimeter to make the structure more durable.
The most popular type of cat scratcher is the post scratching post.
- To make it, you will need 1 sheet of chipboard, from which we will make a stand for the nail clipper. For this purpose, you can use a former countertop, parts of an old cabinet or other furniture. The base should be wide and stable enough so that the cat does not overturn the entire structure during play.
- The shape of the stand can be round, square or rectangular, at your discretion. If you choose the first option, then you will have to use a compass to first draw an even circle, and then cut it out exactly along the circumference with a jigsaw.
- You can leave the wooden base as is, but it is best to make some kind of covering so that the cats can also use it as a bed. You can cover it with carpet or glue it with jute rope, moving from the edges to the middle.
- If you want to make an additional bed for your pet at the top of the scratching post, you will need another sheet of chipboard or plywood, equal in size to the bottom one.
- The column itself can be made from a metal pipe or several tin cans placed one on top of the other. We connect them to each other using glue, after placing some heavy object in the bottom one for stability of the structure. Then we cover it first with carpet, and then with rope. We connect the column to the base using furniture corners.
- If you make a post from wood, it can be either round or rectangular. The average height is 60-80 cm. It can be covered with nothing or wrapped with sisal or jute cord, pre-lubricated with glue. It is attached to the base with nails or screws.
We will hang the toy on the top of the scratching post, securing it to the end of the rope.
Almost everyone can make the above options for claws.
But to make a scratching post with a bed and a house , you will need at least minimal carpentry skills and preferably a partner.
- You will need 2 sheets of plywood: one larger (for the base), the second smaller (it will serve as a lounger and should be equal to the size of the cat when extended, both in length and width).
- We take two wooden posts of the same diameter. One of them will be a stand for the house, the second will act as a scratching post, and there will also be a bed on it. The first should be significantly smaller in height than the second - about 30 centimeters.
- We screw both posts to the base with self-tapping screws.
- We coat a large post with glue and wrap a rope made of jute or sisal around it.
- After the glue has dried, we place a smaller sheet of plywood on top of the structure, covered with carpet or furniture fabric. The bed is ready.
- Having made the markings, we cut out the walls, ceiling and bottom of the future house from wood or plywood. They should be the same size, approximately 35*35 cm. We cut a round inlet hole, which we first draw with a compass. We nail all parts of the house to each other. They can also be pre-covered with fabric.
- In the center of the bottom of the house we mark the attachment points to the base post. For greater stability, you can attach it to the scratching post itself, first making markings on the wall. We fasten the house with self-tapping screws.
If you have more than one cat, and you want to make a scratching post part of a play complex with several beds and houses, then you will need a preliminary drawing of the structure (for wooden and metal elements), as well as cutting (for fabric upholstery).
Schemes of various models can be found on the Internet or created yourself.
DIY cat house and scratching post
The design of the future cat shelter for the Maine Coon can be chosen from the following options:
- An ordinary rectangular house is a simple shape, easy to design and manufacture.
- Round, made from scraps of large diameter pipe.
- A castle for a Maine Coon is a fantasy project with decorations and additional elements in the form of stairs, passages, and a jagged roof.
Important information! Some Maine Coon owners are considering decorative options for a house with a scratching post, the development of which will require both imagination and time. In this case, the cat can be placed in a wigwam, a fabric tunnel or a wicker basket.
Tools and materials for a house with a scratching post
To work on the project for a Maine Coon house with a scratching post you will need:
It’s good when, among other things, there are clamps, and for complex woodworking a hand router is useful.
It is preferable to choose materials for a house with a scratching post that are not the most expensive, but strong and natural.
Instructions for making a house and scratching post for a Maine Coon
To create a Maine Coon house, you need to determine the dimensions of the future structure and make cuts in accordance with the drawings.
Holes (about 200x200 mm) are made in the front and one side wall for the Maine Coon to enter the house.
The rectangular box is assembled along the walls with self-tapping screws, twisted into corners or using connecting strips. The upper part of the box necessarily contains a strapping of slats, which serve as a stop for the lid. It should be removable, opening the internal space for cleaning and disinfection. Regardless of the size of the house for the Maine Coon, it is necessary to provide free access to their “living” part.
The scratching post is made from a plastic pipe or wooden beam. Both materials are strong enough to withstand the pressure of a large cat, which will lean on the structure with its entire weight.
There is another clever way to secure the edge of a rope to a scratching post without any additional materials. At a distance of 30-40 cm to the edge, a doubled loop of strong thin wire or thick fishing line is placed under the turns of the cord.
Its two free ends should remain 20-30 cm below, and the fold should remain above the level of the scratching post. Next, they continue to apply tight turns to the very top. The end of the cord with a margin of 10-15 cm is passed through a wire loop and pulled towards the floor by the lower free ends. Even with a very strong tension on the cord, it is not necessary to apply much effort; a thin wire begins to come out from under the rope braid, and its upper part pulls the tip of the cord into the space between the base of the scratching post and the wound top layer.
Thus, the edge of the rope is completely hidden, and the wire comes out freely without disturbing the integrity of the turns.
All that remains is to cover all the elements of the house with fabric. Experts advise using simple one-component formulations. They are applied in a thin layer to the surface so that no air bubbles remain under the material. Once the cat feels that it can tear off a piece of the rag, it will not stop until it gets its way. Therefore, you need to glue over the entire plane, leaving no voids.
The final stage is screwing the Maine Coon house to the stand. Small holes should be made in the fabric in advance to the size of the fastener so that unpresentable metal parts are hidden under the covering.
Basic rules for reliable installation
An important requirement for any scratching post is its correct fastening. A scratching post with your own hands must support the weight of the cat, and not tip over, and have a stable base. If the fastening is weak, the animal will be able to knock it over, this may lead to the fact that the pet will begin to be afraid of it and after this incident will not use it.
The base must be calculated taking into account the height and body weight of the animal.
There are a few tricks to getting your cat to like this new piece of furniture. To do this, it is recommended to treat the jute rope for the scratching post with mint or catnip leaves. It should not be treated with valerian.
Most cats prefer to sharpen their claws in the morning, so it is better to place it near their sleeping place (ideally, make a bed or house equipped with a post with a jute winding). If possible, it is recommended to place a new scratching post in those places where the cat was accustomed to sharpening its claws before its appearance.
To make it clear how to make a scratching post on your own at home, you can watch a video of making a scratching post.
Types of scratching posts
What is the ideal scratching post for a large cat? In pet stores, among the large selection of accessories for animals, several types of scratching posts for cats can be distinguished: floor-standing, wall-mounted and free-standing.
According to breeders, wall-mounted devices and scratching posts have proven themselves to be the best for Maine Coons. It is better to securely fix them so that the cat feels comfortable and is not afraid to turn over when doing what she loves.
You should be prepared in advance that you won’t be able to buy a scratching post the first time. Most of the designs sold in the store are not suitable for your giant cat. The upholstery on finished houses can easily tear, and on complex cat complexes, cat hair can accumulate in large quantities.
Frequent errors in manufacturing and assembly
- Often, when making a scratching post, some mistakes are made, the most basic of which are insufficient stability, incorrect materials, ill-conceived design.
- Any structure must be balanced and securely screwed. If it falls, the cat will get scared and stop using it.
- Purchasing the cheapest ready-made scratching posts. For their manufacture, the most fragile, low-quality materials are used, which, with frequent use, quickly become unusable. Such products can lead to injury to the cat, its paws, and claws.
- The owner thinks that the cat itself should understand the purpose of this new object. She needs to be taught, shown what the animal should do with her, and to interest the pet in every possible way.
- Wrong sizes. When developing drawings and diagrams, the owner does not take into account the size of his animal, its habits, habits, and character. The pet may simply not like such an item, and sometimes it does not correspond to its dimensions or weight.
A house for a Maine Coon should be larger than, for example, a house for a British or other breed.
The animal cannot use it comfortably. It is easier to train a small kitten than an adult who is used to sharpening her claws elsewhere. Such an animal must get used to new furniture gradually.
Requirements for a house with a scratching post for a Maine Coon
Before you start designing an object, you need to decide on its functional tasks, technical configuration, find a place for installation and think through the general details of the project.
- If there is not one cat in the house, but several, then for each pet it is necessary to organize its own space for relaxation. Maine Coons are very tolerant of pets, but will not share a personal “nest” with another cat.
- The layout of the cat's play area must be calculated in accordance with the general layout of the room and the arrangement of furniture. The house and scratching post should not be close to windows, cabinets with dishes and vases, walls with paintings or other hanging objects. If this happens, an active Maine Coon will definitely decide that curtains, cornices and shelves with crystal wine glasses also fall within the scope of the play space.
- Any breed of cat (Maine Coon among them) is very susceptible to drafts. This should also be taken into account when choosing a location for the house and scratching post.
- be strong and safe;
- made only from environmentally friendly components;
- do not have sharp metal parts (tips of self-tapping screws, protruding connecting corners);
- In case of wall mounting, it is necessary to ensure safe and reliable installation.
Technical requirements for the structure itself and the materials for it must meet simple conditions:
Of course, you can purchase a ready-made kit, but the cost of high-quality houses with scratching posts and other useful attributes for Maine Coon entertainment is high, and independent creativity allows you not only to save significantly, but also to create a completely unique project.