Home » Useful Information
To take care of leisure time for your pet, you can make simple toys for cats with your own hands.
To do this, you can use cardboard boxes, paper, old teddy bears and other available materials.
You can make a cat toy with your own hands with minimal investment of money and time.
- 2 Pompom - a light toy for kittens
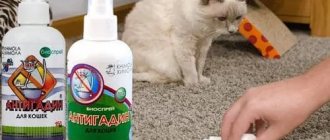
- 3 How to make a fragrant toy
- 4 Miniature rattle
- 5 Another option for a soft toy
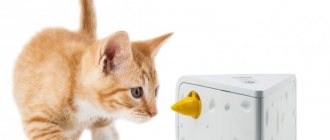
- 6 What is an interactive toy
- 7 Option for an interactive toy made from pipes
- 8 A complex labyrinth made from improvised means
- 9 The simplest and most accessible
We knit balls of yarn
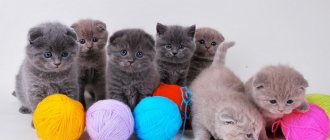
If you have an old ball of yarn lying around, give it to your kitten. Surely during the game it will be interesting for him to watch how the ball turns into an infinitely long thread. True, after such fun you will have to rewind the ball again.
“Piercing gaze”
For all the colors of the rainbow
Playful curl
DIY cat toys
There are many possibilities to make cat toys from available materials. You can buy a paper bag for 8 rubles in any large store (Auchan, OK) - we are sure that this will be an excellent opportunity to keep your cat busy. Various sticks, pencils, balls of any size. You can make something yourself from what you have in the house.
Candy toy
The next master class is DIY kitten toys. To make it, you need 2 parts: a paper tube from used foil or paper towels and corrugated or any rustling paper.
Cut a small piece from the paper core.
Use a thread to pull the rustling paper.
Insert it into the sleeve - that’s it, the cat toy is ready! You can start the game.
Toy made from a regular bottle
Every home has an empty plastic drink bottle. We wash it, dry it, and wipe it dry.
We cut holes in the bottle - large and small. The holes should not be sharp - otherwise the cat may injure its paw. You can burn the edges with a lighter so that they are not sharp. We put a treat for cats in the bottle. The cat’s task is to get the treat with its paw. To be convincing, you can rattle the bottle and roll it on the floor. The interactive toy is ready.
Toilet paper rolls come in handy too.
You can pamper your kitten with anything. Even a roll of toilet paper! Decorate it with fun things and the fun is ready!
Let the fluffy ride the cars
Even a toy red cat will amuse your pet
Wonderful frogs on a string
Cat and mouse - game under the sofa
Cats love to play - everyone knows that. DIY cat toys are a good idea. One of their favorite games is to push a ping pong ball under the sofa and try to fish it out from all angles. So the idea arose - why not make such a toy - a cat and a mouse (game under the sofa).
There was only one question - how to make sure that the toy could be returned from under the sofa. After all, the balls roll very far and eventually get lost. There was one more question: to make your own “sofa” for a cat, which, while playing, clings to the fabric with its claws (and, accordingly, spoils the sofa itself).
A toy mouse and a return mechanism are used as a running mouse. The return mechanism is a metal tape measure, it can be bought for 100 rubles. at any newsstand. Do-it-yourself interactive cat toys in pet stores cost the same as toys for children (a lot). We will do no worse.
It was decided to make the cat's own sofa. A piece of chipboard, knocked down in the shape of the letter P, was used as a sofa.
All that remains is to cover it with carpet. A cardboard cylinder from toilet paper is used as a holder.
A mouse pulled from under the sofa comes back, which forces the cat to pull it out from under the sofa over and over again.
Here is the finished toy - a cat and a mouse under the sofa. The most important thing is that it can also serve as a scratching post for your cat.
Gambling stick
Anything can be attached to a rope - sewn circles, hearts, pompoms, feathers. They will greatly comfort the kitten.
Option for an interactive toy made from pipes
Another version of the interactive toy is made from plumbing pipes.
For work you will need:
- four plastic elbows;
- drill with a special attachment.
Original part
Connect the water pipe elbows together to form a vicious circle.
Using a drill with a special attachment, make holes in them that only a cat's paw will fit through.
Process the edges and throw a rattling ball into the resulting maze.
Mouse Hunt
Surprise your cat by decorating your mouse with a bright long tail.
The design of this mouse couldn't be easier! Fill a cone-shaped bag with soft filling, sew on ears, a tail, and the pet has prey at his complete disposal.
Heart mouse for a cat - master class
From any piece of fabric, leather, or suede you can make this heart-mouse for a cat. This toy can be filled with different “fillings” - you can take dry catnip, chamomile, wheatgrass, barley, oats. You cannot take plants that are poisonous to cats: datura, wormwood, hogweed, henbane, poppy. If you stuff your mouse with fresh grass, collect it away from the roads, in a clean area, and be sure to wash it in water and then dry it with a napkin.
So, we have decided on the filling, all that remains is to sew the mouse itself. You can sew several mice for your pet and fill them with different herbs - then you can determine exactly what attracts your cat more. We offer you our master class on sewing a mouse step by step.
To work you will need:
- Fabric (small pieces).
- Grass.
- Sample.
- Needle, scissors, thread.
- A stick or pencil for stuffing the “mouse”.
- Tailor's pins.
- Rope.
- Thick needle.
We print or draw the toy pattern by hand. The dotted line indicates the line along which we will sew 2 parts. Using two points - the place that we are missing - we will turn the toy inside out through it.
Place the 2 parts of the mouse with the right sides facing inward. We pin the pattern with pins.
Trim off excess fabric.
We cut a piece of rope equal to 16 cm. We need to insert the rope into the center of the heart so that it protrudes 1 cm.
We insert a piece of rope inside two parts of the toy.
Let's see: we will sew on the wrong side, we have already inserted the “tail” of the mouse. Don't forget to leave an unstitched section for turning the toy inside out.
We sewed 2 parts and turned them right side out. We fill the toy with chopped grass through the unstitched area; it is more convenient to do this through a funnel.
We compact the grass with a stick or pencil more firmly, let the mouse be plump.
Sew up the remaining hole. We take a thick needle and thread a rope into the eye. This will be a mouse's whisker.
We tie thick knots at both ends of the mustache. Tie more knots - it will be more interesting for the cat to untangle them.
You can sew 2 eyes from felt, but this is not necessary. Even without this, the cat will understand that it is a mouse; everything on the mouse is in place: the mustache and the tail.
funny feather
The slightest breath of breeze will stir the air feathers, attracting the attention of your kitten.
Cat made of cones
Cat crafts made from cones are especially beautiful - such a natural material is very popular in kindergartens and schools in the fall, when kids are asked to make any craft from fir cones, all they need is their imagination!
You will need:
- Fir and pine cones of different sizes,
- PVA glue,
- And also long pine needles,
- A little pink plasticine
- And two peas of black pepper.
Progress:
- To begin with, we will need a small pine cone, to which we will glue two spruce scales - in this way we will make ears on the top of our cat’s head. We use PVA glue for fastening, glue on eyes from black peppercorns, and also make mustaches from pine needles. The nose can be made from pink plasticine.
- The largest fir cone should be oblong - this will be the body of the cat. Using PVA glue we glue the finished head to it.
- You can make a cat’s tail from a spruce cone, which looks fuller - let the animal’s tail be fluffy. For better visualization, you can carefully peel back the scales to create a “fluffy” feeling. We also glue it with PVA glue.
- We make the paws from fir cones, approximately the same size, so that our cat stands firmly on her paws.
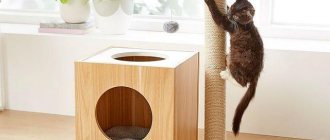
"Who's there?" Let's play peek-a-boo
With this game your cat will definitely not get bored. Treat him with a fun activity. It will be enough to cut out the figures in the box and put inside everything that might interest a curious pet. Balls, beads, skeins, spools of thread are an excellent option.
Cat puzzle
The elusive mouse on a stick. Shall we try to catch it?
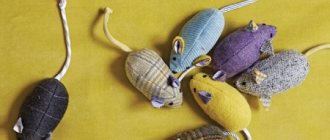
Soft toy for cat
Pet owners should remember that cats need attention and care. Original and exciting mouse toys will delight any cat. You can make such toys yourself from scrap materials. Moreover, if you choose colorful and bright materials, then such toys will be able to overcome the apathetic mood of even the most boring and clumsy cat. After all, if the cat is bored, and at the same time she is an active lady, then she will try to bite you once again on the hand or leg, and run around the entire apartment. Such toys will help solve the problem of boredom for a long time.
In this case, it is completely useless to purchase expensive toys; as practice shows, most often expensive toys only last for two to three days. Therefore, you can make many similar toys, diversifying them with your imagination.
For work you will need the following materials:
- beads for eyes
- pattern
- cotton wool or padding polyester
- the fabric is varied, preferably bright, it can be cotton, wool, etc.
- needle
- threads
- laces
- iron
- scissors
We cut out a pattern from a piece of fabric according to the template.
First you need to cut out one side part, and therefore one bottom part. The fabric can be chosen in different colors and textures, so the side can be one color and the bottom another. Then we can turn the template over and cut out the remaining parts.
For the ponytail, we need to outline a rectangle on fabric measuring 2.5x10 cm and cut it out; you can also use a simple lace for the ponytail.
Now you need to make the ears, cut them out of the fabric and apply the two parts for the ears to each other with the wrong side.
If we make the tail from fabric, then you need to fold the rectangle in half lengthwise and fasten it with a seam, leaving an allowance of 5 mm. The ends of the strip should not be sewn together to turn the tail out. Now you can start sewing together all the parts for the mouse body. We attach the parts to each other and stitch them, do not forget that you need to fold them right sides together, with an allowance of 5 mm, then leave a hole on the back so that you can then stuff the toy with padding polyester. We turn it inside out and stuff it with padding polyester, insert the tail into the hole, sew everything tightly with a hidden seam and tie the tip of the tail with a knot.
We take the ears, fold the parts for them in half and sew them to the body with small stitches. It is recommended to make the eyes with a line stitch, but you can also sew on beads, but it is worth remembering that these are small parts and they must be sewn securely; if you are not sure, then just make a line stitch. Now the mouse toy is ready.
HAND MADE Mouse for cat
Simple DIY cat toys are a good idea. In order to please and entertain your cat, you don’t have to spend money; we’ll show you how to make a heart-shaped mouse stuffed with catnip and other toys for your pet from available materials. To prevent your cat from getting bored and spoiling his home environment, make several toys for him with your own hands.
Making a fluffy pompom
Making a fuzzy smiley
Plasticine cat
This photo shows what wonderful cat crafts can be made from plasticine. This material is easy to use, and therefore something is often made from it during labor lessons in elementary school or kindergarten.
To work you will need:
- Only plasticine of different colors (depending on the color of the cat)
- And a stack for cutting.
Progress:
- We start making the cat from the head and body - roll two balls. Please note that the head should be round, but the body should be slightly oblong. Let's connect together.
- The legs and tail will be the same, so you need to roll five small balls of approximately the same size. From four we make “sausages”, and from the fifth we make a tail. Moreover, it should taper towards the end (the one that will be attached to the body).
- Now you need to attach the legs and tail to the body. It's easiest if the cat is in a standing position.
- To make the ears, you need to roll two small balls - slightly smaller in size than those from which the paws were made. Then we give them a triangular shape and attach them to the cat’s head.
- The base for the cat is ready. Then you can get creative with your child - make the eyes yellow or blue, stick multi-colored spots or strips of plasticine of a different color onto the “fur” of the animal, etc.
Let's cast a fishing rod
A voluminous fish - you can't miss it!
A feather instead of a tail
And someone has already enjoyed it!
Decorate the fish with shiny scales
Pompom - a light toy for kittens
Another option for a soft toy for a kitten or adult cat is a pompom.
It’s even easier to make than a mouse or a fish.
- Gather fabric strips of equal length.
- Fold the resulting bundle in half and tie it tightly in the center.
- Cut strips on the fold.
- Distribute the ponytails evenly.
This completes the pompom for the cat.
All that remains is to cut at the fold
The importance of the game for dog training
Dogs are social animals; they love to communicate not only with humans, but also with their relatives. And not just to communicate, but to play and frolic. The opportunity to run around with a similar companion who also doesn’t mind playing is one of the best motivations for a dog. Interestingly, in general, for most animals, the peak of play activity occurs during adolescence. And a dog’s motivation to play remains throughout its life, although it is formed in puppyhood.
Dogs are social animals
Any game has great benefits for a dog, regardless of its age. If for an adult pet this is an opportunity to let off steam and spend mental energy, then for a puppy it is exploring the world, the opportunity for socialization, developing useful skills, preparing for training, etc. So games for a dog are far from a pointless activity.
Candy toys are interesting for active dogs, because you can do whatever you want with them.
On a note ! There is a hypothesis that in the wild, play serves as a unique method of preparation for adult life, develops abilities that will be useful during hunting, trains reflexes, and helps members of the species learn to communicate correctly with each other.
For example, a small puppy, playing with littermates, learns to control the force of its bite. Those puppies that were taken away from their mother early do not know how to do this, since they were not able to acquire this skill. While playing, the child learns to defend his own boundaries and appreciate those of others. Dogs who play actively have excellent coordination of movements, and their brains work more actively than those who spend their lives passively.
The fastest and easiest toy to make for pets is from a tennis ball.
In addition, the game is an excellent training tool that the dog owner can use to achieve certain goals. For example, play can be a great motivator for a dog learning something new. In some cases, it can even replace such a reward as a treat. Also, during the game, the dog can be taught self-control, control of its excitement, perform certain actions on command, and so on.
The dog learns while playing
On a note ! Dog handlers note that after playing, a dog perceives any commands much better and learns more willingly.
The game can also demonstrate the dog's health status. Thus, an animal that does not feel well will refuse to play even with its favorite toy. And if the dog has become inactive in games or plays rarely, this is a reason to contact a veterinarian.
→ See also: Wooden houses made of profiled timber
Paper applique of a cat
Applique paintings are no less beautiful - there are several options: geometric (details in the form of geometric shapes), torn (pieces of paper come off) and others.
Both beginners and advanced students can make a cat craft in the form of an applique - in fact, everything is simpler than it seems at first glance.
Let's consider the simplest option - a geometric application, for which we will need:
- Colored cardboard (background),
- Glue,
- Scissors and colored paper blanks in the form of three small circles and two triangles.
Work progress:
- Take one of the circles and cut it in half with scissors. Glue half of the circle to the cardboard with the rounded side up. We glue the second half to the side on the left, slightly above the edge - this will be the tail of our cat.
- Next we glue the circle so as to “capture” a little bit of the semicircles - this is the body of the cat. We glue the last circle, placing it on the upper edge of the cat’s body circle - this is how we made the cat’s head.
- Triangle blanks are cat ears. We glue them on both sides of the head.
- In general, the cat applique is ready. Circles and triangles can be used in different colors to create the look of a motley cat. You need to draw a muzzle on the face with a felt-tip pen or pen, although the eyes can be glued on if you have special stationery - it will look very cool!
Black cat paper craft
Will need
- a sheet of black thin cardboard;
- paper plate;
- glue;
- brush;
- scissors.
We cut out a segment from the plate so that we get the cat’s paws and an arched back. We paint the part with black paint.
From cardboard we cut out the round head, ears and tail of the cat. Glue the eyes to the head. You can draw and cut them out or buy them ready-made. Then we glue the ears and tail. Select the gluing location as desired. You can make a scared cat if you attach the tail vertically and leave a small gap between the ears.
We make mustaches from paper strips. Glue it to the head and secure it with a small round paper nose on top. Instead of paper, you can use a bead or a soft pink pompom.
We attach the head to the body with glue. Attach a loop of thread, thin wire or braid to the back of the body. Now the craft can be hung on the wall.