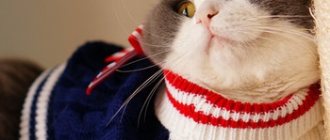
Sharp cat claws often cause problems for the owner if his pet does not leave the apartment. Not everyone knows how to trim their claws on their own, especially since during this procedure the animal can be seriously injured. Therefore, the best way out of the situation is to purchase or make a scratching post for your cat with your own hands. Let's find out how to properly organize this process at home.
Why do cats need a scratching post?
The domestic kitty traces its origins to wild creatures that had an extensive set of instincts. Claws serve to implement the natural functions inherent in all representatives of the cat family. Cat claws carry a multifunctional load:
- used for climbing trees;
- help with hunting;
- protect from attacks by aggressors;
- maintain balance when walking or jumping;
- promote the release of odorous secretion from the finger pads to mark the boundaries of the territory.
In the natural environment, cats sharpen their claws on hard objects: pebbles, tree bark, dry plants. Pets do not need to hunt to get food. Maintaining normal nail length continues to be an urgent need for cats, as long nails will cause pain when moving. A cat, driven by instincts, always finds an object to fulfill its natural needs. Usually, upholstered furniture (sofa, armchairs), carpet pile and wallpaper are affected. An easy way to save your home furnishings from destruction is to purchase a device for sharpening cat claws.
What tools will you need?
To make a comfortable cat house, you may need some tools:
- compass;
- markers or pencil for marking;
- fabric stapler;
- knife;
- ruler and tape measure;
- screwdrivers;
- screwdriver and drills;
- grinder (angle grinder with a disk for cutting wood) or jigsaw;
- hammer;
- pliers;
- drill;
- hatchet
- hot glue gun.
These tools are useful for scratching posts, depending on their design and complexity of design, technical features of the structure.
Declaw surgery
Some cat owners prefer not to use scratching posts, but to solve the problem radically - remove the pet's claw phalanx or stick anti-scratch pads on the claws. This operation is similar to the removal of human fingers and makes the animal permanently disabled. A cat, deprived of nail phalanges, is forced to re-learn how to walk and jump, and will no longer feel like a full-fledged cat. An animal without claws loses its balance, feels defenseless and easily suffers damage to its internal organs. If a pet without phalanges accidentally ends up on the street, the chance of survival of such an animal is close to zero. Most veterinary clinics do not agree to perform such procedures.
Other design and trim options
Instead of carpet, you can use jute or hemp twine. Which you need to wrap each board tightly before fastening.
And if you attach a shelf on top of the structure, which is ¾ of a circle, with a radius of 20-25 cm. Upholster it with thick fabric, then your pet will have an additional bed.
This scratching post will not take up much space in the apartment. But it will distract the cat’s attention from the furniture or walls, thereby ensuring their safety.
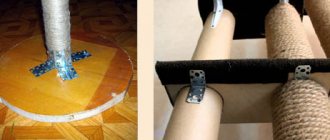
Repair of sisal post scratching post
Scratches in nurseries quickly become unusable due to increased use. The photographs show the repair of a homemade scratching post for kittens.
Unscrew the shield from the post and base. Remove sisal rope from plywood
Cut a piece of carpet to the size of the plywood with allowances. Finish the edges with a lighter. Attach the carpet to the plywood from the ends and sides using a construction stapler (14 mm staples)
Completely cover the plywood with carpet
Wind a jute rope with a diameter of 8 mm onto the post
Screw the plywood to the post and base
Shoot a circle of carpet onto the top of the column. Send the scratching post to the kittens for control
We make a claw grinder ourselves
So, let's start making a gift for our tailed friend. There can be many varieties, everything is limited only by your imagination, skill, and desire. In order for the item to please not only the cat, but also the household, it is advisable to think of an option that fits well into the interior of the apartment or house. It is better to choose a calm color, close to that found in nature: greenery, sand, earth, tree bark.
Rope post
This scratching post is quite easy to make.
You will need:
- base with a diameter or width of 10–12 cm (timber, plastic pipe, small log, board);
- sisal rope with a cross section of 8–10 mm;
- plywood 22 mm thick;
- a piece of carpet;
- self-tapping screws;
- sandpaper.
Also prepare your tools:
- scissors;
- jigsaw or saw;
- screwdriver;
- hammer;
- measuring tape;
- glue gun
Pre-calculate how much rope you will need:
- Multiply the diameter of the base pipe by 3.14 or calculate the perimeter of the square base.
- Divide the height of the stand by the diameter of the rope, so you will find out how many times the rope will wrap around the base.
- Multiply the number of turns by the number obtained from the multiplication in the first step.
- Add 10% to the result for the reserve.
Now you can proceed directly to making the scratching post:
- If you decide that the surfaces will be round, cut out two slabs from plywood with a jigsaw: 30 cm in diameter for the top and 40 cm for supporting the post. If square, make them using a saw, the dimensions are the same.
- You need to determine the center of the base plate and measure two points spaced 4 cm from the central one. These will be the centers for attaching the post to the base and top sheets of plywood.
Support structures are manufactured first - Sand all edges with sandpaper.
- If you have a wooden post, attaching it to the supports will not be difficult using self-tapping screws of the appropriate length. The situation is a little more complicated with a plastic pipe. Drill three small screw holes on each side of the tube, equidistant from each other and 1cm from the edge. Cut two circles from plywood along the inner diameter of the pipe so that you can insert them tightly into it. Attach them to the side platforms using self-tapping screws. If a plastic pipe is chosen as a post, plywood plugs are first inserted into its edges, with the help of which it will be easy to attach the post to the base
- Secure the rope at the top of the product using a strong double knot. If you made grooves for the edges of the rope, hide them. You can fix it in a wooden post using glue, in a plastic one - simply by putting prepared side plates on both sides. If no holes are made, leave a short end of the rope (at least 10 cm). When winding, place it along the product and wind it with the main part of the rope.
- The winding should be done as tightly as possible, securing it with a glue gun every 7–10 turns. For a tighter fit, tap the coils with a hammer.
- The final stage of making a column is connecting the main parts. You need to attach the side plates - the top and base - to the edges of the post using self-tapping screws.
After completing the winding, the top and base are attached to the post - Cover the surfaces of the platforms with carpet, cutting out the appropriate pieces and finishing their edges with fabric edging. You can attach the carpet using a glue gun or a construction stapler.
I think that the wooden version of the post will be better and more durable. But if you have chosen a PVC pipe, I advise you to fill it with sand or gravel for stability. This will give the nail clipper strength and add weight so that your pet doesn’t accidentally drop the structure. Another tip: in both the wooden and plastic posts, you can drill holes on both sides equal to the cross-section of the rope so that the ends of the rope can be hidden in them.
Scratching post-mat
If your pet tends to leave only scraps of your carpeting, make him a scratching post-mat.
Making this option is very simple. You will need:
- plywood sheet 30*50 cm;
- a piece of carpet corresponding to its size;
- scissors;
- hacksaw;
- roulette;
- construction stapler.
Attach the carpet to the plywood cut to the dimensions given above using a stapler, bending the edges so that the fabric does not fray.
If you want to make a floor-mounted scratcher, you need to place it in a place convenient for you and your cat. But cats often prefer to sharpen their claws while standing, against the wall. To do this, use a self-tapping screw (if the wall is wooden) or screws (if it is stone) to attach the nail clipper to a vertical surface. It should be located at such a height that the animal can stretch out to its full height during the process. You can attach a toy to the product, for example, a homemade mouse on a string.
Using the same scheme, you can make a corner scratching post by making two such panels and connecting them with a butterfly loop.
Photo gallery: options for scratching mats
Cute scratching post design will decorate your interior
The floor scratching post will appeal to those who like to tear up the carpet.
The triangular design allows you to do without attaching the rug to the wall
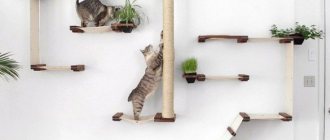
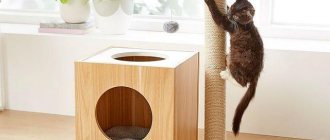
Scratching post house
If you decide to create a grandiose project, build a house with claw clippers for your furry friend. There can be many options, it all depends on your capabilities, skills, and imagination. We offer you one of them.
Required material:
- carpet;
- timber for supports;
- plywood for platforms 22 mm thick;
- jute rope;
- self-tapping screws;
- corners.
Tools:
- saw;
- jigsaw;
- yardstick;
- scissors;
- pencil;
- construction stapler;
- glue gun
Preparatory activities are as follows:
- First of all, think about the design of the structure. How many platforms will there be, what height will the supports be, will there be shelters. It's better to draw a diagram.
- Cut the timber into several parts, from which the supports of the house will be made. Our version consists of three supports and three platforms. All pillars must stand on the same platform. Then they can be connected to the shelves in any order.
- The main thing is that the structure is stable and durable. You need to make holes in the shelves for the posts with which they will be connected.
Assemble the prepared parts into the structure to see the planned result
Then proceed as follows:
- Cover the prepared plywood with carpet using a stapler, secure the platforms to the posts with corners.
- From sheets of plywood, corners and carpet you can make not only shelves, but also a house.
- When the structure is ready, all you have to do is wrap the support posts with jute rope, securing every 7-10 turns with a glue gun.
- Place the gift in the place prepared for it and offer to evaluate it for your pet.
Your pet will appreciate the results of your work.
Video: how to make a scratching post yourself
Anti-vandal fabrics
Modern manufacturers meet the wishes of pet owners and produce special materials that can be used to protect upholstered furniture from the sharp claws of a pet. Scope of application of anti-vandal fabrics:
- as furniture upholstery materials;
- for removable covers;
- when making a sleeping place for a pet.
What to sew a cat bed from or make an unusual homemade ottoman? We list several of the most popular options for anti-claw fabrics:
- Flock. This two-layer fabric is combined from natural and polymer fibers and impregnated with a special compound that increases strength and resistance to wetness. The outer fibers have a long-lasting color and are resistant to stains. To remove dirt, simply wipe the flock with a damp cloth. For long-term use, the fabric can be washed in a washing machine. The fabric surface is smooth, so cat claws cannot catch and pull out the fibers. It is recommended to vacuum this material frequently, since flock is easily electrified (like any synthetics) and attracts dust.
- Relax is a combined synthetic fabric in which a base of cotton and polyester is covered with a layer of isoprene. Thanks to this composition, the fabric invariably retains a neat and elegant appearance and lasts for many years, requiring virtually no maintenance. Elastic material cannot be scratched. Dirt from the surface of the relaxation area can be easily removed with soapy water.
- Faux suede consists of two layers. The base is a mixed fabric made of cotton and polyamide, and the top fleecy layer is polyester. The advantage of this material is the absence of electrification and permeability to air. Wet cleaning and washing are not permitted. In case of severe contamination, you will have to invite specialists in chemical cleaning of furniture. Unfortunately, faux suede is not very durable, so a diligent cat can tear this fabric.
- Microfiber is a synthetic fabric formed by interweaving thin artificial threads. Typically, manufacturers impregnate the fabric with Teflon, which makes the material tear-resistant. This durable material is easy to care for: it can be machine washed and wet cleaned with a wet sponge.
- Tapestry fabric is a dense material formed by the interweaving of thick threads. The tapestry looks stylish and expensive. The only drawback is that the tapestry is afraid of ultraviolet radiation and easily loses its original shade in direct sunlight.
- Scotchgard is a jacquard weave fabric with water-repellent impregnation. This canvas is well protected from damage and always retains its original bright pattern. Allows dry cleaning, wiping with soapy water or a special cleaning agent.
The play complex was made by ourselves for kittens
Cattery kittens on a homemade three-story scratching post complex with beds, a house, and a hammock
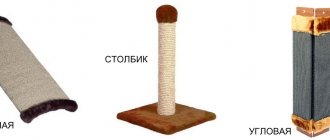
Floor-standing
Perhaps the simplest designs to implement. They can be of various shapes and located on the floor or at an angle to it. In addition, they can be combined with some other elements, columns, houses.
How to make a floor scratching post
We suggest making a floor scratching post from corrugated cardboard yourself with step-by-step instructions. To work you will need:
- construction tape,
- pencil,
- ruler,
- scissors or wallpaper knife,
- glue.
You can take a box with low sides for the mold, but you can do without it by securing the finished structure with cardboard tape around the perimeter.
Necessary tools for making a scratching post
Place the strips tightly in the box
Cut the cardboard into strips to fit the length and height of the box. Glue the strips with glue and connect them. It is advisable to use glue with a minimally noticeable odor, for example, PVA. After drying, the nail clipper is ready for use.
Simple round corrugated cardboard scratching post
Corrugated cardboard bends quite easily, so the second version of the scratching post is a twisted long strip secured with glue or adhesive tape. In this case, the size can be chosen at your discretion, and in case of long-term use, simply add layers as the shaggy consumer grows.
How to avoid mistakes when making a scratching post
The main points that a home craftsman should pay attention to when making a sharpener and a cat claw holder:
- Ensure reliability and stability. The cat will not be injured if it falls from the structure, but will quickly lose interest in the unreliable device.
- Do not skimp on raw materials. Low-quality products will quickly wear out and all the work will have to be redone. Remember: the miser pays twice!
- Spend time teaching your cat how to use a nail clipper. Adult animals are distrustful of unfamiliar objects, so you need to stimulate the cat's interest with toys and praise.
If you have any questions about our homemade complexes, ask them in the comments.
Where to place
So, the main stage has been completed. A wonderful handmade item that will bring joy to you and your pet. But another important question arises: where to place it now. Here you need to proceed from the following aspects:
- the accessory should be located conveniently for the cat, preferably in a place where he has already chosen a place for his manicure;
- The scratching post should fit into the interior of the room, not get in the way of you and your household, and be pleasing to the eye.
The scratching post should be located in a convenient place and fit into the interior
Application
Bathe the tail and wait for the pile to dry completely (!).
Before combing, if there are tangles, remove them with a tangle cutter or scissors and make sure there are no skin ailments.
It is advisable to comb it with a comb or, as professionals advise, first install a knife with long teeth into the tool to straighten the tangled pile, and then use a knife with standard blades.
Start from the back, move to the sides and tail, and then to tender, often “forbidden” places - the chest and belly. Move the comb first easily, smoothly and lightly in the direction of hair growth (carefully near the genitals, on the paws and tummy), and then a little more intensely (but slowly and without fanaticism!). And when finished, use a wet napkin (or hand) to remove all residue from above.
Owners note that an incredible amount of fluff is combed out for the first time!
At the beginning of summer (during the heat) and during the molting period (spring and autumn), clean 2-3 times a week, the rest of the time - no more than once every 1.5 months, and in winter it is recommended to clean only once, i.e. because it’s cold in winter, but the animal loves warmth. For short-haired breeds, veterinarians advise no more than 8 times a year.
If there is no undercoat, then it cannot be used. And the breeds: shorthaired Balinese, Tiffany, Cornish Rex, Burmese, Don Sphynx, Peterbald, Oriental, Turkish Angora, Devon Rex, La Permian, Singaporean and some more.
You can and should (!): chinchilla, British, Scottish, Persian, Somali, Maine Coon, Ragdoll, Norwegian Forest, Siberian, Neva Masquerade, Kurilian bobtail and many others.
And if you’ve never brushed your furry one before, then it’s quite possible to gradually accustom him: start with less time, gradually increasing; petting while quietly communicating; treat you to your favorite treat before and after; It’s better to do it at the same time every day. The cat, an intelligent and perceptive creature, will quickly pick up on this pleasant dependence that you create, and each time it will behave more and more favorably. It will take a maximum of six months to completely get used to it. One review says: “The grooming process is now accompanied by loud purring and eyes rolling back in pleasure.”
Classification
Purchased ones come in the form of:
- combs that comb completely; use daily;
- brushes (with an antistatic effect) and slicker brushes (good for combing the undercoat); apply 1-2 times a week, and during shedding - 3;
- rubber mittens - they are used for general massage and improve the appearance of the fur coat;
- wall and floor combs - for massage, partial combing and improving mood.
And when choosing them, it is important to take into account the parameters of the cloves.
Size
- for short-haired dogs, the length of the teeth is 1-2.5 cm;
- with an average length - 3-4.5 cm;
- For long-haired ones, 5 to 6 cm is suitable.
Frequency of posting
- for shorthairs - with frequent placement;
- Suitable for everyone with a middle position;
- with rare - if the fur is thick.
Form
- with rotating teeth - to remove tangles and make it easier to comb out the undercoat;
- a combination of different sizes will cope with both short undercoat and long fur.
Material
- metal - for constant combing of an adult;
- natural bristles - for little ones;
- artificial bristles - for massage;
- rubber - also for massage;
- plastic is an inexpensive and fragile material that becomes electrified and irritates the cat, and contains a harmful dye.