Often, cat owners do not allow their pets to walk outside. This makes it easier to care for them, and their paws and fur don’t get dirty. And the animal itself is not exposed to danger, especially when it comes to walking near roadways. However, any cat has a physiological need to grind down its constantly growing claws.
The lack of walking, when the animal can climb trees and run on the soil to its fullest, leads to the fact that the old “covers” of the claws are not removed naturally and cause discomfort; the cat is forced to sharpen its claws on objects in the house. This can damage walls, furniture, carpets and much more. A device that you can even make yourself is designed to eliminate this problem. The scratching post is assembled with your own hands from the simplest materials.
How is a homemade scratching post better than a store-bought one?
Even if cats live in the most ordinary city apartment, their instincts remain predatory. At the first danger, they must climb to the top of the cabinet. When playing with their owners, they show their instincts. For all this, the cat uses its claws, because in the wild they serve primarily for hunting. A DIY scratching post will maximally satisfy all the needs of the animal. It can be equipped with a bed, a ladder, or a closed house. There are other advantages:
- Saving money (a handmade product is much cheaper than a ready-made product from a store).
- Use of quality materials. The cat owner purchases only the best materials for his pet.
- Manufacturing according to your own design. You can come up with and then create a scratching post of a shape that cannot be found in the store or will be expensive.
- Dimensions. The scratching post will have dimensions that will fit best into the apartment or, taking into account all the features of the size of the room or the arrangement of other furniture.
Those who think that they cannot handle the product themselves, but want cat furniture to suit their taste, should order a scratching post based on an individual sketch.
Question to the expert
Do all cat breeds need an indoor scratching post?
All cats have genes that they inherited from their distant wild ancestors. They owe their behavior and instincts, which are also present in modern domestic cats. Accordingly, all cat breeds have a need to sharpen their claws.
Option 1: on a patterned carpet
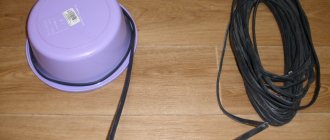
Commercial scratching posts are unlikely to fit the design of an apartment, but you want every detail to be in its place and look harmonious. For a designer column you need to find:
- sisal rope;
- rug;
- stapler;
- the base is a small beam, stick, metal rod.
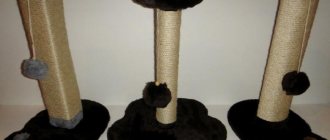
On a piece of carpet, a place in the center is determined where the pillar will be placed. Using super glue, the base (beam) is placed. Then it is simply wrapped in sisal. Additionally, you can paint part of the rope so that the scratching post fits harmoniously into the interior. The carpet is selected individually; a small piece can be purchased at any market (trimmings/remnants are often used for these purposes). Photos of a hand-made scratching post for cats can be studied on the Internet.
Materials from which you can make a scratching post
Making a scratching post with your own hands is not difficult; the main thing is to choose the right materials. Before you begin choosing materials, you need to draw up a drawing of the future product. First of all, any scratching post must be stable and withstand the weight of the animal, and not tip over if the cat rests its whole body on it. After drawing up drawings and diagrams, you need to move on to the selection of materials. They must meet certain requirements:
- wooden blocks (maple, birch);
- twisted or woven products (carpet base or thick thick rope);
- jute hemp;
- dense fabric for upholstery, preferably resistant to animal claws;
- cardboard, possibly corrugated;
- carpet;
- rope for scratching post
- wool products.
A DIY scratching post can cost zero if you have these materials available at home. You can use old covers or upholstery fabric from an old sofa or chair.
You should not secure individual elements with nails or staples, especially in places where the cat will sharpen its claws. Metal objects can cause injury to the animal. Iron fasteners should be in places where the pet cannot reach, and the nails should be driven all the way to the head so that it does not stick out.
The best option is to use glue (PVA). It is not recommended to use cotton fabric for upholstery, since when scratched, fibers will be scratched out of it and it will quickly become unusable. It is not the best option to use cardboard as a frame; it has low strength and fragility.
What should I scratch my claws on?
The base of the claw cleaner can be anything strong enough; We will return to this issue later. Much more important is the “abrasive” itself: the cat’s scratching post must be strong enough to remove the keratinized layers, but not excessively, so as not to damage the living tissues of the claw.
For the same purpose, the material of the cleaning surface should be fibrous and moderately rough, not too fine, but not too rough. To prevent the claw from getting stuck and tangled in it, the tensile strength of the fibers of the material should be lower than that of the “plastic” of the claw, but again, not excessively, otherwise nothing will peel off on it. Finally, cats sense electricity. Not nearly as subtle as fish, but they still feel it. Therefore, claw cleaning material should allow static electricity to flow away, but should not be highly electrically conductive. These requirements are fully satisfied by natural materials:
- Wood, but not all wood, see below.
- Hemp hemp and woven/twisted products made from it: burlap, carpet bases, ropes, ropes.
- Jute hemp and the same products made from it, plus coarse furniture fabrics.
- Braided coarse wool products: drape, tapestry, old greatcoat cloth or green cloth for gambling tables.
- Packaging corrugated cardboard – for kittens and small weak decorative breeds
Synthetics of any type are not suitable: their fibers are too tensile, but at the same time too smooth and slippery. As well as sisal and manila hemp fibers. The cotton fibers are very weak, the cat will tear them, but will not clean the claws properly.
Note: metal and plastic fastening/supporting parts in the scratching post (see figure) accessible to the animal should be avoided if possible - metal instantly removes static, which is unpleasant for the cat, while plastic, on the contrary, accumulates it itself. In addition, both of them can tear your claws.
Incorrect use of metal in a cat scratching post
Tree
A wooden scratching post is most suitable for a cat: he is the original owner and protector of his site. He needs his claws not only for hunting weak prey; the cat must be ready at any moment to enter into battle with an equal or even stronger person. Therefore, cats' claws are renewed more slowly than those of cats, but are more durable. The tree for the cat’s scratching post should be a strong, absolutely healthy, straight-grained one. Birch is suitable for deciduous trees; their conifers - everything except spruce. In any case, the wood must be well exposed to air and light (and not in the shade, as is sometimes written) so that its fragile viscous volatile (and odorous) components are completely weathered or bituminized; At the same time, the tree turns gray, and in conifers the layering clearly appears. Look at the picture: such a serious man won’t scratch his claws on anything. Yellow plaque is nothing, it’s a lichen, harmless and safe.
Wood suitable for cat claw point
The second condition is that the wooden scratching post must have a straight-layer section free of knots with a height no less than the height of the animal without a tail. It is on this that the cat will tidy up its claws. It is best to start from the floor or bed to make it easier to tear the back claws. Product on item 1 Fig. Suitable for kittens who do not yet know how to climb properly, but as they grow older, they will begin to look closely at baseboards, wallpaper and furniture. But what’s in pos. 2, suitable for a cat of any age, does not require purchased material and is compact enough for installation in an apartment.
Wooden cat scratching posts
Smooth-haired cats are generally energetic, tenacious, and willing to climb. A wooden scratching post for them can be made from fairly thin branches with bark, pos. 3. Long-haired dogs are more phlegmatic and are not particularly good at climbing, so the wooden piece needs to be wrapped in rope (positions 4 and 5). A thick branch, partially wrapped, is suitable for both, pos. 6.
What tools will you need?
To make a comfortable cat house, you may need some tools:
- compass;
- markers or pencil for marking;
- fabric stapler;
- knife;
- ruler and tape measure;
- screwdrivers;
- screwdriver and drills;
- grinder (angle grinder with a disk for cutting wood) or jigsaw;
- hammer;
- pliers;
- drill;
- hatchet
- hot glue gun.
These tools are useful for scratching posts, depending on their design and complexity of design, technical features of the structure.
Step-by-step instructions for making a homemade house with a scratching post
We draw a rectangle measuring 40x60 cm on our base; the two extreme corners can be rounded as desired. Using an 8mm diameter drill, drill holes in the indicated locations.
This drill diameter should be used when assembling confirmations. If assembly will be carried out using self-tapping screws, the holes should be smaller.
We draw a bed with a diameter of 35 cm, then we also cut it out with a jigsaw. We drill two holes in the center, the distance between them is 5 cm with a column diameter of at least 9 cm.
Next we proceed to the walls. You will need two identical parts, one with an entrance, the other without. Dimensions in the photo. It is necessary to drill two holes into the end of the chipboard from below, leaving 7 cm from each edge. Hole diameter 4-5mm. This is where confirmations will be placed. We take fiberboard and cut out a figure 90x39(40)cm. It will serve as the roof of our house.
Let's move on to the scratching post itself. Cut a cardboard tube 60cm high. Using an ax, we cut out two pieces of wood from a tree, as shown in the photo. We also make holes of a smaller diameter in them at a distance of 5 cm.
After this, we place our piece of wood in the pipe and fix it with self-tapping screws. This mount will hold the scratching post firmly and is easy to make. For home production - the best option.
We wind the rope onto the pipe. We fix it first and at the very end. The rope should be wound tightly and tightly; it is better to glue it for longer use.
Let's start covering the parts. We take the necessary fabric and upholster the parts using a stapler.
After all the steps we will get this picture:
We screw the walls of the house to the base using confirmations. You will also need two small bars to secure the roof. If possible, it is also better to cover them with fabric on both front sides. We screw them to the base.
Using nails we nail our roof to the wall and beams. The house is ready! All that remains is to connect the column with the base and the bed with confirmations.
And this is what we got:
How to make a scratching post with your own hands
This type of design is the most common among cat owners. It does not need to be equipped with a house; it is a separate piece of furniture. You can make such an accessory entirely on your own, without spending a lot of money, effort and time. To make it, you will need a piece of chipboard, which will become its base. If you don't have one, an old countertop or any other flat piece of wood that is wide and thick enough will do.
You can choose almost any shape of the scratching post itself - square, oval, round, any other. The main requirement for her is to be resilient. The base is covered with jute, which is well secured on the sides, and then wound vertically, moving in a spiral.
The post itself can be made from PVC pipe, but a wooden beam with a cross-section of at least 10 cm can also be used. To give the structure massiveness and better stability, you can weight the base with additional weight.
Basic rules for reliable installation
An important requirement for any scratching post is its correct fastening. A scratching post with your own hands must support the weight of the cat, and not tip over, and have a stable base. If the fastening is weak, the animal will be able to knock it over, this may lead to the fact that the pet will begin to be afraid of it and after this incident will not use it. The base must be calculated taking into account the height and body weight of the animal. There are a few tricks to getting your cat to like this new piece of furniture. To do this, it is recommended to treat the jute rope for the scratching post with mint or catnip leaves. It should not be treated with valerian.
Most cats prefer to sharpen their claws in the morning, so it is better to place it near their sleeping place (ideally, make a bed or house equipped with a post with a jute winding). If possible, it is recommended to place a new scratching post in those places where the cat was accustomed to sharpening its claws before its appearance. To make it clear how to make a scratching post on your own at home, you can watch a video of making a scratching post.
Wall mounted
The most economical option and easy to implement (see photo above). Fastening is carried out to the wall in the right place, but you can simply hang it. The material may be different: wood, twine, etc.
How to make a wall-mounted claw clipper
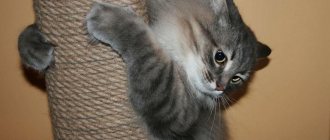
A stronger and more durable claw scraper would be a piece of wood. Cleared of the remaining bark, sanded and wrapped in places with thick twine, the tree will turn into a necessary item for the animal. It should be taken into account that the wood is quite hard and not all cats will like it as a “sharpener”.
To make your own wall scratching post you will need:
- plywood or board 20 cm wide and 50 - 60 cm long;
- rope or fabric;
- glue, stapler;
- glue gun or just glue;
- screwdriver
You can make the board yourself or choose the right size. It is not necessary to blindly follow the sizes - the main thing is that the animal is comfortable in height and width. You can also use corrugated cardboard glued in several layers as a base. You just need to think about a strong mount to the wall. Using a screwdriver, drill a hole in the board for fastening. If you need to prevent swaying, then make two holes at the top and bottom or both at the top.
Size doesn't really matter. The main thing in a scratching post is to fulfill its direct function.
Winding the twine around the base, apply glue in some places with a gun and lay the thread on it. This is necessary to prevent the wound rope from moving. If you don’t have such a gun, you can use simple glue, applying enough of it to attach the rope.
As fabric for the scratching post, you can use drape, overcoat cloth, Chelsea cloth, as well as fur or carpet. In this case, you can secure the material from the reverse side with a stapler.