Who doesn't love cats? Everyone loves cats! And many owners try to provide the best living conditions for their pets. Expensive bowls, good dry food, regular medical care. Of course, you still need a good sleeping place. They are expensive, but this is not a problem - you can do it yourself. This will be discussed in the article.
Step-by-step instructions for durable houses
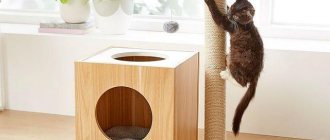
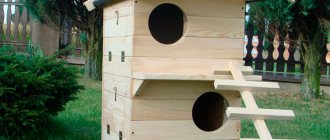
Wooden house
If you decide to make a house “for centuries”, it is recommended to use wood.
This is the best material for cat permanent residence.
For it you will need:
- plywood;
- electric jigsaw, wood saw, plywood saw;
- good wood glue;
- nails;
- carpenter's hammer;
- screwdriver with brush;
- brush;
- black paint;
- sandpaper;
- wear-resistant varnish
- fabric for bedding.
When everything is ready, you can start making:
1. You need to glue the sides to the plywood square. Ordinary carpentry PVA, such as “Moment Joiner,” works well.
2. Make identical pentagonal walls. It is necessary to cut a passage for the cat into one of them.
3. Insert the walls into the mold and glue.
4. Now make the base of the roof. To do this, just glue in 2 crossbars made of plywood.
5. Cut small rectangles from plywood - these will be tiles. If you're lazy, you can just glue 2 squares.
6. For decoration, you can glue fake doors, as in the photo.
7. Use a drill with a brush to go over the tiles. This will create an aging effect.
8. Now it's a matter of processing. The walls need to be coated with a good layer of varnish. It's better to just paint the gate.
9. All you have to do is put the pillow inside and a great permanent home is ready.
The bedding can be soft and made of fabric material.
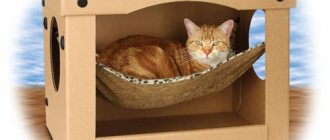
Shelter for homeless cats
If you decide to make a house for stray cats and kittens, fabrics will not work. You will need impermeable and warm material, and cheap one at that.
For it you will need:
- Foam thermobox. Sold in large supermarkets. You can save money and glue it yourself using polyurethane foam.
- Good tape, preferably plumber's tape.
- Any insulation.
- Plastic film for protection against mildew.
- A good utility knife.
- Marker for marking.
- Polyurethane foam or foam glue
- Fabric material for soft bedding.
First you need to prepare the input:
- Mark one side with a marker.
- Cut a hole using a utility knife.
Then you need to connect the walls and the lid:
- Apply foam glue around the perimeter. Stores sell special compounds from 3M, but you can also use regular polyurethane foam.
- While drying, secure the lid with good tape. Wait until completely dry.
Now you can make a crib:
- Place the cotton wool in a ZIP bag.
- Place inside and cover with a cloth.
Done, you can safely move the house outside. The foam will maintain a moderate temperature inside even in severe frosts and the cats will always be warm.
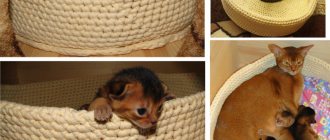
Materials
For a knitted house you need the following materials:
- knitting yarn 5 – 6 skeins;
- hook number 10;
- scissors.
In a couple of evenings, with basic knowledge of crochet, you can create a shelter for a cat. Such a handmade product can be given as a gift to friends who have a furry pet or even sold at a fair.
felted house
You can make a cat house with your own hands from wool. The home turns out warm and soft. The owners will receive a purr in gratitude. Now many people are interested in felting wool - this type of needlework has become especially popular. For those who are familiar with felting, it will be easy to felt a cat house. The process is long, not complicated, but it will take a lot of time. If you decide on the type of house and decide where the entrance will be, the principle of felting will be determined. It is also important to take measurements of your pet while he is resting and curled up in a ball. The main thing is to increase it by 3-4 times - wool tends to bunch up in things.
DIY cat house: how to make it
To make a house, you need to select natural threads that will not cause allergies in the animal.
The threads for work are taken as natural as possible so as not to cause allergic reactions. At the same time, they are dense and wear-resistant so that they retain their appearance after cleaning, washing and scratching. Average consumption is about 500 g of knitted yarn, wool or acrylic/viscose. The product is created whole or in such parts as:
- bottom;
- roof;
- side wall.
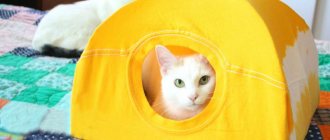
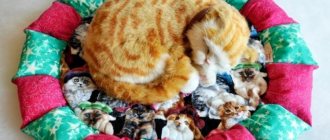
Cave house
It is a cone-shaped cocoon with an entrance on a wire frame, the circumference of which depends on the size of the animal. Use a thick thread, a hook 8-12 mm thick. They tie the hoop with loops, close the ring and knit using the double-sided fabric technique in a circle, decreasing by 3 loops every 2-3 rows until the required size of the house is reached. The end of the cave can be sewn shut or left open. When using knitting needles, a trapezoidal fabric is created with any elastic band, from which a cone is then formed and joined along the seam. A wire is inserted into a wide socket.
How to tie a needle?
A dome-shaped pouch with an entrance hole in the side wall, similar to an Eskimo dwelling. To create, you need hook number 8, knitting yarn 1 kg. Legend: ch - air loop, sc - single crochet. The beginning and end of the row are united by a connecting column. The height of the finished product is 20 cm, the diameter along the bottom is 37 cm. The technique is as follows:
To make a dome-shaped product, you need to purchase one kilogram of knitting yarn.
- Cast on 3 ch and close into a ring. There will be 41 rows in total.
- In the first three, increase in each, after 1 and 2 loops, respectively.
- 4-18 alternate rows consisting only of sc with increasing rows (every 2 sc - in 5,7, 9 and 11; after 4 - in 13; 5 - in 17).
- at 19-25 the entrance to the house is made. The first method: breaking the thread and skipping 10 loops, the left tail is woven into subsequent rows, forming a beautifully highlighted entrance arch. Second option: the entire row of sc, leave the last 10 loops, turn the work around and knit in the opposite direction from the wrong side.
- 26 all without extra charge, 8 chains are typed above the entrance.
- 27-41 rows of sc alternate with decreasing rows (every 4 sc - in 31, every 3-34, 36, 37, every 2-38, 39, every 1 sc - in 40 and 41) until the circle closes.
If knitting is limited to 20 rows, then the cat will get a nice bed instead of a closed house.
Which knitting method is suitable
The most convenient way to crochet a house is to get the desired shape easier. But if the housewife likes to knit, this is also doable.
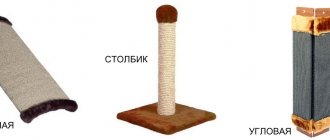
Short Crochet
The main technique that is suitable for a cat house is short crochet. The loops and posts are successively strung on top of each other, gradually creating the product. It takes patience and perseverance, but the results are worth it.
Tunisian knitting
Tunisian knitting is suitable if you need to make a large house for a Maine Coon or a cat that likes to stretch out its paws in its sleep. A long hook is used, on which loops are cast on, like on a knitting needle.
Circular knitting
Circular knitting is suitable for quickly making beds with low sides. The fabric is supported by four knitting needles, the fifth is used as a working knitting needle. The method is not suitable for complex structures.