In our modern times, it is customary to care for and love animals. The most common pet is a cat. The variety of furry friends allows a person to choose any animal: from the more active to the calmer. But any individual needs care, and a scratching post should be an essential element of a cat’s life.
Reference! A scratching post is a special device that allows animals to sharpen their claws.
It’s worth starting with the fact that sharpening of claws is required by the physiology of the animal. A cat will not be able to live in peace without sharpening its claws. Cats are very clean animals and carefully ensure that there are no unnecessary elements on their body. The scale that forms on the claws over time is this extra element. When sharpening on some surfaces, dead and keratinized particles are removed from the claws, which cats simply do not need. Additionally, the sharpening procedure prevents the cat's claw from growing into the cat's paw pad.
This need for constant sharpening of claws is characteristic of all members of the cat family: from a tiny kitten to a large lion or tiger. That is why you should not ignore the cat’s physiological need. Of course, cat owners don’t have to bother and don’t buy a scratching post for their pet, but then any furniture and rugs in the house will suffer, because their furry friend needs to sharpen his claws.
A cat scratching post must meet a number of mandatory criteria. These include:
- device security. Many scratching posts tend to turn over and fall, this can have a detrimental effect on the cat’s condition;
- upholstery material. Many cats are picky about the upholstery material, some need extremely rough and hard ones;
- medium height. The scratching post should not be too big or too small;
- functionality. The scratching post should have a lot of space, and there may also be additional devices in the form of: a bed, a feeder, and so on;
These are the main criteria that a cat scratching post must meet. However, it is worth clarifying that such a design should not be too complicated. As a rule, such goods are not accepted back into stores, and the cat may not at all like the owner’s purchase.
General recommendations
There are a number of rules that will help you prepare for work on arranging a hut for a cat.
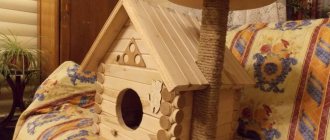
A small house for your pet
First, learn the most basic ones:
- Before you start building a house for an animal, think about what materials you will use. It is better to use fabric made from natural fibers and natural wood in such work. These materials are the safest for cats. But in any store they are expensive. And Chinese analogues, as a rule, consist of synthetics and plastic.
- You need to clearly understand what kind of house you want to make. To do this, draw it on a piece of paper in advance. Such a sketch will help you not to forget anything. You will also properly plan the purchase of materials and prepare the means at hand.
- This is a fun activity for parents with children. After all, participation in the creative process always brings joy.
Use only quality materials
Declaw surgery
Some cat owners prefer not to use scratching posts, but to solve the problem radically - remove the pet's claw phalanx or stick anti-scratch pads on the claws. This operation is similar to the removal of human fingers and makes the animal permanently disabled. A cat, deprived of nail phalanges, is forced to re-learn how to walk and jump, and will no longer feel like a full-fledged cat. An animal without claws loses its balance, feels defenseless and easily suffers damage to its internal organs. If a pet without phalanges accidentally ends up on the street, the chance of survival of such an animal is close to zero. Most veterinary clinics do not agree to perform such procedures.
Houses for cats step by step: main recipes
Making a cat house with your own hands is more fun with your children. Just give preference to safe materials. So, the simplest and cheapest option for arranging a hut is the following:
- You need to take a large corrugated cardboard box. It is better that the box has dimensions of at least 35 by 50 cm in width and up to 50 cm in height.
- Now you need to prepare the available tools: scissors, glue, a stationery knife, fine sandpaper, tape, pencil, colored paper, upholstery material and more.
- For the internal frame (laying on the floor), you can use foam rubber. But if it is not available, an unnecessary blouse or a piece of an old blanket will do. For the exterior decoration of the house, you can use colored paper. But it is more relevant to use boucle fabric or fur.
- Now let's start preparing the box itself. To do this, remove the stickers from it, glue the places where there are cracks with tape, cut off the burrs, and sand the roughness with sandpaper.
The creative process brings joy not only to children
- Draw a hole on the end of the box. To do this, place a saucer with a diameter of at least 20 cm on it and circle it around the edges. Then we cut out a hole using a stationery knife. Gently sand the edges with sandpaper.
- Once again we seal all the joints with tape or glue. The house should be durable so that the cat feels comfortable and calm in it. Dry the product before starting exterior finishing.
- Now we cover the house with colored paper or textiles. For the second option, silicone quick-drying glue is suitable. In this case, you cannot use a furniture stapler, as the cat may be injured from the inside of the staples.
- To match the size of the floor in the house, sew a small pad made of foam rubber and upholstery fabric.
Make it as easy as shelling pears
Now the house is ready for use. And you can let your pet into this cozy nest. It can be supplemented with glued toys, hanging threads, and sparkles.
WHAT TOOLS AND MATERIALS WILL WE NEED?
To make your own personal apartment for your four-legged friend, you will need very few materials and tools. Moreover, you can easily find most of it in a storage room, garage or shed: as a rule, you will only have to buy elements of the external finishing of the structure in the store. Before starting work, you will need the following tools and consumables:
- tape measure and long ruler;
- pencil (you can take either a simple or a construction pencil);
- jigsaw (it’s faster and more accurate to use a jigsaw; in extreme cases, a manual one will do);
- screwdriver, electric drill, set of drills and bits for them;
- drawing compass;
- construction stapler with staples;
- hammer;
- hot glue gun;
- a sharp knife (can be a stationery or construction knife), scissors;
- if the assembly will be carried out in a house (apartment), then it is worth preparing a household vacuum cleaner;
- stool or workbench for assembly.
Directly for the construction of cat apartments we will need:
- plywood or chipboard, OSB boards 9–12 mm thick. I used an old countertop;
- timber for making support pillars. Some advise using metal or plastic pipes instead of timber, but with them the structure is not as strong and durable;
- fabric for upholstery of beds and cat houses. Carpet is optimally suited for this purpose;
- a set of screws of various thicknesses and diameters for wood;
- furniture corners for reliable fixation of all structural elements and arrangement of the hammock;
- jute or hemp rope with a diameter of about 1 cm.
As you can see, most of the tools are usually always at the disposal of the home owner. The missing materials for assembling the base of the structure can easily be found by rummaging around in the garage and storage room. And it won’t take much money to purchase everything you need - at least many times less than the cost of a ready-made cat house.
Popular options
The cat building may have a non-standard shape. You can make it from available materials. It may also not have a scratching post at all. Let's consider several of these options:
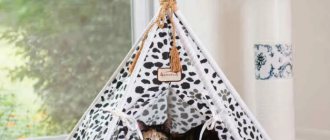
- Wigwam . The structure is made of metal rods in the shape of a tent. Then it is covered on all sides (except one) with fabric. Foam rubber and bedding are laid on the floor of such a house.
The wigwam itself is quite an interesting object
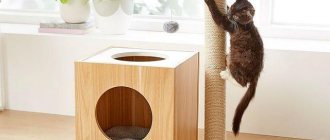
- Ottoman house . A standard square ottoman usually consists of a wooden or MDF structure. Therefore, we remove the fabric from the bottom of the pouf and cut out a hole with a jigsaw. Then the wooden part can be covered with latex paint, and a soft lining can be placed inside.
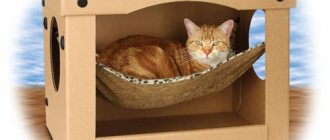
- Hammock house . Any cat is interested in new places. Making a hammock for her to relax is very simple. To do this, you can use: a small coffee table, an armchair or a chair. But these pieces of furniture must have 4 legs. So, at the level between the floor and the tabletop/seat, the canvas is stretched. On its sides two fabric strips should be sewn to each. Then the canvas is attached to the legs using ties. And voila!
Hammock house for cats
- Triangle house . This is the simplest type of pet hut. To make it you will need 3 small pieces of OSB. They can be cut from a thin board, 6 ml thick. The pieces should be equal in size and rectangular in shape. Then we place the first piece on the floor, and on top of it we make a dome from the remaining two. We fix the parts together using nails or screws. Additionally, you can use metal triangles. Using a glue gun or a furniture stapler, we frame the outside of the house with fabric. We put a soft lining inside.
- Shelf house . From available materials (osb boards, boards, laminate or chipboard) you can prepare shelves of various levels. But its main task will be to become a place for the cat to relax. So, you will need to cover the resulting piece of furniture with fabric and place it on the floor.
Wall-mounted option in the form of a shelf
From the box
A box that has gone out of use (from food or household appliances) can be used for the benefit of your beloved cat.
You can involve children in this activity; they will definitely like this idea.
You will need:
- cardboard box;
- carpet;
- moisture-repellent material;
- stationery knife;
- glue;
- markers, rulers and the like;
- scotch.
Follow all steps according to the following instructions:
- Mark the main and emergency passages with a marker, and then make holes. The front entrance needs to be cut out larger compared to the second entrance.
- Seal the edges of the home with tape.
- Cut out pieces of moisture-repellent material to fit the walls. Carefully push them through the “entrance”, gradually attaching them to the inner walls. We recommend taking a handy hot melt glue gun; it is not harmful and does not leave any unpleasant odors.
- Also glue the joints of the box with moisture-repellent material. In this case, parts of the home will not accumulate moisture, which will have a positive effect on its service life.
- Now you can do the exterior finishing, cut pieces from the carpet. It is quite difficult to cut, so be careful and extremely careful, otherwise you may get hurt. Make a reserve of 2 centimeters of material for the entrance. Trim the edge of the carpet crosswise and glue it, tucking it inside the home.
- The cat's home should stand for at least 3 days, during which time the glue can dry well. After this time, put a pillow inside and bring the cat to rest, perhaps he will immediately fall in love with his new home.
These DIY options can be improved slightly. For example, a multi-level structure is not so difficult to assemble; it can be created using cardboard and tape.
Houses with scratching post
Every cat needs to sharpen its claws. If your pet is indoors and it is not possible for him to go outside regularly, then he will have to do this at home. Without the claw grinding procedure, the owner will have to trim them.
And if there is no scratching post in the house, the pet will begin to sharpen its claws on the furniture.
Therefore, it is better to make a house for a cat with a scratching post, which will fully perform its intended function.
Don't forget about the scratching post
Materials
First decide on the construction site. Then you need to measure the allotted “angle” in height and width. Now prepare the materials most convenient for sharpening the animal’s claws. This:
- carpet;
- tapestry;
- jute rope;
- fur;
- tree.
A good option with a scratching post
Carpet is a fairly durable and soft material. The cat will sit comfortably on it and also comfortably sharpen its claws on it.
In addition, you will need:
- plywood sheets;
- wooden beams;
- plastic pipes as support pillars;
- self-tapping screws;
- corners;
- screwdriver;
- jigsaw
Choose a variety not only according to taste, but also according to convenience.
But these tools may not be found in the house. Therefore, it is worth taking care of their availability in advance.
What and where to buy?
To build a hut with a scratching post for an animal, buy a whole sheet of plywood at once - 1.5 by 1.5 cm. Then cut it into pieces: 0.50 by 0.75 cm.
For the support (post), you can use a regular beam, which will need to be divided into several parts. Choose timber up to 2.5 m long.
Sketch first before making
It is advisable to choose plywood sheets with a thickness of at least 10 mm. Since the cat will often jump on them in the future. And this material must be strong.
Advice Do not buy the most expensive carpet. Give preference to the cheap option. You can also ask the seller to sell you scraps of this material.
Jute rope can be found in every hardware store or market. The difficulty is that it is sold in bulk . You'll have to buy a whole skein or look for a store that sells rope by the meter. But the price of a cut product is much higher. Take a rope at least 1 cm thick.
Budget and convenient
Safety fastening elements are purchased for the building: corners and triangles for better fixation of structures.
Manufacturing process
When the design of the hut is completed and all materials are at hand, you can begin to work. The basic frame can be one-, two-, or even three-tiered. The number of platforms also depends on the number of cats in the house. So, if two pets live in an apartment, then each of them should have its own seat.
When a scratching post is replaced by a house
So let's get started:
- A wooden beam is attached to the plywood base.
- You can put a plastic pipe of suitable size on it (so that the pipe fits tightly to the walls of the beam and does not twist).
- If we make several platforms, then at some distance from each other on a single base we fix 1-2 more beams.
- Each of them has its own platform (at different heights). We fix them on top with self-tapping screws and metal corners on the sides.
Make designs easy to carry
- The first shelf must be fixed not only to its beam, but also be connected to the second. Therefore, a hole for the second beam is prepared in advance in the plywood. He will have to go on the board. The second shelf is attached to the third in the same way.
- Now you can begin framing the plywood surfaces with carpet. Here you can use a stapler or use regular nails and a hammer. If you decorate the house with ordinary fabric, then soon the building will need its replacement. Most likely the animal will want to sharpen its claws on the fabric too.
- Tie all the pillars from beginning to end with rope. Try to keep their rings tightly adjacent to each other.
Now the scratching post structure for your pet is ready! Additionally, you can decorate it with colored felt, threads with buttons, sparkles, and foil.
From paper tubes
Weaving specialists from such tubes create simply incredible masterpieces. By taking an armful of newspapers you can create a wonderful home. For a cozy home you will need:
- glue stick;
- scissors;
- wooden skewers;
- a pack of newspapers.
Step-by-step instruction:
- Spread the entire newspaper into strips 8-10 centimeters wide. Wrap all the ribbons around the skewers, hooking them at one end. The edge of the resulting tube must be glued, otherwise it will unwind back into a ribbon.
- Weaving should begin from the bottom of the cat's house. We create a crosshair in the middle, and then transform it into a circle. Try to weave the tubes together more tightly.
- Then we attach the tubes along the contour; the main frame will rest on them. First, it is important to make a frame around the perimeter of the bottom.
- Next we will raise the cocoon, confidently increasing the volume of the tubes. You can fasten them together with hot glue.
- We don’t use standing tubes, then we will braid them to make the house look even more beautiful.
A soft pillow should be placed inside for the comfort of purring. Throw his favorite toy inside, then the pet will quickly get used to his house.
Scratching post options
In addition to the most common scratching posts for cats, you can make simple but original analogues. So, it is permissible to make a scratching post in the form of a picture. To do this you will need a simple piece of plywood (rectangular) and carpet.
When there is a lot of space, you can afford to build a large house
The carpet is fixed to the board using nails and a hammer. The corners of the fabric should be hidden on the back. They even attach a mini hanger. Then the finished painting is hung on the wall in the corridor or room. It should hang at the height of the pet. This refers to the cat's height at the withers, and not from the floor to the tips of his ears.
VIDEO: How to build a house for a cat with your own hands?
Cat's house
Do it yourself
Cat wigwam
Print out a photo of the finished structure, then it will be easier for you to assemble the wigwam. The following materials will be required:
- Twigs or branches 6 pieces. Their upper parts are connected, and the lower parts are moved apart.
- Rope - for attaching the support.
- Cardboard is the base of the wigwam. A hexagon is cut out and trimmed with fabric (preferably with water-repellent properties).
- Glue – for joining fabric.
- Fabric - cut into 6 triangles with 2 equal sides, a hole is made in one of them for entry.
The elements are fastened so that it is possible to install our branches in the seam. Leave the material to dry for a day so that the smell of the glue disappears and it can finally join the pieces of fabric.
A frame is installed in the wigwam, and the edges are sewn to the base. Not all pets like to sleep on cardboard, so you can put an unnecessary sweater at the base of the wigwam.
House
Try to take the words “cat house” literally and make separate apartments for your pet. It could be a minimalist plywood house, stylized as a country house, or a luxurious mansion - an exact copy of some castle. Huge scope for imagination!
The advantage of such “apartments” is their aesthetic appearance. The house can be decorated with various decorative elements, such as flowers in pots. Remember: the items chosen for the design must be safe for the pet.
Photo: picclick.com
House "Zoogurman Empire" for dogs and cats
RUB 1,550
Buy
Soft bed
Does your pet like to sleep on your pillow and other soft objects? Then he will definitely like the soft bed. These beds come in different colors and shapes, so you are sure to find an option that will not only please your pet, but will also suit the interior of the room.
Photo: ebay.it
Curver Pet Bed with Knitted Comfort Pillow
RUB 7,994
Buy
Device
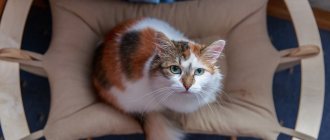
Cat on a bed
To tear through the cat’s claws, at worst, a simple post or board will suffice, pos. 1 in Fig. However, it is better to complement it with a bed, pos. 2. Firstly, in nature, cat markers are not equivalent. One of them, with an elevated bench for relaxation and an observation deck above it, is the main one, the capital, so to speak. It is not necessarily in the center, it can be on the periphery. The cat's territory in the home is limited. You can do without boundary (contour) markers, but the main one will give the cat dignity, which, in turn, can well decorate the interior, see fig. on right.
Scratching posts for cats with a bed
But to combine a scratching post with a house, and even installed below, as in pos. 3, should not. In natural conditions, the cat's den is never combined with the main marker, for safety reasons. Some exceptions are cats of Asian origin: Siamese, Bengal, Abyssinian, etc., the territory of whose ancestors in the jungle is limited to an area of just one tree. But then the house must be elevated and equipped with 2 exits: a spare one perpendicular to the main one and opens onto an additional platform, pos. 4.
It is best if the scratching post with a bed and viewing platform is not a straight column, but a branched one, somewhat reminiscent of a tree, pos. 5. This can be built from cardboard pipes, see below. And on to the next. rice. – drawings of scratching posts with a climbing frame and platforms: on the left for energetic and jumping cats, and on the right for phlegmatic and sedate cats.
Drawings of scratching posts with beds and climbing frames
About the sites
Houses, toys, climbing frames and beds for cats are actually a different topic. In relation to scratching posts with platforms, it would be appropriate to say that the bed and the “observatory” do not need to be covered: cats have soft fur of their own. If you want to visually ennoble the product, then you don’t need to fasten the fabric like furniture, with nails or staples: metal can tear off a claw if it gets caught, and it conducts electricity too well for cats.
Cat areas are lined with PVA glue: when dried, it is odorless and is harmless and indifferent to cats. Step-by-step instructions for covering a cat bed with fabric are as follows:
- We cut with an allowance for the edge thickness plus 25-30 mm;
- We cut out the base (plywood or board 16 mm thick) with rounded corners so that the folds on them are small or can be completely dispersed;
- Apply glue to the upper part in rays and along the contour, see fig. on right. It is better to do this with a brush to immediately disperse the glue in a thin layer;
- Immediately, before the glue begins to set, we apply the fabric;
- We coat the edge with glue and, together with it, under the platform along the contour by 35-40 mm;
- We fold the fabric over the edge and tuck it under;
- From the bottom we pull the tight-fitting thread with a needle, zigzag along and across;
- Straighten the folds at the corners;
- We dry it for a day, there is no need to apply pressure;
- We cut off the excess fabric at the bottom along with the threads;
- Instead of overcasting, we impregnate the fold of the fabric on the underside with the same PVA, diluted by half with water.
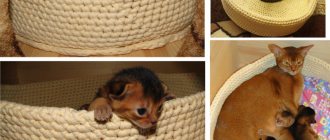
Knitted basket
The simplest and most minimalistic option. You can put such a house anywhere, and making it yourself is as easy as shelling pears (there are many video tutorials on the Internet that will show you how to easily make a basket). A voluminous knitted bed will add coziness to the interior. Just choose the right color and spend a couple of hours making it.
Photo: ebay.it
Animal bed "Cascade"
RUB 5,515
Buy