We always wanted to have some kind of corner for the cat where she could jump and hide, something aesthetically pleasing, interesting for her and useful for us. As a result, inspired by the projects of other people, I made a play complex for cats with my own hands. I hope you like the climbing frame idea and also get inspired and enjoy the cute cat photos.
Preparing the necessary materials
How to make a house for a cat with your own hands: patterns
To make a cat house you will need the following materials:
- pine or plywood boards;
- steps (30 cm by 120 cm)
- birch plywood 50 cm by 50 cm;
- poplar board 7 mm by 7 cm;
- oak dowel;
- carpet 100 cm;
- upholstery;
- foam;
- screws for connection;
- shelf brackets;
- LED Strip Light;
- wiring.
Construction materials
Construction materials
Most often, leftover building materials are used to build a house. When choosing them, you should pay attention to the absence of a strong odor, in addition to the smell of wood itself. The material should not be electrified; it is better to avoid silk. The following building materials are used: plywood, chipboard sheets, thin boards, rods, newspaper tubes.
The vertical or inclined part can be made from a plastic sewer or paper pipe, a tree trunk, or a wooden beam. The inclined part is also decorated with boards, chipboard or fabric. A hammock is usually constructed from rope and thick fabric. The site is built from wood, chipboard, plywood.
Note! Wood is not sheathed, but plywood and chipboard must be covered with fabric. You can also use a ready-made strong branch and use it to create an unusual house for your pet.
Types of houses for cats
Beginning of work
A DIY climbing frame for cats made from a tree branch will be a wonderful and unusual addition to the interior, the main thing is to find a suitable tree. It needs to be firmly secured where the cat house will be built. The cut branches of the tree will become the places where the shelves will be located.
Important! One of the shelves must be located at the top, as animals love to climb high.
Preparing the necessary materials
Rope bridge
Step-by-step instructions for creating:
- Divide the poplar leaf into 6 parts.
- Coat each piece with varnish or a mixture of tung oil and wax.
- Wait until completely dry.
- Stack all the pieces on top of each other and drill the corresponding holes using a drill.
- To connect, you can use either nuts or wooden beads. Connect the parts and attach to the cat house.
Making a rope bridge
Cutting parts
When making a wooden cat climbing frame with your own hands, you should use a jigsaw to cut all the parts, measure the vertical and inclined “pillars” to the required size, and also saw off the excess. Next you need to prepare the base and side parts.
How to cut parts
Connections
In order for the cat house to be strong, appropriate holes should be made in the beams and bushings should be inserted into the base. In addition, it is better to secure the side parts not with small nails, but with self-tapping screws.
Making connections
Gluing the main structure
After all the parts are prepared and connected to each other, you can begin upholstering and varnishing the house. The corners must be carefully glued so that there are no gaps.
Gluing parts of the structure
The assembled rope bridge must be connected to the main structure. To do this, securely fasten it at the very entrance to the house and on the opposite shelf.
Rope bridge
Making a cat climbing frame
Step-by-step instructions for creating:
- Make a diagram with the dimensions of each part.
- Prepare the necessary building materials.
- Cut each piece to size.
- Connect all the parts together.
- Cover with varnish or decorate with fabric upholstery.
- Add additional entertainment elements: tunnel, rope, bridge, hammock, slide, wheel.
Construction connection
Construction of a drawing
This stage should be approached as responsibly as possible, since a correctly constructed drawing is already 50% of the work. If you do not have drawing skills, you can use ready-made drawings.
Please note that for cats it is recommended to use a high structure, since cats love to climb on tops; you can even place part of the structure on the wall, as shown in the photo below.
But, of course, the dimensions of the structure directly depend on your capabilities. If your living space does not allow you to make a large and tall complex, you can get by with a more compact one, your pet will be happy with this too.
Some examples of drawing construction:
Of course, try to diversify your complex as much as possible with various entertainment structures:
- ladders to climb;
- various posts wrapped in jute rope so your cat can sharpen her claws;
- ropes that will be interesting for your pet to play with, and more.
Well, cats not only love to play, but also to hide somewhere in a secluded corner to pamper themselves for their own pleasure. Various cozy houses or loungers are ideal for this; make sure that at least one such structure is in your design.
In fact, there are a huge number of variations in the construction of drawings; use a little imagination, and you will get a unique complex for your pet.
Play complexes for cats - what are they?
The cat complex can be placed on the walls, the family can be given a separate room, and the most popular option is floor-mounted, in the form of independent furniture. Let's take a look at them to choose the right one.
A wall cabinet can be placed on one or more walls. Its various elements in the form of shelves, baskets, floorings, hammocks, houses, scratching posts are securely fixed at different levels, right up to the ceiling. This design is convenient for cats, it does not take up space in the room, and it is interesting to watch skilled animals. At the same time, traces of their movements remain on the walls, and the complex itself, when dismantled, leaves many unnecessary holes.
It is wise for a cat family to allocate a small room. In addition to entertainment and relaxation elements that are placed on the walls, floors and even the ceiling, there is a dining room and a cat bath. As a result, all odors remain in one room.
The most popular are floor complexes. The basis of such structures is the vertical supports and shelves placed on them. Abroad, such products are called “cat trees”. It is easy to move and install anywhere in the room.
With your own hands you can assemble a set of floor coverings of the required size and color, as well as provide an individual set of elements. We will look at just such a design using a manufacturing example.
Drawing up a drawing and cutting out parts with examples
Before building a house, you need to think it through to the smallest detail, and this is where a drawing is needed. You can take a ready-made one or design it yourself. If you have no previous experience in this matter, then it is better to take drawings without complex multi-component structures.
DIY cat scratching post: options at home
When preparing a drawing yourself, you need to pay attention to:
- house dimensions. It should be only slightly larger than the pet;
- The drawing must indicate the dimensions of each part.
Note! An important condition is the size of the living space. If the area of the apartment does not allow for the construction of a large cat dwelling, then a structure equipped with a scratching post, a stand, and a hanging ball will be sufficient.
Drawings of cat houses
After all materials and tools have been prepared, you can begin cutting out parts. It is necessary to strictly follow the instructions for making a home structure.
For a plywood house, you need to cut out a rectangle with dimensions of 55×40 cm and a square of 30×30 cm with a jigsaw. Three shallow holes with d = 3 cm need to be made in the rectangular part, the structure posts will be inserted into them. One similar hole is made in the square. To make the upper part, you will need a piece of wood, from which you need to cut 2 round parts with d=40 cm. A hole with a recess should be made in the center of each.
Homemade cat house
Vertical sticks need to be cut into the required sizes: 85 cm, 120 cm, 120 cm, 173 cm. They will be inserted into the holes. The side parts are also cut out with a jigsaw, and through holes are made.
After all the parts are cut out, you should do the upholstery. To make it soft, the floor of the house is covered first with foam rubber and then with fabric. The walls are also decorated with fabric and foam rubber, everything is attached with a furniture stapler.
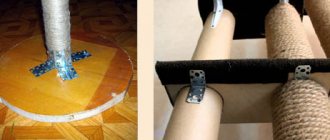
To strengthen the structure, it is necessary to prepare a pair of bushings; they are fixed in the center of the bases, and appropriate connectors for entry are made in the beams. This way the structure will be the most stable.
Note! Vertical beams are wrapped with hemp rope. The surface is smeared with glue and the wood wrapping begins.
Cat shelf
To make it you will need a pine or oak board. It should be cut into shelves of the required size. Next, you should connect all the parts together using self-tapping screws or wood glue and a furniture dowel.
Cat shelf
After the wall structure is assembled, it should be examined again for nicks and irregularities. If necessary, it is recommended to clean them, after which the shelf is varnished.
Setting up the glow strip
The luminous tape is installed along the outer perimeter of the house, and the appropriate settings are made.
LED strip for a cat house
Upholstery of steps
The upholstery on the steps can be secured with special hat nails or a stapler.
Decoration of steps
For your information! A little catnip will allow the owner to attract the attention of his pet to the new design.
cat house
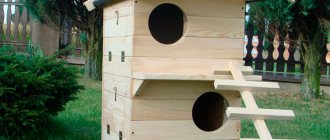
A cat house is a convenient and useful structure not only for the cat, but for other family members. This will allow the owner to forget about the torn wallpaper and sofas and give the cat the opportunity to relax in privacy. If there are children in the house for an animal, this is simply a necessary design.
House for a kitten
DIY automatic cat feeder
The best house for a kitten will be one with as much entertainment as possible.
Note! When designing a home for a small kitten, it is important to consider its height so that he can climb into it.
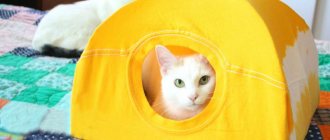
You should not build a house for growth, in this case the animal will be uncomfortable and uncomfortable in it. Therefore, at this age, owners often prefer soft houses made from newspaper tubes or cardboard blanks. For a small pet, a regular cardboard box or a light fabric house will do.
House for a kitten
Multi-story plywood structure
If you can keep your pet occupied by arranging for him a play complex with ladder shelves, labyrinths, several hanging toys and a scratching post, perhaps he will leave your things alone and will not take them to the corners even in your absence.
Multi-storey plywood house
To make it, in addition to plywood, you will need furniture corners, sandpaper for cleaning cut areas, glue, screws and furniture corners. It is better to first upholster the house with foam rubber, and then with a dense, not too easily soiled fabric.
A piece of carpet will also come in handy - this material is quite durable and will last longer.
Production of a gaming complex in stages
Manufacturing diagram with dimensions
A durable house will be made from plywood, fiberboard, chipboard. You can donate several boards for it - the structure will only benefit from this.
So, step-by-step instructions for making it:
1First, draw a detailed diagram indicating the size of each part. Even if it is quite simple, you should not ignore this stage. It will be a shame if, when joining individual parts, they do not fit in size.
2Plywood, if desired, can be bent and products of complex shapes can be made from it. To do this, frequent blind cuts are made in it. A similar method is used when bending chipboard and MDF. In the future, to strengthen the structure, the resulting grooves can be filled with glue. Curvilinear parts from this material are cut out with a jigsaw.
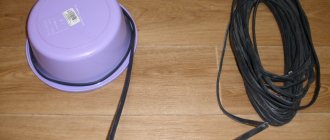
3You can replace wooden blocks with PVC water pipes. To connect them, fittings are used (corners, tees, etc.), which are attached with glue. The pipes must first be degreased with solvent or alcohol, joined to the fittings and marked with a pencil where the glue will be applied. Fixing the elements motionless is required for 5-6 minutes.
4To “build” a plywood house with 4 walls, a floor and a roof in which a cat will rest, you will need 6 square or rectangular parts. Such a dwelling is located at the very top of the structure so that the cat can have a greater viewing angle. And the temperature closer to the ceiling is always higher, and there are much fewer drafts.
5Cats don’t really like closed boxes, so provide not one, but a couple of openings in the house. Be sure to sand the cut areas so that the animal does not get hurt.
6The remaining details of the gaming complex are selected at your discretion, depending on the inclinations of the animal. To fasten pipes or bars in rectangular or round wooden pieces, you will need to drill holes of a suitable diameter.
7 Cover not only the sides of the structure with carpet or foam rubber, but also the inside surface of the house so that the animal feels comfortable in it.
8To make the structure strong, use metal corners to connect the parts.
9Apply a layer of glue to the wooden blocks or PVC pipes and wrap them tightly with hemp or jute twine, tapping it well against the surface of the block with a hammer. It will be more convenient for the cat to climb them to any floor.
10 You can attach a miniature springboard to the house, along which the cat will climb up. Don’t forget to build an observation deck - animals love to climb up to be able to have a good view of the room.
11Make sure the house is securely fastened to the wall or floor. If it collapses one day, the animal will be wary of it and is unlikely to agree to live in it.
The smell of freshly cut boards or glue-soaked plywood can repel a cat. They must be well aired before assembly.
Attaching a tree to the house
The cat really likes to climb tree branches. Do not deny her this pleasure; build a device for her from any available means - PVC pipes or wooden blocks covered with jute rope or covered with carpet.
You can even bring part of a real tree with large knots from the forest.
Tree for a cat in an apartment
1To prevent the animal from dragging the bark all over the house, it must first be cleaned.
2 Carefully sand each of the branches so that the animal cannot get hurt.
3For ease of climbing, attach several viewing platforms to large branches, on which the cat can comfortably lie down and watch those around him. They can be attached using bolts.
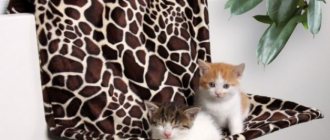
4You can hang a hammock on one of the branches. Stretch its ends well so that the animal can climb into it comfortably.
You should not use leather or leatherette for upholstering a lounger - cats do not like slippery surfaces that absorb heat.
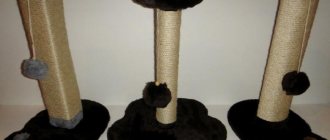
Making a scratching post
Scolding a cat for sharpening its claws is pointless . Indeed, in the wild, when animals climb rocks and trees, they wear off automatically. In an apartment they don’t have this opportunity, and their overgrown claws get in the way.
You can protect furniture and door frames from damage by attaching a wall-mounted, floor-mounted or hanging scratching post to your house.
House with scratching post
Let's describe how to make a house with a scratching post:
1The most convenient design is a column or rectangle with a height of 9-10 cm. Its width should also be sufficient - from 8-10 cm. At the top of such a structure you can arrange a comfortable lounger.
2The scratching post is attached using furniture corners to a cross-shaped, rectangular stand, which, in turn, is screwed to the floor.
3To cover it, you can take thick jute twine 0.5-1 cm thick, carpet or thick burlap. Synthetic rope should not be used - if an animal gets caught on its fibers, it can damage its claw. The twine is tightly glued to the surface, while being tapped with a hammer.
4As a scratching post, you can use a rug attached to the wall, a carefully sanded log, or even a piece of wood brought from the forest. Before installation, all small knots must be removed and sanded well.
5Hang a couple of your favorite toys next to it - they will help attract the animal's attention.