Dear cat lovers, today I want to give you advice on how to make a hammock for cats with your own hands.
And in this article I will look at 7 types of hammocks for cats. I wrote in great detail in this article about why cats love hammocks and how to choose the right one. I advise you to read it. Very useful in production.
And now I will briefly introduce you with a photo to the technology of making such a favorite sleeping place for cats as a hammock. So, here I go.
Bed in the form of a slipper
Another good sleeping place for cats is slipper-shaped beds.
Cats like to sleep on soft house shoes, so a large slipper is an ideal bed for them. This “sleeping bag” will be a warm and comfortable corner for both cats and cats with kittens.
The pattern includes two parts: “top” and “sole” (each consists of 2 parts: top – 52/42 cm, bottom – 54/38 cm). Craftswomen advise choosing dense natural material when making a bed for cats, for example, denim.
First, a mattress is made in the shape of a sole, stuffed with filling, and quilted with nylon threads. Next, the 2 upper elements are stitched, but 7 cm are left so that you can turn them inside out and fill them with stuffing.
After filling, sew up this area (use a blind stitch). The top is stitched through and through by hand using parallel lines. The last step is to sew the top to the “sole”.
Care products
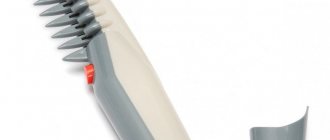
Vacuum cleaner
Battery-powered mini vacuum cleaner for combing cats.
Price: 586 rubles.
Buy
Brush glove
A simplified version of the previous device, which copes with its task no worse.
Price: 255 rubles.
Buy
Anti-flea collar
Silicone collar with special impregnation that repels fleas and other parasites.
Price: 58 rubles.
Buy
Swim bag
A mesh bag in which you can bathe an aggressive cat, trim his nails, vaccinate him or clean his ears.
Price: 336 rubles.
Buy
Sewing a bed with sides
Do-it-yourself hammock for a cat
To make such a product, you will need a piece of foam rubber or padding polyester, suitable fabric, thick cardboard, scissors, a needle, thread, a ruler and a pen. You can use an old unnecessary pillow as a base. It is necessary to cut three parts: two narrow rectangles for the sides and one large one for the base (bottom). They take the part that will be the bottom, round its edges, ultimately forming an elongated oval.
For reliability, you can sheathe the edges of all three blanks to prevent the padding polyester from falling out and sliding. The sides are connected to each other. After this, they take the fabric, lay it out on a flat surface and cut it out according to the size of the padding polyester blanks (cut old pillow). Having cut out a rectangle of sufficient length, grind it down in the middle and put the sides on the part.
Next, the side is connected into a ring, the allowance is packed inside, making a secret stitch. After this, the sides are sewn to the base. This can be done with a machine stitch, pinning the board to the base with the edge matching.
An original lounger can be a model in the form of a sofa. To complete this you will need polystyrene foam, ten-centimeter thick foam rubber, as well as textiles. In addition, you will have to use glue in the work. Four parts are cut out of foam plastic: the base, the back and two sides. In this case, you should get two large rectangular blanks and two small ones.
The back (large part) is glued to the seat, and the sides are glued to the sides. It turns out a kind of frame, similar to a sofa. To refine the structure, it is thickened with foam rubber, cut to the same dimensions as the first four parts. If you want to make the sidewalls soft on three sides, take measurements and cut out elements of greater width.
After the foam rubber is glued, you can begin making the upholstery. To prevent the product from making an unpleasant squeak in places where there is no foam rubber, the cover can be sewn from dense fabric. For example, fleece or textiles with large pile, which are used in the manufacture of blankets, are well suited for this. If you have an old blanket at home, that will do too.
Having taken measurements of the sofa, they make a pattern for the cover, then lay it out on the fabric, cut out and assemble the upholstery on a sewing machine. In this case, you can also use elastic textiles: they can stretch and therefore fit better than regular fabric with plain weave threads. This material is called bielastic; it stretches both lengthwise and crosswise. Having sewn the cover, it is put on the prepared base.
Recommendations to help ensure animal safety
When creating or purchasing a ready-made hammock, you should remember that only the safety of your pet can be higher than the comfort of your pet. Of course, the design should use materials that are compatible with the interior of the house, but if this contradicts the safety of the cat, it is better to ignore this factor.
Tip #1
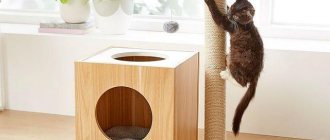
When choosing a material for a hammock frame, do not forget that when jumping, crampons create a high load on the entire structure. For this reason, you should not use flimsy materials when creating a frame. The best solution would be to use available means: boxes, thick cardboard, wooden boxes and plywood boards, since they have sides that create a feeling of safety for the animal.
Tip #2
When choosing padding material, it is better to give preference to foam rubber or padding polyester. These materials are quite soft, they do not wear out, and you do not need to spend a lot of money to buy them.
Tip #3
If the bed was created for a kitten not accustomed to a litter box, or a sick animal, its bottom should be made waterproof using film or oilcloth, which can be easily changed.
Tip #4
Before you start creating a cat bed, you should study your pet's behavior and preferences. Observe your cat and find out where she hangs out most often and what surfaces she likes to sleep on. These simple steps will help you choose the ideal materials for the design that will be pleasant to the animal.
Tip #5
If the hammock will be installed outdoors or in a cool hallway, its bottom must be insulated with foam plastic. This solution will not allow your four-legged friend to freeze from the cold coming from the ground.
Tip #6
If you decide to install a hammock on a table or windowsill, make sure that the structure is stable. Cats love to jump and move quickly, and a poorly secured bed will sooner or later fall, scaring the animal or harming it.
By following the tips listed above when creating or purchasing a bed, you will ensure your pet not only comfort, but also complete safety.
To summarize, it is worth noting that simple designs can be made from absolutely any available means. To create one, you don’t even need to go to the store: just find some old clothes, pick up a pair of scissors and a needle, and use your imagination a little. The result will not be long in coming, and in the end, having invested diligence, love and care into the work process, you will get a good hammock for a cat who will be happy with such a gift.
Idea for creating do-it-yourself beds
How to make a hammock for a summer house with your own hands
We offer a small master class on making beds for cats. To begin with, a budget and very practical option is a sleeping place made from an old sweater. All you need is an old sweater, padding polyester for filling and thread.
A cat bed can be made from available materials.
This is how you make a sofa for a cat yourself:
- The neck of the sweater is cut off and sewn flush with the shoulder seams.
- The stitching is done at the level of the sleeves.
- The sleeves, the space between the sleeves, as well as the body of the future bed are stuffed with padding polyester.
- The bottom of the sweater is sewn.
- The sleeves (in the cuff area) are inserted into each other and sewn together.
- The resulting ring from the sleeves is stuffed with padding polyester and sewn to the base. The sofa is ready.
Sewing a cat bed is not difficult.
If desired, you can decorate the bed with appliqués or accessories based on the theme - cat figures, paw prints, bows, and the like. By the way, you can additionally use an old blanket inside the bed to make it softer for your pet. But this is at your discretion.
You can choose any fabric for the bed.
If you are not afraid of complex tasks and have cutting and sewing skills, you can also do a more complex model - a soft sofa made of foam rubber. The algorithm of actions is as follows:
- First, a drawing is made.
- Marks are made on a piece of foam rubber in accordance with the drawing.
- The side parts are sewn together.
- Then a cover is made and the foam “frame” is covered with fabric.
- An additional blanket or fur lining is placed on the bottom, but this is at your request or at the request of your pet.
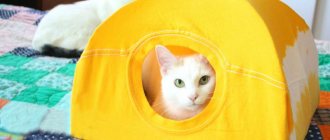
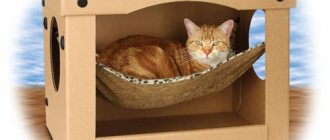
Cats love to sleep in boxes.
You can come up with the idea of a bed yourself, relying on the materials you have at hand. For example, an old pillow, polystyrene foam, a cardboard box, a stool that is no longer used for its intended purpose, and much more are quite suitable for constructing a sleeping place for a cat.
The bed can be a flat pillow.
If your house is home to more than just one cat, but a whole cat dynasty, you won’t be able to get by with just one sleeping place. A good option in this situation is a wooden bunk bed. This model looks very unusual and can perfectly decorate any interior.
You can build a whole house for your pet.
Bunk sofas have their own requirements:
- The structure should be as stable as possible, because cats will jump on it and possibly play. Therefore, ideally, a two-tier bed should be screwed to the floor to avoid falls and other troubles.
- You need to install such a bed where it will be convenient for both pets. If they prefer dark secluded corners to relax, then a bed placed near the window will always be empty.
- The distance between the top and bottom shelves should be approximately 40 centimeters, then the pets will feel comfortable there and it will be convenient for them to climb on and off.
- It is better to mount ladders and scratching posts separately. Cats will definitely not use such devices while sleeping, but the degree of comfort will decrease significantly.
Wooden bunk beds are complemented by purchased or homemade mattresses. Choose ones that are easy to wash and dry quickly.
As you can see, in order to choose or make a suitable sleeping place for cats with your own hands, it will take time, effort and imagination. By choosing the right shape and source materials, you will provide your pet with a comfortable lounger, and save yourself from additional cleaning of sofas and armchairs.
Purpose of the design
Any pet tries to find a cozy place to rest. Often the choice of a pet does not coincide with the preferences of the owner, because not every owner will allow the cat to sleep on his bed or some other furniture. In this situation, the most appropriate option is to provide the animal with an alternative.
Of course, it is best to make a cat bed with your own hands. It will not be difficult for even a novice craftswoman to create a pattern for the product. The point is not only about saving money, but the owner will be able to independently select fabric and other safe materials for making the structure, taking into account the pet’s habits. It should be noted that a cat can chew and scratch the upholstery, so it is not recommended to use velor and other materials with long pile for sewing.
It is best to make a place for a cat to rest from materials that are resistant to damage and easy to wash. As you know, cats shed, so the bed will need to be periodically cleaned of hair and debris that the animal may carry on its paws. In addition, some pets have the habit of bringing food to the bed. You need to understand that this design is a subject of constant use.
Hammock for a cat on a radiator
How to make a cat toy with your own hands?
This is just an example. You can buy a hammock for a cat for a radiator, it is not expensive, or you can make it yourself. Essentially, it's just a frame made of thick wire or other material. True, the bedding cover wears out quickly. This problem is easy to solve.
All you need is a blanket that you don't mind cutting up and some sewing supplies. A sewing machine does the job faster, but you can sew it yourself, by hand, with a needle and thread.
- Remove the frame from the fabric cover and cut the blanket to fit the old cover.
- Sew along the side and bottom of the hem to create a long pouch shape.
- Then you simply turn it inside out to hide the handles and the case is ready to fit into the frame.
Ready.
Photo source catsanddiy.wordpress.com/2013/12/10/diy-radiator-cat-bed-cover/
Why a hammock?
A cat hammock has specific benefits that make it more enticing for both humans and their pets.
Unlike people, it is important for cats that their sleeping place perfectly follows the shape of their body. A soft bed will lead to curvature of the spine in a person, but for a cat it will be the most comfortable and convenient option. A hammock is best suited for this purpose.
The hammock can easily be placed in a secluded place. If for some reason the cat doesn’t like it, you can move it somewhere else without any problems. Under a chair or under a table, on a radiator or right up to the ceiling - there’s plenty of space for a hammock everywhere.
It’s very easy to make a hammock for a cat with your own hands; you don’t need much experience or specific knowledge. Enough accuracy and patience.
There are many hammock options. For the simplest of them, you only need a piece of fabric and thread with a needle.
This is interesting: Vanda Orchid: key growing features (23 photos)
Knitted round bed
If you still have unnecessary sweaters, but have free time, you can use them on a cheesecake bed for your cat. You don’t even have to knit everything yourself: the base of the work is already ready. Cut off the collar of the sweater, sew up the neckline with strong thread and lay a stitch over the chest at the same width as the sleeves - these are the future sides of the couch.
Fill the sleeves and the resulting hole with holofiber or padding polyester in a circle, monitoring the even distribution of the filler. To strengthen the bottom, cut out a shape from thick cardboard or thin plywood. It will be more comfortable for the cat if you put a thin layer of litter or an old towel inside.
Sew all the edges and then loop the tightly stuffed sleeves around the bottom to make an impromptu cheesecake. Make sure that there are no sloppy folds or seals anywhere. You can sew all the details directly on a machine or even manually using strong nylon or silk thread.
Toilets and mats
High sided tray
Spacious cat litter box with removable grid.
Price: from 1,295 rubles.
Buy
Round tray
A simple round tray for small cats or kittens.
Price: 692 rubles.
Buy
Toilet tray
Tray insert for installation directly on the toilet. May be useful for those who have little space in the toilet.
Price: 2,201 rubles.
Buy
Rug
A rug with a special texture that collects leftover litter from cat paws.
Price: 579 rubles.
Buy
Hammock for a cat - step-by-step instructions
Step 1
First cut the timber into pieces. You will need to make eight 18" pieces from ½ x ½" lumber, and four 8" pieces from ½" x 2" pine lumber. We used a small power saw for this purpose, but if you don't have access to power tools, you can use a hacksaw or a handsaw.
Using sandpaper, sand any rough edges on the wooden pieces.
Step 3
Now you need to prepare the bars to assemble the upper and lower frame of the hammock. Each corner of the frame is fixed with a screw. Therefore, first drill holes to attach them, which will prevent the wood from splitting when screwing in the screw. Don't forget to drill holes to attach the screw head.
Step 4
Now that you have prepared bars with holes, you can join them into squares. To do this, apply a small amount of wood glue to the joints, then use a screwdriver to screw the screws into the holes. You can do this yourself, but it is much more convenient to ask a person close to you for help, who will hold the pieces of wood perpendicular to each other.
Step 5
Attach the 8-inch (20 cm) pine pieces you made earlier to the frames on each of the four sides. Just like in Steps 3 and 4, you will need to pre-drill holes in them and also make holes for the screw heads. As you can see in the photo below, this screw does not go into the wood at a straight angle. It is screwed about 2.5 cm from the corner so as not to touch the other screw that is already installed.
So, connect the top and bottom frames. Be sure to apply a small amount of wood glue to the joints before driving the screws into them.
Step 6
Drill holes in the top of the side panels and screw four screw-in cabinet handles into them. These handles will hold the hammock in place.
Step 7
Now you need to move from the power tool to the sewing machine. Cut out identical pieces measuring 48 cm x 48 cm from two types of fabric. For these purposes, we used sheepskin and cotton in a black and white pattern.
Step 8
Place both pieces of fabric face to face and sew them together along the perimeter. Place an elastic hair tie at each corner and secure by stitching back and forth at least three times over the elastic. Leave a hole of approximately 10 cm on one side of the hammock.
Step 9
Turn the fabric right side out. Sew the opening by hand, carefully folding the raw edges under. Don't forget to add an elastic hair tie to it! Finally, go over the hole one more time with the sewing machine.
Step 10
Attach the hammock to the frame and place it in your cat's favorite sleeping spot.
The hammock for the cat is ready! We hope your pet enjoys it!
1006 Orfeus December 27, 2018
3
Tools and materials Time: 4 hours • Difficulty: medium
- ½" x ½" (1.3 cm x 1.3 cm) square timber - 13 feet (4 meters);
- pine lumber measuring ½" x 2" (1.3 cm x 2 cm) - 3 feet (91 cm);
- wood glue;
- pencil for marking;
- roulette;
- sandpaper;
- 1 1/8 inch (3 cm) wood screws;
- cordless drill and drill bits;
- Phillips screwdriver;
- saw/power saw;
- handles for cabinets – 4 pieces;
- elastic hair bands – 4 pieces;
- two different types of fabric (we used faux sheepskin and cotton);
- threads corresponding to the fabric;
- sewing machine;
- fabric scissors;
- catnip or catnip (optional).
Just imagine: a comfy bed with a cat hammock that's removable, so depending on the season, you can give your pet either a warm wool surface to stay warm or a thin cotton surface to keep cool. In addition, this coating is very easy to remove and throw in the wash. Believe me: your pet will love it!
This is interesting: Features and advantages of roller blinds (25 photos)
How to make a cat house with your own hands
A house for a cat can be made from anything. The only limitation is your skill and imagination - you can sew, knit, weave, build, glue, cut, etc.
Houses made from boxes
The most commonly used and affordable material for building cat houses is cardboard boxes. It is a natural material and cats love it very much. The only negative is its fragility. But you can also find a positive in this - you can change house models quite often. And you won’t be bored and the cat will have something new.
Photo gallery: houses for cats made of cardboard boxes
To make it, you will need the boxes themselves, a knife for cutting out various holes, PVA glue and/or tape for joining parts, textiles for interior decoration, acrylic paints or other materials of your choice for exterior decoration. The designs range from the simplest (take a box, cut a hole, put a mattress inside) to the most complex (multi-room and multi-story). You can only be limited by the availability of free space in your apartment.
Houses made of cardboard rings
If you decide to use boxes to build a cat house, but you want to make something special, we suggest creating it from cardboard rings.
A cat house made from cardboard rings looks original
Rings five centimeters wide are cut out of the boxes
If you choose a simple cone shape, then each subsequent ring should be one centimeter smaller in diameter. Then the rings are carefully glued together with PVA glue. Let the structure dry thoroughly. Carefully cut out the hole. Glue the bottom and the small circle onto the roof and let them stick completely. If you want, you can cover it with water-based varnish.. Not only pyramids can be made from rings, but also other structures, only in this case the difference between the rings should be less - only half a centimeter
Not only pyramids can be made from rings, but also other structures, only in this case the difference between the rings should be less - only half a centimeter.
You can make houses of different designs from cardboard rings, for example, in the form of a snail shell
House for a cat made of two basins
If you want to make a simple but durable cat house, use the two-basin option. Plastic basins must be the same diameter. Cut out the future entrance to the house, drill holes along the edges and fasten the basins. The house is ready. By the way, this design is very easy to clean.
From two plastic basins you can make a cozy house that is easy to clean
Houses for cats from old monitors
Good houses are made from completely waste material - cases from old monitors. The most important thing is to carefully remove all the insides from them, rinse them well, especially inside, and decorate them to your liking. When disassembling the monitor, be careful to ensure that your cat does not swallow small parts and get injured.
Old monitor and TV cases make great homes for cats.
Hanging houses for cats and play complexes
If your cat likes to rest at heights, you can build him hanging structures. This option is especially suitable for small apartments, as it does not take up floor space. For such structures, plywood, lining, boards, chipboard, bars, etc. are used. Skills in working with a drill, saw, jigsaw and other tools are also required. Here is an example of such a complex.
A hanging house for a cat can be combined with a climbing frame and an open bed
There is a staircase with steps, a hanging bridge, a closed house and a separate high bed that you need to specifically jump onto. This design can also be used as shelves for various small items.
Please note: all horizontal surfaces must be non-slippery, it is best to stick pieces of carpet on them so that the cat does not slip
If you want to make a vertical multi-level complex with a house, then it is better to use a beam as a base, which should be wrapped with jute rope, at the same time you will get claws.
Video: how to make a vertical complex with a house for a cat
House from an old bedside table
If your cat prefers to sleep in large closed objects, for example, in a closet, then you can use some unnecessary furniture for her house. An old bedside table is quite suitable for these purposes. Inside you can leave or specially attach several shelves at different heights, or hang a hammock. A hole is cut out on the side, preferably round. You can use the top of the bedside table for your own purposes or arrange a cat bed there.
An old bedside table can also serve as a cat house
Miscellaneous
Harness with leash
An elegant harness in the form of a vest with a bow tie for walking domestic cats.
Price: from 441 rubles.
Buy
Anti-scratch
Silicone anti-scratch claws. There are options in various colors and sizes.
Price: from 60 rubles.
Buy
Automatic drinker
Automatic drinker with feed compartment.
Price: from 188 rubles.
Buy
Cat door
This can be installed in the toilet door so as not to keep it constantly open.
Price: 748 rubles.
Buy
Construction instructions
For a novice builder, it would be best to choose a hammock option that involves a wooden frame. After all, wood is quite easy to process, and can also be purchased at any hardware store for mere pennies. It is recommended to make the frame according to a certain algorithm of actions.
- Creation of the main part. It will be located behind the radiator, so you don’t have to stand on ceremony with its appearance. However, it is this part that will bear the main load, so the part must be made with the highest possible quality. Dimensions are usually calculated based on the dimensions of the battery. However, in most cases it will be enough to connect two 30-centimeter slats and two 15-centimeter slats together in a rectangular shape. The cross-sectional area of the parts should be approximately 8 square centimeters.
- Attaching the rafters. As soon as the main part of the frame is ready, it is necessary to attach two more thick slats to it, onto which the hammock itself will later be attached. This part must be connected using several screws. The size of the slats is calculated based on the weight of the cat. They should be placed at a distance of 30 centimeters from each other and connected to each other by another transverse rail, which provides additional compaction and the ability to withstand heavy loads.
- Decorative works. As soon as the main frame and rafters are ready, you can begin decorative work. Here everything depends on the owner’s imagination and his capabilities. For example, you can upholster all the wooden parts with some beautiful fabric that matches the interior. Or decorate the tree with a beautiful design and then treat it with a burner. Some craftsmen even paint the parts in an antique style and attach various retro decorations to them to make the hammock frame look more luxurious. The choice is simply huge.
All that remains is to attach the hammock itself. This can be done using ordinary nylon ropes or any other material that is lying around the household. If it is possible to insert rings into the fabric, then you should use it. Thanks to such elements, the hammock can always be tightened so that the cat feels more comfortable on it.
Mandatory nuances
In order for the finished structure to fully suit the pet for whom it was made, it is necessary to take into account three main nuances before manufacturing, which many novice builders simply forget about and then regret. So that you don’t have to waste materials, and your cat enjoys lying in the hammock, you should remember three important rules:
- The size of the hammock should match the size of the pet. That is, for a big cat it should be quite spacious, and for a small kitten it should be small. Otherwise, the pet will feel uncomfortable. So you shouldn’t save too much on materials or make a crib “to grow.”
- It is necessary to choose a fabric that does not electrify. Jeans scraps are best suited for this purpose, because they are not only very durable, but also do not receive a charge of electricity when an animal rubs against them. However, other decorative options besides silk are also suitable.
- Pet tastes . It is worth considering the preferences of cats. It is not at all necessary to make a hammock that will hang on the radiator. After all, some cats like to fall asleep on the closet, while others prefer fresh air on the balcony. So it’s worth thinking carefully about which design the cat will like the most.
You can consider the option of making not just a hammock, but an entire cat house that has a wall and a roof. This design may also have a suspension and several shelves, with enough space to accommodate absolutely all pets. This option is ideal for those owners who keep several cats at home.
Cat sofa gathered with ribbon bows
To sew a cat bed with your own hands, you need to take:
- fabric in two colors, used can be used;
- ribbons to match the main colors - ready-made or made independently from fabric;
- padding polyester;
- sewing tool.
Master class: how to sew a cat bed
The pattern must be made keeping the proportions suggested below. Decide on the size of the sleeping area for animals yourself, depending on the dimensions.
On the cut out parts, mark the places for threading the ribbons.
Sew around the perimeter of the sofa, leaving 12 cm open areas on each side for filling.
Turn the product inside out.
Fill all areas with filler, paying special attention to the side walls, since maintaining the shape of the sofa depends on their stability. Sew along the perimeter of the bottom pillow, sew up the remaining open areas with a hand blind seam
Sew along the perimeter of the bottom pillow, sew up the remaining open areas with a hand-blind stitch.
Tuck the side walls and tie the ribbons, securing the connection. The bed is ready!
Tips for making a hammock
To ensure that your pet likes the hammock and is functional, it is recommended to adhere to the following rules during the manufacturing process:
- The dimensions of the product and the weight of the animal are taken into account. For a kitten, the design should not be too large, and for large animals it should not be small and flimsy.
- Materials that are not electrified are used. It is best to use old thick fabric.
- Take into account the pet's tastes. If the cat likes to sleep at heights, then the bed should be placed, for example, on a closet. If he prefers to relax in a secluded place, then a warm and shaded corner will be just right.
Regardless of the chosen design of the lounger, it should be safe, comfortable and convenient. The material used must be well cleaned from wool, dirt, and dust.
Having looked at master classes on how to make a step-by-step hammock for cats on a battery with your own hands, according to the given instructions with photo examples, everyone will be able to create a comfortable corner for their furry pet. A wide selection of finishing materials allows you to make the product in such a way that it is combined with the overall style of the room and does not stand out from the overall design.
Additional ideas
The unlimited imagination of the owners allows them to arrange a place for their pet to relax using absolutely different materials. You just need to look around carefully and, at the same time, take a closer look at the animals’ favorite places to sleep.
Ideas for places where you can arrange beds for your pet:
For many animal lovers, cats are full members of the family. This means that if each member of the household has his own sleeping place, then the pet should also have a bed. We offer you several ways to make a cat sofa yourself.
A cat bed must meet several requirements at once:
1. It should be easy to wash;
2. Do not accumulate too much dust;
3. Be comfortable for the pet;
4. Be safe for the animal.
After carefully assessing all these characteristics, one detail often goes unnoticed - the cat's sleeping area should be made in a style that matches the entire interior. This is not always easy, it will require your imagination and some skills if you want to make it yourself, but the result will please both you and your pet.
The first thing that comes to mind when thinking about how to make a cat bed is creating a beautiful pillow. It seems that it is not difficult to sew such a product from a suitable fabric. Indeed, the correct selection of colors allows you to combine this accessory with any interior style. But it is worth considering that it is much more comfortable for pets to sleep on beds that have a depression in the center - a kind of cozy nest, so the pillow should not be stuffed too tightly. It is better if the sofa for the cat has soft sides, then the pet will be able to take everyone’s favorite sleeping position - curl up. Such a bed will be both comfortable and beautiful.
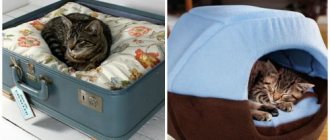
A cat sofa made from an old suitcase is perfect for a vintage style interior. Moreover, the more unusual and antique the suitcase, the more interesting the bed will look. Making a bed like this for a pet is not difficult, as can be seen from the photographs above. Legs are attached to the suitcase (although you can do without them) and a comfortable pillow is placed inside. Vintage cat bed is ready!
Does your cat like to lounge on the sofa? Provide a special place for her in it, as in the next photo. Any pet will love such a secluded corner, and the owners are nearby.
Most long-tailed pranksters love to hide under blankets and climb behind furniture. Help them feel just as comfortable in their home. This fun sandwich style cat bed is sure to become your furry pet's favorite place to relax.
Set up a house for your cat with a bed, disguised as a bedside table. You can do the same with other suitable interior items: flower pots, cabinets and armchairs.
Since a cat is a full-fledged member of the family, it needs furniture similar to human furniture. Then why not make a bed - a copy of the master's? Add a mattress, sheets and pillow and use the crib to create a unique decor for your bedroom.
A DIY cat bed with battery mount is a great idea for the cold season. Here your pet will always be warm, and cats love it (that’s why they snuggle up to the radiator in winter without any devices), and softly.
Some cats like to sleep lounging, and several portable bed options have already been invented for them. For example, a hammock, as in the next photo, of course, is not suitable for all animals, but some cats will be delighted with such a sleeping place.
Simpler hammocks made of elastic materials are suitable for owners who are thinking about how to make a cat bed quickly and without wasting time and money. You just need to stretch the fabric between the legs of the coffee table and show your pet how comfortable and cozy it can be to sit there. In the interior, such a find will look harmonious.
Since long-tailed pets love to climb mazes, you can plan to make more than one sofa for the cat, but several pieces throughout the maze from shelves on the walls or a separate massive structure. Then the cats will be able to rest, a little tired from playing.
It is good to use wicker baskets for making a cat bed. Such accessories are appropriate in country, Provence, and rustic styles.
Some cats like beds made of wood with a fairly hard surface. This bed is compatible with many modern interior styles.
What should a place to relax be like?
Having decided what the place to sleep should be, you need to take into account its placement. A quiet corner of a distant room or a place near a window is suitable for this (even the window sill itself can serve as the basis for a sleeping lounger).
Taking into account the cat's needs, the resting place should be:
- as high as possible (cats love heights);
- necessarily soft (they are known couch potatoes);
- preferably warm (a place near the radiator);
- be sure to be quiet (sleep is health).
If we take into account the owner’s wishes, we will add to this list:
- environmentally friendly (wooden surfaces should not be treated with paint or varnish);
- made from materials that are easy to wash (with spare covers).
How to make something out of old things
Using the example of our master class, it is not difficult to sew a bed with your own hands from an old sweater:
- We hide the high collar of the sweater inside and sew up the neck tightly (we do this manually, from the inside with a machine seam). We turn the product inside out.
- From the point of the right armpit of the sweater, we draw a small curve upward in a small arc to the point of the second armpit. Using a machine stitch, we sew along the basting along the front side.
- Insert padding polyester into the resulting pipe on both sides to give it shape. These are the sides of the future bed. Now loop the pipe by sewing two cuffs together and sew them in a circle to the body of the sweater.
- Inside the sweater we put a small pillow of any shape you choose and sew together both lower parts of the sweater.
- To hide flaws on the seams, they can be covered by decorating them with a lace frill, satin ribbon, or silk cord.
From a sweater
If you decide to sew a bed from a sweater, remember that it is best to choose natural, fairly warm and dense yarn. If the yarn is scratchy, your cat may not like it.
Prepare the following materials in advance:
- old wool sweater;
- padding polyester or unnecessary pillow;
- scissors;
- thread;
- a needle.
Take the sweater and turn it inside out. It is necessary to immediately cut and sew up the neckline, and also sew the sleeves together from one to the other at armpit level. Fill the latter with padding polyester and distribute it evenly. Also fill the lower part of the sweater with padding polyester or put a small pad commensurate with the width of the sweater to form the bottom. The pillow will save you a lot of time and make the lounger more dense. Then sew up the bottom of the sweater and sew the sleeves to the bottom of the lounger - they will serve as sides. That's all, you've given an old sweater a second life, and your cat a comfortable bed.
What is a cat hammock
The hanging bed, invented by man, has been modified by pet product manufacturers. Now it is offered for the needs of pets. A cat hammock is a bed made of sagging soft fabric suspended on a frame made of wood or metal. This type of bed is suitable for your pet if she likes to sleep on a bed that sinks under her weight.
A classic hammock, suspended by opposite ends on rope knots, is too mobile. The animal takes a long time to get used to it. Having gotten used to it, he spends all his free time from playing in the hanging bed. When the cat wakes up and stretches sleepily, the hammock swings and lulls it to sleep.
Shape and size of a hammock for a cat
The rectangular mesh or fabric in a regular hammock is stretched along the edges over two wooden slats or a strong rope. Cords are threaded evenly into each plank. The rope belay is located inside the entire panel and is collected into bundles on two opposite sides of the hammock. They are fitted with steel rings, with the help of which the entire structure is supported on a massive support made of wood or steel. For animals, slightly sagging beds with fabric covered with a supporting frame over the entire size of the product are preferable.
Pet supply stores offer hammocks of different designs, the types of which depend on the location of the hammock model. They have one thing in common: the bed is firmly fixed to the support so that the animal does not fall out of it or along with it. The fabric of the sleeping place is most often removable; it is regularly washed or cleaned with a vacuum cleaner.
Types of hammocks by location:
- on glass indoors or in a car;
- on a rope post in the play complex;
- on a plate heating radiator;
- floor with stand;
- under the chair;
- on the wall.
The shape of the cat hammock follows the position of the animal in sleep, if it is round. But most models have a square or rectangular shape so that a sleeping cat can stretch and not fall out of the hammock. The frame of the hanging lounger is made of wood or metal. The fabric is most often stretched with loops and Velcro sewn to it. In some models, the ropes are located inside the hammock panel and extend out, forming part of the fasteners.
A sagging hammock in the shape of a circle with a diameter of 38–40 cm is intended for mounting in a play complex on a claw post. If the fabric of the lounger is stretched over a wide hoop, its dimensions increase to 67 cm in diameter. This wall-mounted hammock will support the weight of a Maine Coon. The design of the lounger resembles a basketball basket.
A hanging bed for a heating radiator is a frame made of steel pipes on which fabric is stretched. The shape resembles a chair seat with a backrest. The dimensions of the hammock vary from 48x28x30 cm for a plate radiator and 55x55x35 cm for a cast iron one.
hammock on the radiator - a warm resting place for a cat
Hammocks for adult domestic cats weighing 3–7 kg have a bed size of 38–45 cm in diameter and 48x35 cm for rectangular designs.
Floor hammocks for cats are located on stands made of bent wood in the shape of an arc or an inverted rocker. They are held at the bottom by parallel crossbars. The parts are fastened with metal rivets. The height of the structure above the floor is 35 cm with a width of 71 cm. The size of the hanging bed made of linen fabric is 45x35 cm, into which wooden slats are inserted along the edges. To reduce the swaying of the hammock, both slats are placed in the center on hooks screwed into the frame arch.
Why does a cat need a hammock?
A hanging hammock hanging under a chair or small table gives the tailed observer the opportunity to see everything that is happening, while remaining hidden from prying eyes. This appeals to cats who like to hide and attack from hiding unexpectedly. An open bed located on the windowsill will allow the animal to bask in the sun. In addition, this design takes up less space.
To transport a domestic cat in a car, a synthetic hammock with three silicone suction cups is used, which are attached to clean glass. The animal can travel with its owner. The shape of the frame follows the volume of the body of a lying pet.
the cat rides in a car, lying comfortably in a hammock
A hanging hammock on a heating system radiator is successfully used in the summer for cats to relax in the fresh air, if it is secured to the railing of an open balcony in an apartment building.
Car transport device
Hammocks are used to transport cats that do not like containers and do not feel comfortable in confined spaces.
A car hammock for transporting cats is made of fabric and attached to the headrests, which are installed on the backs of the seats. Since the car is in motion, the structure needs strong fastenings so that the animal does not get injured during turns.
To make such a device yourself, you need to sew it from thick, waterproof fabric and add strong straps. The work is carried out according to the following scheme:
The straps must be made with special length adjustment so as not to remove the headrest every time you travel with your pet
To work you will need the following tools:
- scissors;
- threads;
- lightning;
- strap for shoulder straps;
- plastic strap length adjusters;
- ruler.
After the fabric is cut, the parts need to be sewn. The result should be a hanging place, as in the picture.
In such a hammock, the cat is securely covered on the sides and does not feel trapped
You can also knit or crochet a hanging bed using macrame and tie it under a chair, coffee table or in a closet. The pet will definitely appreciate the care and efforts of the owners, and will love this comfortable, safe place to sleep and relax.
Options for homemade hammocks
With such a hanging system you can save a lot of space in a small apartment. When planning to make a hammock for a cat with your own hands, the main thing is not to forget to take into account its size. For neutered cats, such a place to sleep is not a very successful idea because they are excessively large. Among other things, the rookery must be removable so that it can be cleaned.
There are about a hundred options for such a product. For its structure, fairly ordinary items are used that are at hand. Here are some of the easiest ways to make a cat hammock with your own hands and avoid additional costs.
Hammock for a cat made of hangers and fabric
To make such a rookery for your mustachioed friend, you need to decide on the location. It can be attached either under a table or under a chair. If the heating device is an old type, then it will also work. The production process is as follows:
- High-quality wooden hangers are selected so that they can support the weight of the pet. In this case, the base of the metal hook should rotate.
- Find a rectangular strip of brushed terry or synthetic fabric. The width depends on the size of the hanger.
- Fold the fabric over the hanger and stitch in this position. An alternative to this would be multiple loops.
- The hooks hook onto the cross slats under the table. In addition, you can attach a hammock for a cat to batteries. To do this, you need to find a small rod and thread it through the bottom to secure the hangers to it.
Of course, the bottom of the lounger can reach the floor surface, making this option suitable for small breeds or babies. But this is not a problem for mustachioed people with a playful character.
Frame models
First of all, it is necessary to prepare a frame of appropriate dimensions. By default, it must be square in shape, although unique models are made in the form of an oval or circle. Much depends on the capabilities of the owner. Will he be able to find such a blank or bend a rod (wire) in a similar way. When selecting the size of the bed, the specialist starts from:
- weight and size of the cat;
- heating device indicators;
- desired height of the object.
You can buy ready-made frames. If they are not there, then you should bend the metal rods. The corners are secured with specialized elbows or perfectly tightened wire. In this case, the edge should be hidden in such a way that the animal does not get hurt. The width of the hammock's mounting hooks on the heating device for the cat should match the thickness of the heating object. They can be created in rectangular or rounded shapes. Plus, you need a good supply. In the end, the lounger will not fly off if the child spins on it.
Wooden structures
Certain owners of luxury breeds use large and heavy beds. They think that a lovely pussy needs space for its own bathing procedures and relaxation. To make such a hanging corner, the master needs the following:
- Two boards: wooden stand and back. Other materials can be used, but they must be light and reliable.
- Sew a bag (the size of the board) from a pleasant fabric. Carefully invest in a foam or padding polyester layer and place it on a wooden frame. The edge needs to be sealed.
- Use chain, rods or wire as fasteners. These parts are attached to the back or base using self-drilling screws and other devices.
You can also purchase a large-diameter plumbing pipe. Cover it with fur coat on both sides (inner and outer). Attach rods along the rims of the pipe and cover them with fur inserts.
It is very rarely practiced to use a hammock for a cat on a window. It is held on by powerful suction cups. To create it, you need to find two brackets on iron cables that are attached to the rookery. Then make a frame from pipes and sew a fabric bedding. Screw two other suction cups to the holes on it. Attach the device to the window. So, an exquisite cat will be able to keep an eye on what is happening on the street.
A few simple tips can help you build a popular hammock for a cat on a radiator, thus providing it with the necessary place to rest.
Choosing a place to install a hammock
You should choose a place to install a hanging bed carefully, based on the preferences of your pet. Every home with small four-legged residents has places where they like to spend most of their time and relax. This is the place where you should install a hammock. At the same time, you need to be prepared that it will become your pet’s personal item, and its unexpected movement will upset your pet.
General recommendations
There are several places where you should place a hammock. First, you should take a closer look at wall-mounted beds, which are perfect for pets who like to climb higher. In this case, you will need to ensure the cat's unhindered access to the hammock.
Secondly, you need to remember that frame structures are installed exclusively on the floor or under a table. If you choose the second method, the cat will always be next to the owner.
For four-legged animals, there is nothing more important than being close to a person.
For some cat breeds that have a small amount of hair, the best place for a hammock will be a radiator. Think for yourself: this place is the warmest in the house, and radiators are usually hidden under the window sills, which is why such places seem protected to animals.
There are also round beds that can be hung from the ceiling. They are perfect for energetic pets who are used to sleeping on cabinets. The main thing is not to forget to attach a ladder or rope to such a hammock.
It should also be noted that many pets like to bask in the sun. Their preferences can be taken into account by installing a comfortable hammock in a place where the sun's rays penetrate. It is important that the animal does not overheat. If the animal avoids the installed hammock, think about it: perhaps it is too hot for him, and you should move the bed to the shade.
This recommendation is especially relevant for apartments where four-legged animals sometimes receive a limited amount of sunlight.
If you look hard enough, you can find a dozen more places in the house where you can install a sun lounger. Everything is based only on the expediency of its presence in this place, as well as the preferences of your four-legged friend.
Making a sun lounger for a battery
Homemade animal beds can be made using different materials. Let's consider making some options for hammocks.
Materials and tools
Before you start creating a product, you need to select materials that can be used for the purposes in question. As a rule, what is on hand is used. The frame can be made of metal, wood, plastic. The main thing is that the design is reliable.
As for the tools, their list directly depends on the materials that will be used during the work. So, if the bed is made of wood, then you may need a jigsaw, as well as a grinder to smooth out sharp edges and remove burrs. If preference is given to a metal structure, then you may even need a welding machine and a grinder. However, it all depends on a creative approach: you can combine different materials and get by with a minimal set of tools.
Create a drawing
To simplify the process of constructing a hammock and avoid mistakes, it is recommended to first create a drawing indicating the dimensions of all elements. You need to calculate all dimensions in advance so that during the installation process there are no problems with joining parts. In addition, the drawings allow you to correctly calculate the amount of material required. The picture shows one of the possible options for such a drawing.
From wooden slats
Considering step by step how to make a hanging bed for a cat battery with your own hands with photo examples, one cannot help but touch upon the simple design with a wooden frame. This is explained by the fact that wood is easy to process and is inexpensive.
The manufacturing process consists of the following steps:
From boards
For a wooden hammock you need to prepare:
The size of the boards directly depends on the breed of your pet. The boards are pre-treated, sanded and varnished. The rest of the process of making a bed is as follows:
From felt
For such a hammock you will need:
You can hang such a product either on a radiator or between the legs of a chair.
Before starting production, measure the radiator itself, the pet, and then cut off the required piece of felt, marking the boundaries with a pencil.
After preparing the base, the edges are reinforced with tape. To simplify the work, the tape is fixed with office clips. This way, it will not slip, and the hammock will turn out smooth and neat.
It is not necessary to use Velcro to attach the hanging stock. From the same tape you can sew loops for attaching the product to the radiator.
As for Velcro, they are more practical, hold well, and allow you to change the tension of the material, so they are recommended to be used for fastening.
After this, all that remains is to fix the hammock. In addition to felt, fleece can also be used as materials for such a lounger.
You can learn more about making a hammock for a cat in the video below.
From PVC pipes
To assemble the battery hammock you need to prepare:
We make a hammock in this order:
Suspension
If you do not want to make a frame, then you can design a product that will be attached, for example, to the ceiling using ropes. This type of bed is suitable for a radiator, a window sill, or any other place where your pet likes to be.
Manufacturing consists of the following stages:
To secure the hammock, a pair of anchor bolts are screwed into the ceiling, to which a rope is tied. If you don’t want to drill into the ceiling, you can assemble a stand from wooden blocks and then hang a hammock from it. This will allow you to place the product anywhere in your home.
Wicker
A wicker hammock has a similar design to a hanging product. Handicrafts will especially like this option.
To work you need to prepare:
The essence of production is as follows:
The process of creating a reliable hammock
The process of creating a hammock will take about 4 hours. It can be speeded up if several people work.
To work you will need the following things:
The items listed above can be replaced if they are missing, but to get the perfect result you should stick to this list.
Step #1
First of all, use a saw to cut the wooden beam into several equal parts. The result of the work should be 8 identical wooden pieces from a square beam, and 4 pieces from a 1.3 x 2 cm beam.